Export Utility
Export Utility Overview
"Export Utility" is a tool designed to simplify and automate the transfer of sales and financial data from your FTx POS system to your accounting software. By enabling seamless exports, it ensures your accounting team has timely and accurate access to essential business data, eliminating the need for manual data entry and reducing the risk of human error.
The utility supports multiple export formats to accommodate different accounting platforms, including Standard CSV, Excel, QuickBooks for Windows, and QuickBooks Online. To ensure successful data transfers, it's important to use the correct templates and follow formatting guidelines specific to each export type.
This article serves as a comprehensive user guide for the Export Utility, covering everything from setup and export options to best practices for smooth integration with your accounting workflows.
1. Reaching "Export Utility"
- Step 1: Log into Control Center
- Step 2: Choose Point of Sale
- Step 3: Choose Other
- Step 4: Choose Export Utility
2. Understanding "Export Utility"
3. Adding a New Export Configuration
- Click the “Add New” button to create a new "Export Configuration."
- The form highlighted in Figure 1.3 will appear on your screen.
Figure 1.3
- Name: Give a name to the new Export Configuration so that it gets uniquely identified.
- Account Name: Select your company name from this drop-down list. You will see more than one account name in the drop-down list, but only if you have a software license for multiple companies.
- Locations: Select the locations from the drop-down list for which you wish to export.
- Export Type: Export Type defines the specific category of data (such as sales, tax, tenders, or time clock) that will be exported from the system.
- Invoice GL Export: Generates invoice-level data for accounting system import.
- General Ledger: Exports journal entries for posting to external GL software.
- Time Clock Export: Exports employee work hours for payroll and attendance tracking.
- Sale Header Export: This export type enables users to generate a file containing summary-level information for all sales across the selected locations.
- Sale Details Export: This export type allows users to generate a file that includes item-level details for all sales across the selected locations, along with the corresponding sale header information.
- Sale Tenders Export: This export type enables users to generate a file containing detailed tender information for all sales across the selected locations, along with the related sale header information.
- Sale Tax Export: This export type allows users to generate a file that includes comprehensive tax details for all sales across the selected locations, along with the associated sale header information.
Figure 1.4
3.1. Invoice GL Export Setup
1. Export Type Selector Panel: This section allows the user to choose the type of export they want to generate (e.g., Invoice GL Export). This defines what kind of export is being configured.2. Fields Available Panel: This area lists all the available data fields that can be included in the export. Shows the fields the user can drag and drop into the Exporter Fields panel.3. Options: This panel contains the "Options" button, which opens additional export configuration settings. It provides advanced or additional export settings.4. Exporter Fields Panel: This panel is where the user places the fields that will be part of the final export. Users drag fields from “Fields Available” into this panel to build the export format.5. Export Preview Panel: This section shows a sample preview of how the export file will look once generated. It displays a mock preview based on the configured fields before downloading or generating the real export.
3.1.1. "Options" Panel
- Invoice Header Description: Here, it displays the invoice number as a header in the Description field.
- Invoice Header Account Number Configuration: The invoice header account number that will be displayed in the Raw Account Number field.
- Invoice Item Description: It displays the invoice item number as a header in the Description field.
- Invoice Item Account Number Configuration: The invoice item account number that will be displayed in the Raw Account Number field.
Figure 1.6
- Exclude Zero Cost Entries: This is a checkbox that, when checked, excludes zero-cost entries.
- Invoice # Configuration: Invoice number configuration affects the invoice number column in the invoice GL Export.
Figure 1.7
- Surcharge Description: Here, it displays the surcharge as a field label in the Description field.
Figure 1.8
- Surcharge Account Number Configuration: The accounting code for the Surcharge Account Number is mentioned in the Raw Account Number column.
- Misc Fee Configuration:
- Misc Fee Description: Here, it displays the misc fee as a field label in the Description field.
- Misc Fee Account Number Configuration: The accounting code for the misc fee account number is mentioned in the Raw Account Number column.
- Excise Configuration
- Excise Tax Description: Here, it displays the misc fee as a field label in the Description field.
- Excise Account Number Configuration: The accounting code for the excise account number is mentioned in the Raw Account Number column.
- Excise Offset Account Number Configuration: The accounting code for the Excise Offset Account is mentioned in the Account Number column.
- Buydown Configuration
- Include Buydowns: This is a checkbox that, when checked, includes buydowns.
- Buydown Description: Here, it displays the buydown description as a field label in the Description field.
- Buydown Receivable Account Number Configuration: The accounting code for the excise account number is mentioned in the Buydown Receivable Account Number column.
- Buydown Misc Account Number Configuration: The accounting code for the Buydown Misc Account Number is mentioned in the Account Number column.
- Other Settings
- Use Applied Date Instead of Received: This is a checkbox that, when checked, uses "applied" date instead of "received."
- Use Extracted Flag for Export: When this checkbox is selected (default setting), the export process includes only invoices that:
- Fall within the specified date range.
- Have not been previously exported.
- Have the Extracted flag set to No (False).
After the invoices are successfully exported, the system marks them as extracted by updating the Extracted flag.If the Use Extracted Flag for Export checkbox is not selected, the export process ignores the Extracted flag and exports invoices based solely on the selected date range.
- Quickbooks Accounts for Item Account: Choose an account from the attached drop-down list of Quickbooks accounts for items.
- Quickbooks Accounts for Surcharge Account: Choose an account from the attached drop-down list of Quickbooks accounts for surcharge accounts.
- Quickbooks Accounts for Buydown Account: Choose an account from the attached drop-down list of Quickbooks accounts for surcharge accounts.
Figure 1.9
3.1.2. Generating the "Invoice General Ledger Data Files"
3.2. General Ledger Export Setup
The General Ledger Export defines how transactional data is summarized, structured, and mapped into General Ledger (GL) entries for accounting and financial reporting.
It provides a consolidated view of sales, taxes, tenders, and other financial activity, formatted to align with your accounting system’s GL structure and posting requirements.
The configuration is accessed through the "Options" button when General Ledger is selected as the Export Type.
1. Export Type Selector Panel: This section allows the user to choose the type of GL export they want to generate (e.g., Invoice GL Export). This defines what kind of export is being configured.2. Fields Available Panel: This area lists all the available data fields that can be included in the export. Shows the fields the user can drag and drop into the Exporter Fields panel.3. Options: This panel contains the "Options" button, which opens additional export configuration settings. It provides advanced or additional export settings.4. Exporter Fields Panel: This panel is where the user places the fields that will be part of the final export. Users drag fields from “Fields Available” into this panel to build the export format.5. Export Preview Panel: This section shows a sample preview of how the export file will look once generated. It displays a mock preview based on the configured fields before downloading or generating the real export.
3.2.1. "Options" Panel
- Include Department Sales: When checked, it includes department sales in the Export Configuration.
- Deduct Buydown From Sales: When checked, it deducts and displays department sales in the Amount column.
- Deduct Discount From Sales: When checked, deducts discounts and displays department sales in the Amount column.
Figure 2.2
- Department Sales Label: Here, the label for Department Sales Tax is set for the Description column.
Figure 2.3
- Account Number Configuration: The accounting code for Department Sales is mentioned in the Account Number column.
Figure 2.4
- Department Sales Memo Label: Here, the description for Department Sales is set for the Memo column.
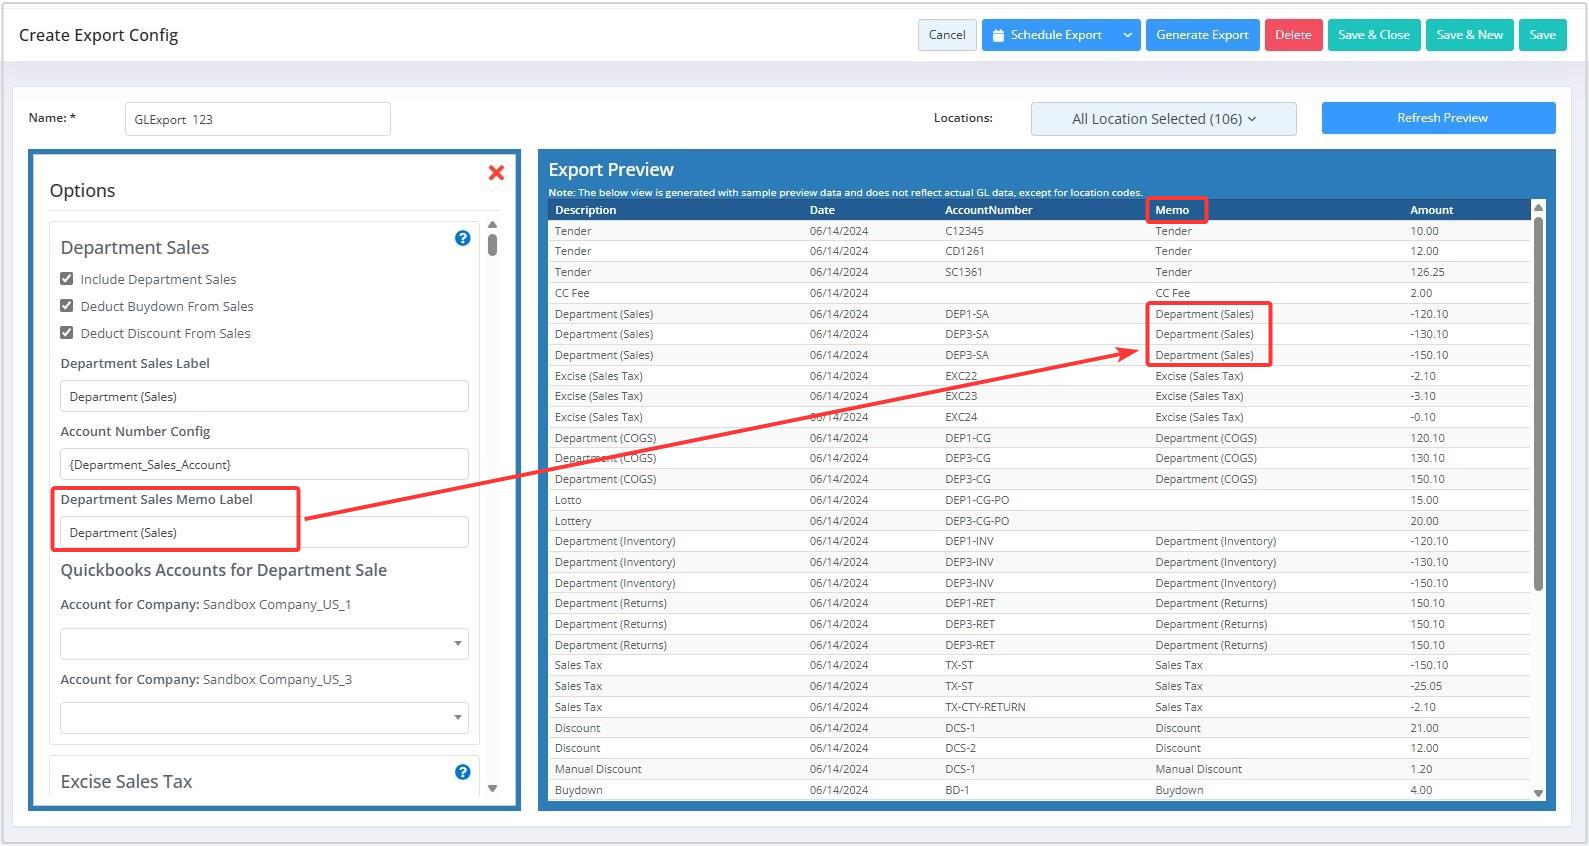 Figure 2.5
2. Excise Sales Tax: Excise Sales tax includes items that were given excise tax, grouped by the department excise tax code.
- Include Excise Sales Tax: This is a checkbox that, when checked, includes the Excise Sales Tax in the Export Configuration.
- Excise Sales Label: Here, the label for Excise Sales Tax is set for the Description column.
Figure 2.6
- Excise Account Number Config: The accounting code for Excise Sales Tax is mentioned in this column.
Figure 2.7
- Excise Sales Memo Label: Here, the description for Excise Sales Tax memo is set for the Memo column.
Figure 2.8
- Include Department COGS: When checked, includes the Department COGS (Cost of Goods Sold) value in the Export Configuration.
- Deduct COGS Buydown: When checked, deducts the Department COGS Buydown value and displays it in the Amount column.
- Department COGS Label: Here, the label for Department COGS is set for the Description column.
- Account Number Config: The accounting code for Excise Sales Tax is mentioned in the Account Number column.
- Department COGS Memo Label: Here, the description for the Excise Sales Tax memo is set for the Memo column.

4. Department COGS - Pay Outs: Department COGS Pay Outs include the cost of department-sold goods, specifically for payouts done via the Lottery module. This is grouped by the department COGS accounting code.
- Include Department COGS - Pay Outs: When checked, includes the Department COGS (Cost of Goods Sold) - Pay Outs in the Export Configuration.
- Account Number Config: The accounting code for Department COGS - Pay Outs is mentioned in the Account Number column.
- Department COGS - Pay Outs Memo Label: Here, the description for the Department COGS - Pay Outs memo is set for the Memo column.

- Include Dept Returns: When checked, it will include Department Returns in the Export Configuration.
- Department Return Label: Here, the label for Department Returns is set for the Description column.
- Account Number Config: The accounting code for Department Returns is mentioned in the Account Number column.
- Department Return Memo Label: Here, the description for the Department Returns memo is set for the Memo column.
The mapping of changes and their reflection can be seen in Figure 3.1.Figure 3.1
- Include Dept Inventory: This is a checkbox, and when checked, it will include Department Inventory in the Export Configuration.
- Department Inventory Label: Here, the label for Department Inventory is set for the Description column.
- Account Number Config: The accounting code for Department Inventory is mentioned in the Account Number column.
- Department Inventory Memo Label: Here, the description for the Department Inventory memo is set for the Memo column.
The mapping of changes and their reflection can be seen in Figure 3.2.Figure 3.2
- Include Sales Tax: This is a checkbox, and when checked, it will include Department Inventory in the Export Configuration.
- Sales Tax Label: Here, the label for Sales Tax is set for the Description column.
- Account Number Config: The accounting code for the Sales Tax is mentioned in the Account Number column.
- Sales Tax Memo Label: Here, the description for the Sales Tax memo is set for the Memo column.
Figure 3.3
- Include Tenders: This is a checkbox, and when checked, it will include Tenders in the Export Configuration.
- Group By Shift: This is a checkbox that, when checked, will group the Tenders by shift.
- Add Payouts to Cash Tender Calculation: This checkbox, when checked, adds payouts to Cash Tender in the Amount column.
- Tenders Label: Here, the label for Tenders is set for the Description column.
- Account Number Config: The accounting code for Tenders is mentioned in the Account Number column.
- Tenders Memo Label: Here, the description for the Sales Tax memo is set for the Memo column.
Figure 3.4
- Include CC Fee: This is a checkbox, and when checked, it will include CC Fee in the Export Configuration.
- CC Fee Label: Here, the label for CC Fees is set for the Description column.
- Account Number Config: The accounting code for CC Fees is mentioned in the Account Number column.
- CC Fee Memo Label: Here, the description for the CC Fee memo is set for the Memo column.
Figure 3.5
10. Discounts: Discounts are system discounts on products sold, grouped by the discount's accounting code.
- Include Discounts: This is a checkbox, and when checked, it will include Discounts (the ones that are added while defining the item) in the Export Configuration.
- Discount Label: Here, the label for Discounts is set for the Description column.
- Account Number Config: The accounting code for Discounts is mentioned in the Account Number column.
- Discount Memo Label: Here, the description for the Discounts memo is set for the Memo column.
Figure 3.6
- Include Manual Discounts: This is a checkbox that, when checked, will include Discounts (discounts that can be added to a subscription without pre-defining them) in the Export Configuration.
- Manual Discount Label: Here, the label for Manual Discounts is set for the Description column.
- Account Number Config: The accounting code for Manual Discounts is mentioned in the Account Number column.
- Manual Discount Memo Label: Here, the description for Manual Discounts memo is set for the Memo column.
Figure 3.7
- Include Buydowns: This is a checkbox, and when checked, it will include Buydowns in the Export Configuration.
- Buydown Label: Here, the label for Buydowns is set for the Description column.
- Buydown Offset Label: Here, the label for Buydowns Offset is set for the Description column.
- Account Number Config: The accounting code for Buydowns is mentioned in the Account Number column.
- Offset Account Number Config: The accounting code for Buydowns Offset is mentioned in the Account Number column.
- Buydown Memo Label: Here, the description for Buydown memo is set for the Memo column.
- Buydown Memo Offset Label: Here, the description for the Buydown Offset memo is set for the Memo column.
Figure 3.8
13. Pay Ins: Pay Ins are incoming cash transactions input into the register, grouped by the pay-in account code.
- Include Pay Ins: This is a checkbox, and when checked, it will include Pay Ins in the Export Configuration.
- Pay In Label: The label for Pay In is set for the Description column here.
- Pay In Offset Label: Here, the label for Pay In Offset is set for the Description column.
- Account Number Config: The accounting code for Pay In is mentioned in the Account Number column.
- Offset Account Number Config: The accounting code for Pay In Offset is mentioned in the Account Number column.
- Pay In Memo Label: Here, the description for Pay In memo is set for the Memo column.
- Pay In Offset Memo Label: Here, the description for the Pay In Offset memo is set for the Memo column.
Figure 3.9
- Include Pay Outs: This is a checkbox, and when
checked, it will include Pay Outs in the Export Configuration.
- Pay Out Label: Here, the label for the Pay Out is
set for the Description column.
- Pay Out Offset Label: Here, the label for the Pay Out Offset is set for the Description column.
- Account Number Config: The accounting code for the Pay Out is mentioned in the Account Number column.
- Offset Account Number Config: The accounting code for the Pay Out Offset is mentioned in the Account Number column.
- Pay Out Memo Label: Here, the description for Pay Out memo is set for the Memo column.
- Pay Out Offset Memo Label: Here, the description
for the Pay Out Offset memo is set for the Memo column.
Figure 4.0
- Include Pay In/Out Grouped: This is a checkbox, and when checked, it will include Pay In/Outs in the Export Configuration.
- Pay In/Out Label: Here, the label for the Pay In/Out is set for the Description column.
- Pay In/Out Offset Label: Here, the label for the Pay In/Out Offset is set for the Description column.
- Account Number Config: The accounting code for the Pay In/Out is mentioned in the Account Number column.
- Offset Account Number Config: The accounting code for the Pay In/Out Offset is mentioned in the Account Number column.
- Pay In/Out Memo Label: Here, the description for the Pay In/Out memo is set for the Memo column.
- Pay In/Out Offset Memo Label: Here, the description for the Pay In/Out Offset memo is set for the Memo column.
- Include Change Bank: This is a checkbox, and when checked, it will include the Change Bank in the Export Configuration.
- Change Bank Label: Here, the label for the Change Bank is set for the Description column.
- Change Bank Offset Label: Here, the label for the Change Bank Offset Label is set for the Description column.
- Account Number Config: The accounting code for the Change Bank is mentioned in the Account Number column.
- Offset Account Number Config: The accounting code for the Change Bank Offset is mentioned in the Account Number column.
- Change Bank Memo Label: Here, the description for the Change Bank memo is set for the Memo column.
- Change Bank Memo Offset Label: Here, the description for the Change Bank memo is set for the Memo column.
- Include Cash Deposits: This is a checkbox, and when checked, it will include Cash Deposits in the Export Configuration.
- Subtract Till Amount from Daily Deposit: This is a checkbox that, when checked, will subtract Till Amount from Cash Deposits and display it in the Amount column.
- Subtract Change Bank from Daily Deposit: This is a checkbox, and when checked, it will Change Bank Amount from Cash Deposits and display it in the Amount column.
- Cash Deposit Label: Here, the label for the Cash Deposit is set for the Description column.
- Account Number Config: The accounting code for the Cash Deposit is mentioned in the Account Number column.
- Cash Deposit Memo Label: Here, the description for the Cash Deposit memo is set for the Memo column.
Figure 4.1
- Include Shift Cash Deposits: This is a checkbox, and when checked, it will include Cash Deposits - Shift in the Export Configuration.
- Use Total Deposit Amount from Shift: This is a checkbox, and when checked, it will include Cash Deposits - Shift in the Amount column.
- Cash Deposit Shift Label: Here, the label for the Cash Deposit - Shift is set for the Description column.
- Account Number Config: The accounting code for the Cash Deposit is mentioned in the Account Number column.
- Cash Deposit Shift Memo Label: Here, the description for Cash Deposit memo is set for the Memo column.
- Include Transfers: This is a checkbox, and when checked, it will include Transfers in the Export configuration.
- Reverse Transfers: Reverse Transfers code is used to switch the credit and debit on transfers based on how you wish to export. If transfers normally appear as credits and offsets as debits, enabling this option will reverse those entries. If checked, this will include Reverse Transfers in the Export Configuration.
- Transfer GL Code/Hold: Holding code is used for a transfer that is not fully implemented, meaning "From" is applied but the "To" is not and is pending. An accounting entry should show that hold added and will be removed later when the location is applied in a future export.
- Transfer Label: Here, the label for the Transfer is set for the Description column.
- Account Number Config: The accounting code for the Transfer is mentioned in the Account Number column.
- Transfer Memo Label: Here, the description for Transfer memo is set for the Memo column.
Figure 4.3
- Include Shrinks/Adjustments: This is a checkbox, and when checked, it will include Adjustments in the Export Configuration.
- Shrink/Adjustment Label: Here, the label for the Shrink/Adjustment is set for the Description column.
- Account Number Config: The accounting code for the Shrink/Adjustment is mentioned in the Account Number column.
- Shrink/Adjustment Memo Label: Here, the description for the Shrink/Adjustment memo is set for the Memo column.
Figure 4.4

- Cashier Value
- This is used by default unless overridden by a manager or audit entry.
- Manager Value
- Used only when:
- The system is not using “From Shift,” and
- The manager-entered value is non-zero, and
- The manager's value is different from the cashier’s value.
- Audit Value
- If an audit entry is provided:
- The audit value overrides both cashier and manager values when it is non-zero and not equal to the manager value.
- System Manager vs System Cashier comparison applies only in Daily Reconciliation.
- Audit values can be applied in both Shift Reconciliation and Daily Reconciliation.
- Include Recon Overage/Offsets: This is a checkbox that, when checked, will include Overage/Offsets Reconciliation in the Export Configuration Amounts field.
- Get Overage/Offsets from Shift: This is a checkbox, and when checked, it will get the overage/offset from the employee's shift reconciliation (if any) and include Overage/Offsets in the Export Configuration's Amounts field.
- Use Overage/Offsets from Audit -> Manager: This is a checkbox, and when checked, it will include overage/offsets when the accounts are audited by the manager.
- Debit (if it increases the balance).
- Credit (if it reduces the balance).
The system fills in only one side per row based on accounting rules.
3.2.2. Accounting Codes
An undistributed account is used to ensure that credits and debits stay balanced. In export configuration, the total credit value should match the total debit value. If they do not, the undistributed account automatically adjusts the difference, adding or subtracting the necessary amount so that both sides align.
For example, if credits are $200 less than debits, the system will post $200 to the undistributed account on the credit side. This usually indicates a configuration or data issue, but it allows the entry to still be accepted by the accounting system, which typically requires balanced debits and credits before importing.
- Include Undistributed Account: This is a checkbox, and when checked, it will include the Undistributed Account in the Export Configuration.
- Undistributed Account Number: This is a checkbox, and when checked, it will include the Undistributed Account in the Export Configuration.
- Undistributed Account Label: Here, the label for the Undistributed Account is set for the Description column.
- Undistributed Account Memo Label: Here, the description for Undistributed Account memo is set for the Memo column.
3.2.3. Generating the "General Ledger Data Files
Fill in the fields with Name, Account Name, and Location(s).
Select, drag, and drop fields from the available to the exporter fields.
Click on the "Save & Close" button to save the changes made.
Figure 4.6
- Start Date: This textbox lets you choose the start date of the desired date range.
- Stop Date: This textbox lets you choose the end date of the desired date range.
- After Midnight: This is a checkbox; when checked, it lets you choose the time from which you wish to start the export for that start date.
- Choose Export Format: This field lets you choose the export format in which you wish to export the sales information, as highlighted in Figure 4.7. By default, the system will show the format you used the last time. You can change it if required.
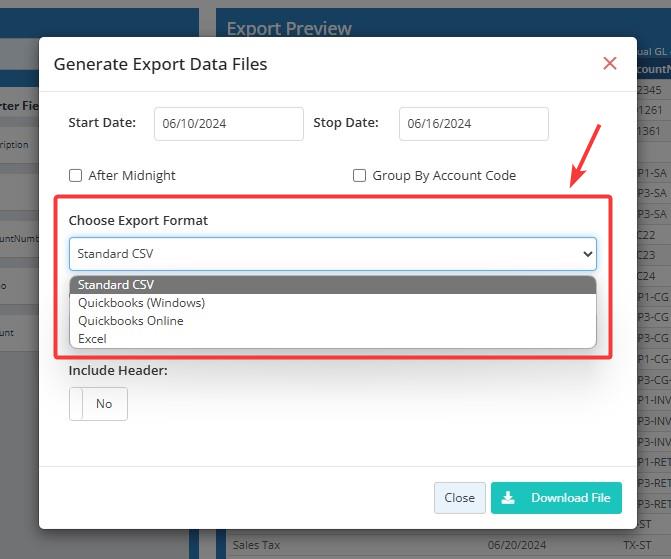
Figure 4.7
- Choose Export Format: This field lets you choose the export format in which you wish to export the sales information in the highlighted Figure 4.8.
Figure 4.8
- Include Header: This toggle will include the header of the exporter fields on top of the account export.
- Download File: This button will generate the general ledger export in the selected format.
Figure 4.9
3.3. Time Clock Export
The Time Clock Export defines how employee time-and-attendance data is selected, structured, and exported for payroll processing and reporting.
The output is formatted to integrate with external payroll or HR systems. Configuration options are available through the "Options" button when Time Clock Export is selected as the Export Type.
Figure 5.0
3.3.1. "Options" Panel
- Include Empty Payroll ID Entries
When this option is enabled, the export will include time clock records for employees who do not have a Payroll ID assigned.
- Enabled: Time clock entries without a Payroll ID are included in the export.
- Disabled: Only records with a valid Payroll ID are exported.
3.3.2. Generating the "Time Clock Export" Data Files
Figure 5.2
3.4. Sale Header Export
- One row per sale.
- Includes sale-level summary data only.
- Store details
- Register details
- Receipt number
- Transaction date/time
- Sale type
- Employee details
- Subtotal, taxes, tenders
- Discounts and buydowns
- Sale total
- Customer ID
- And other configured header-level fields
3.5. Sale Details Export
- Multiple rows per sale (one per item).
- Includes all Sale Header columns by default.
- Includes item-level columns.
- Item Name
- Item UPC
- Manufacturer
- Department details
- Price, cost, quantity
- Discounts and buydowns
- Excise tax
- Return details
- Sale flags
- And other configured item-level fields
3.6. Sale Tenders Export
- Multiple rows per sale (one per tender).
- Includes all Sale Header columns by default.
- Includes tender-specific fields.
- Tender Type
- Reconciliation Bucket
- Tender Amount
- Change Due
- Credit card authorization details
- Account/check/gift card numbers
- Tender quantity
- CC Fee
3.7. Sale Tax Export
- Multiple rows per sale (one per tax type).
- Includes all Sale Header columns by default.
- Includes tax-specific fields.
- Tax Rate
- Tax Group
- Taxable Sales
- Tax Exempt Sales
- Tax Amount
- Flat Tax Amount
- Occupational Tax Amount
- Tax Refund Amount
4. Configuring Additional Options
4.1 Exclude ECommerce Sales
- Checkbox: Exclude ECommerce Sales
- Default: Unchecked (ECommerce sales included)
- ECommerce sales will be excluded from the export file.
4.2 Sale Type Filters (Header & Details Only)
- Sale Header Export
- Sale Details Export
4.2.1. For Sale Header Export
- Include Clear Sales
- Include Cancelled Sales
- Include PayIn/Payout Sales
- Include Safe Drop
- Include No Sale
- Include Starting Till
4.2.2. For Sale Details Export
- Include Voided/Was Voided Items
- Include Returned Items
- Include Cancelled Items
4.3. Selecting Fields for Export
- All available fields appear in the Fields Available box.
- Fields vary based on selected Export Type.
- Drag required fields from Fields Available.
- Drop them into the Exporter Fields box.
4.4. Previewing the Export
- The system automatically displays an export preview.
- The preview shows:
- 20 sample rows.
- Generic fake data.
- Only selected columns.
5. Generating the Export File
- Click on "Save."
- Once clicked on "Save," an option to generate export will be enabled.
- Click “Generate Export.” A pop-up window will appear.
- Enter Export Parameters.
- Select Start Date & End Date using calendar. Or manually enter date in required format.
- Choose Export Format from the dropdown menu.
- Dropdown options:
- Standard CSV
- Excel
- Choose Export Delimiter from the dropdown menu.
- Dropdown options:
- Tab Separated
- Comma Separated
- Pipe Separated
- Enable/disable Include Header toggle.
- If enabled, the Header row included.
- If disabled, the Header row excluded.
- Click "Download File" to generate and download the export.
6. Editing the Export Configuration
- Click the Edit button to edit the existing.
- The form highlighted in Figure 5.8 will appear on your screen.
Figure 5.8
- Make the required changes and click on the "Save" or "Save & Close" button.
7. Deleting an Export Configuration
Follow the steps mentioned below to delete an Export Configuration:
- Click the “Delete” button highlighted in Figure 2.1 above to delete an "Export Configuration."
- The message shown in Figure 5.9 below will appear.
Figure 5.9
- Click “Yes, Delete” to continue the process of deleting the Export Configuration.
- Click “Cancel” to close the pop-up and skip the deletion process.
8. Refresh Preview
- After changing export options
- After adding or removing exporter fields
- After modifying locations
- To validate how the export will be formatted
9. Schedule Export
Follow the steps mentioned below to schedule an Export Configuration:
- Click the “Schedule Export" button highlighted in Figure 6.1 to schedule an Export Configuration. The screen shown below in Figure 6.1 will appear.
Figure 6.11) Replace Existing Export: This button will replace the existing scheduled export. From the existing scheduled export, you can search by entering the name of the scheduled accounting report that you wish to replace, as highlighted in Figure 6.2.Figure 6.22) Create New Scheduled Export: This button lets you schedule a new Export Configuration.Figure 6.3Fill in all the required fields as described below:
- Name: Enter the name of the Export Configuration that you wish to schedule.
- Run Time: This is the time for which you wish to schedule the export.
- Export Type: This field lets you choose the export format in which you wish to export the sales information, as highlighted in Figure 6.4.
Figure 6.4
- Choose Export Format: This field lets you choose the export format in which you wish to export the sales information in the highlighted Figure 6.5.
Figure 6.5
- Delivery Method: This is a delivery method by which you can send the scheduled export.
Figure 6.6
- Email: With this method, the user can deliver the account data to a given email address.
- FTP: The account data can be exported over an FTP connection, depending on the choice of selection.
- SFTP: The account data can be exported over an SFTP connection if this option is chosen.
- Include Header: This is a toggle. If it is set to "Yes," it will include the header of the fields in the accounting export file.
- Click on the "Schedule Export" button to schedule an Export Configuration.
Related Articles
Invoice Export
Invoice Export Overview It is essential for a retail business to keep an eye on vendor-wise and location-wise invoices. "Invoice Export" enables you to export invoices for the combination of selected vendors and location(s) or location group(s) for ...Worksheet Export
Worksheet Export Overview It is important for a retail business to keep an eye on vendor-wise and location-wise inventory adjustments. "Worksheet Export" enables you to export the selected worksheets created for adjusting the inventory level. ...Import Utility
Import Utility Overview FTx Cloud POS Import Utility is a powerful feature that enables you to import data into the system from an external file in a supported format (CSV). This utility allows you to add or insert bulk data across various system ...Inventory Movement Report
Inventory Movement Report Overview Inventory Movement refers to tracking the physical transfer of products — whether it's receiving stock from a vendor or transferring items between store locations. For example, when your company receives products ...Inventory Adjustments Report - Store Employee
Inventory Adjustments Report Overview The Inventory Adjustments Report offers a comprehensive overview of all inventory changes made within a specified date range, enabling users to monitor and verify adjustments for accuracy and transparency. It ...