Adjustments
Adjustments Overview
Adjustments are kinds of inventory corrections used to adjust a product's in-stock quantity. You can use "Adjustments" when there is a known theft, damage, or mistake in counts. You can create adjustments for both positive and negative quantities. When an adjustment is applied, it changes the inventory level accordingly.
FTx Cloud POS enables you to create and apply the adjustments as per your requirements. It also keeps track of events, such as who created an adjustment and who applied the adjustment, along with respective timestamps. It will also make necessary changes to accounting automatically. You can alter or delete an adjustment record if it is not applied. Once applied, you can only view it.
"Adjustments" enables you to:
- Create an adjustment
- Add multiple products to an adjustment with positive or negative amounts
- Apply an adjustment
- Edit, copy, or delete an adjustment record
- View who created and who applied the adjustment
Reaching "Adjustments"
- Step 1: Log into Control Center
- Step 2: Choose Point of Sale
- Step 3: Choose Inventory
- Step 4: Choose Adjustments
Please see Figure 0.1 to understand the navigation better.
Figure 0.1
Understanding the "Adjustments" Layout
Please refer to Figure 0.2 and the descriptions of the buttons and fields below to understand the layout of "Adjustments."
Figure 0.2
Column Titles: Each column title indicates the type of information in the column. You can filter the list using any title if you want to search for any specific adjustment record.
1: Add New: This button lets you add a new adjustment.2.1: Search Item: This button lets you search the adjustment record using the product name or a UPC.2.2: Filter Range: This button lets you see the adjustment records for the selected date range. Select the required dates in the Start and End fields and click the "Filter Range" button to see the adjustment records for the selected date range.3.1: Edit Adjustment: This button lets you edit the adjustment record.3.2: Print Adjustment Summary: This button lets you print the adjustment summary.3.3: Copy Adjustment: This button lets you copy an adjustment for the same product. You can copy the adjustment filter applied to a particular adjustment record.3.4: View Notes: This button lets you view the notes added to the adjustment, if any. The Notes History screen will appear when you click this button, as Figure 0.2 shows. It will show all notes added to the transfer, as well as information about the user who added them and timestamps.Figure 0.33.5: Delete Adjustment: This button lets you delete the adjustment record.
1. Adding a New Adjustment
Please follow the steps mentioned below to add a new adjustment:
- Click "Add New," shown in the top right corner.
- The Create Adjustment screen will appear, as shown in Figure 1.1.
Figure 1.1
The Create New Adjustment screen can be segregated into 2 sections.
1. Adjustment InformationFill in the appropriate information in the fields, as explained below:
- Date: Select the adjustment date.
- This field shows the current date.
- To change the date, click on the field. A drop-down calendar will appear. Select the desired date.
- Memo: Write down the appropriate notes.
- From Location: Select the store location you are creating the adjustment for.
- Adjustment Type: Select the applicable adjustment type from the drop-down.
- Adjustment Reason: This field appears when the selected adjustment type is "Other." Write down the reasons for creating the adjustment.
2. Action Buttons: Click Save, Save & Close, and Save & New to save the adjustment created.
2. Editing the Adjustment Record

Once the adjustment is saved and applied, you can’t make any modifications or alterations, and the form becomes View Only. So, there are no steps to edit an applied adjustment.
Please follow the steps below to edit an adjustment record.
- Click the Edit button highlighted in Figure 0.2 to edit the adjustment record.
- The Edit Adjustment screen will appear, as shown in Figure 2.1.
Figure 2.1
- There will be more information and action buttons on the Edit Adjustment screen than on the Create Adjustment screen. Those buttons are highlighted in Figure 2.1 above, and their descriptions are below:
1. Basic Details
This section displays general information about the adjustment:
- Created At: Date and time the adjustment record was created.
- From Location: Store or business location where the adjustment is being processed.
- Adjustment Type: Indicates the reason for the adjustment (e.g., system issue, etc.).
- Memo: Any note entered during creation to explain the adjustment.
2. Totals Information
This section shows overall totals associated with the adjustment, including:
- Applied Date: Date the adjustment was finalized or posted.
- Applied By: User who applied the adjustment, if applicable.
- Created By: User who originally created the record.
- # of Line Items: Total number of product rows included in the adjustment.
3. Status Information
This section provides the current status and values related to the adjustment:
This section provides the current status and values related to the adjustment:
- Status: Indicates whether the adjustment is applied or still pending (e.g., Not Applied).
- Total Cost: Total cost impact of the adjustment.
- Total Retail: Retail value of the items involved.
- Total Product Qty: Total quantity affected by the adjustment.
- Expand / Collapse: Toggles visibility of these detail panels.
4. "Products On Adjustment" Action Button
This section explains the buttons on Products On Adjustment in the respective series.
This section explains the buttons on Products On Adjustment in the respective series.
Figure 2.2
Action Buttons:
- Switch Font: Click this button to switch between large and small fonts.
- Add (+) Button: Click to add a new product to the adjustment. This part is explained in section 2.1. Adding Products on Adjustment.
- Search by UPC/Part #: Allows users to search for products by entering a UPC or part number.
- Columns Dropdown: Opens a list of available columns so the user can show or hide specific fields in the grid.
- Reset Columns: Restores the product grid to its default column layout by undoing any custom column show/hide changes made by the user.
5. Products on Adjustment Grid Column Information:
- Name: Product name.
- UPC: Unique product barcode.
- Qty: Quantity being adjusted.
- Cost / Total Cost: Individual unit cost and total cost impact based on quantity.
- Retail Each: Retail price per unit.
- QOH: Current Quantity On Hand in inventory.
- Adjustment Type: Type assigned to the product row (e.g., System Issue).
6. Actions:
- Edit: Allows modifying the selected product row.
Figure 2.3This screen allows you to update the details of a single product within an inventory adjustment. It is accessed by clicking the Edit icon in the product list. Any changes made here will update the quantity, cost, or adjustment type for that specific product.Field Descriptions ("Edit Adjustment Item" Screen)
- Item / UPC: Displays the product name and UPC. These values are system-generated and cannot be edited.
- Current Quantity: Shows the present stock quantity at the selected location.
- Quantity: Enter the quantity to adjust. Positive or negative values may be allowed depending on the adjustment logic.
- Cost: Displays or allows updating the cost value used in the adjustment.
- Adjustment Type: Dropdown to select the reason for the adjustment (e.g., System Issue, Inventory Correction).
- Buttons on Edit Adjustment :
- Save: Applies the changes to the product and returns to the list.
- Close: Exits without saving changes.
- Delete: Removes the selected product row from the adjustment as displayed in Figure 2.1.
- Clicking this button will open the delete dialog box. See Figure 2.4.
- Click "Yes" to delete the item on this transfer, and click Close to close the delete dialog box.
Figure 2.4
7. Action Buttons (Top Right)
- Cancel: Exits without saving any changes.
- Add Closeout Item: Opens a form to add a closeout product to the adjustment, explained in section 2.1 Adding Closeout Item.
- Add To-Do: Creates a linked To-Do task.
- Apply (Dropdown): Options to apply adjustment actions.
- Delete: Deletes the entire adjustment record.
- Split Save Button: Click on "Save" to save the adjustment, Save & New to save and open a new adjustment form, and Save & Close to save and return to the previous screen.
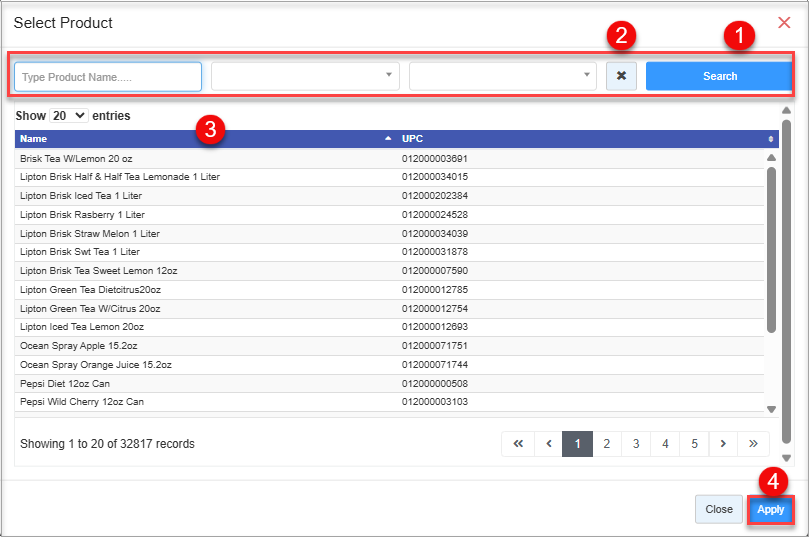
2.1. Adding Products on Adjustment
Click on "Add" to add products to the Adjustment.
The Select Product window will appear, which will allow you to search and choose an item to add to the adjustment.
The Select Product window will appear, which will allow you to search and choose an item to add to the adjustment.
Figure 2.1.1
Select Product Screen Information:
Select Product Screen Information:
1. Search the product by using the Type Product Name field, the Select Category Name drop-down, and the Select Manufacturer Name drop-down. Enter the product name, select the category or manufacturer from the respective drop-down, and click the "Search" button.
2. Use the Delete icon to remove the selections made for the Type Product Name field, the Select Category Name drop-down, and the Select Manufacturer Name drop-down, if any.
3. The system displays a list of all available products. Click on the desired product name to select it. The system will display the products accordingly if you have used the Type Product Name field, the Select Category Name drop-down, and the Select Manufacturer Name drop-down.
4. Click "Apply."The Add Adjustment Item screen will appear, as shown in Figure 2.2. Enter the quantity you want to transfer and click "Add." You can repeat the same process and add multiple products. The product will be added to the adjustment, as Figure 2.3 shows.
2.2. Adding Closeout Item
 Closeout Items are the items that are out of the store's business for any reason.
This button lets you add a closeout item to the adjustment if required.
- When you click the "Add Closeout Item" button, the Add Closeout Item screen will appear, as shown in Figure 2.1. Select the required products and click "Add Closeout Item."
Figure 2.2.1
- Select Closeout Item: Enter the name of the item whose inventory is to be adjusted.
Figure 2.2.2
- Adjustment Items Grid: The list below displays all items that have already been added to the adjustment with a negative quantity. You can select one or more adjustment items from this list to associate with the chosen closeout item.
Figure 2.2.3
- Quantity: The quantity is auto-fetched as per the selected product.
- Cost Each: The cost is auto-fetched as per the selected product.
- Ext Cost: The extended cost is auto-fetched per the selected product.
- Once added, click on "Apply Closeout Item" to make the change.
- Click on "Cancel" to discard the change.
3. Copying the Adjustment
You can copy the adjustment when creating a new adjustment for the same product. Please follow the steps mentioned below to copy an adjustment:
- Click the “Copy” button highlighted in Figure 0.2 or Figure 2.1 to copy the adjustment record.
- The Copy Adjustment screen will appear, as shown in Figure 3.1.
Figure 3.1
- Fill in the appropriate information and click "Copy." The Success message will appear, as Figure 3.2 shows.
Figure 3.2
- Click on "Go to the New Adjustment."
- The Edit Adjustment screen will open in a new tab.
- Make the required changes and click "Save" to save them.
4. Printing an Adjustment Summary
Please follow the steps mentioned below to print a summary of the adjustment record:
- Click the "Print Summary" button highlighted in Figure 0.2 or the "Print Report" button highlighted in Figure 4.1.
- The Print Report screen will appear, as shown in Figure 4.1.
Figure 4.1
- Export Type: Select the export type: PDF, CSV, or Excel.
- Include Header: Enable this button to include the header in the printout.
- Repeat Headers On Every Page: Enable this button to repeat the header on every printout page.
- Print Title On Every Page: Enable this button to print the title on every printout page.
- Click "Start Print."
- The PDF, CSV, or Excel file will open in a new tab. Download it using the Download icon, and print it using the Print icon.
5. Deleting the Adjustment

For a successful adjustment record, the "Delete" option will not be available.
You can delete the adjustment record from the Adjustment home screen and the Edit Adjustment screen.
Please follow the steps below to delete an adjustment record from the Adjustment home screen:
- Click the Delete button shown in Figure 5.1.
Figure 5.1
- A warning dialog will appear with two related options, as shown in Figure 5.2.
Figure 5.2
- Click “Yes, Delete” to continue deleting the adjustment record.
- Click “Cancel” to close the pop-up and skip the deletion process.
- To delete the adjustment record from the Edit Adjustment screen:
- Click the Edit icon highlighted in Figure 0.2.
- The Edit Adjustment screen will appear, as Figure 2.1 shows.
- Click the "Delete" button. The warning dialog will appear, as Figure 5.1 shows.
- Click “Yes, Delete” to continue deleting the adjustment record.
- Click “Cancel” to close the pop-up and skip the deletion process.
6. FTx Academy Training Course
Watch the FTx Academy video to see how to perform and track adjustments.
To gain a more comprehensive understanding, sign up for the FTx Academy training program — enroll in the courses and explore the topic lesson by lesson and reinforce your learning with quick quizzes at the end of each module.
Related Articles
Manual Adjustments Report
Overview In certain inventory-handling scenarios — such as damaged items, inventory loss, or system discrepancies — manual adjustments to the on-hand quantity may be necessary. The Manual Adjustments Report provides a summarized view of all manual ...Inventory Adjustments Report
Inventory Adjustments Report Overview The "Inventory Adjustments Report" offers a comprehensive overview of all inventory changes made within a specified date range, enabling users to monitor and verify adjustments for accuracy and transparency. It ...Adjustments - POS – Classic
Adjustments Overview Adjustments are additions or deductions made in stock levels in a point-of-sale system to accommodate known breakage, theft, waste, item expiration, internal use, shipment errors, and various write-offs. When an adjustment is ...Adjustments - Store Employee
Adjustments Overview In retail business, particularly in inventory management, an adjustment refers to changes made to inventory records to reflect the actual physical stock. These adjustments can be either positive (when extra stock is found) or ...Manual Adjustments Report - Store Employee
Manual Adjustments Report Overview In certain inventory-handling scenarios — such as damaged items, inventory loss, or system discrepancies — manual adjustments to the on-hand quantity may be necessary. The "Manual Adjustments Report" provides a ...