Create Swag Item
Overview
Loyal-n-Save offers retailers two types of Swag items that customers can exchange for their hard-earned tokens:
- Merchandise (Physical Product)
- Coupon (Digital Coupon)
This article provides a detailed explanation of each Swag item type and outlines the steps to create them in Control Center.
Swag Item Types
Merchandise (Physical Product)
Retailers can offer exclusive merchandise as a reward for customer loyalty. This allows customers to redeem their tokens for physical products.
Key Features:
- Upload merchandise images using drag-and-drop tools.
- Set the token value required for redemption.
- Customize product details visible to customers.
- Choose whether the product can be shipped or is only available for in-store pickup.
Merchandise items created in Control Center are accessible on both the Loyal-n-Save web portal and mobile app.
Digital Coupon
Retailers can create digital coupons, allowing customers to redeem tokens for discounts or free items on future purchases.
Key Features:
- Create digital coupons for in-store or online use.
- Customers can redeem tokens for valuable discounts or free items.
Digital coupons created in Control Center are available on the Loyal-n-Save web portal and mobile app.
How to Create Swag Items (Merchandise)
Creating a Merchandise Item
To create a merchandise item in Control Center, perform the following:
- Step 1: Log into Control Center
- Step 2: Choose Loyalty
- Step 3: Choose Swag Shop
- Step 4: Choose Items
Figure 1.0
- In the Swag Item window, click on the "Add New" button.
This is where you can create the merchandise item that you want your customers to redeem or gift with the available tokens they have in their account.
- Swag Item Type: Select "Merchandise" from the Swag Item Type drop-down menu.
Figure 1.1
Details Tab
Figure 1.2
- Name: Enter the name of the merchandise item for internal identification and tracking.
- Category: Select the name of the category (child). The child category is a more specific sub-category under the parent category.
- Tags: Tags in a Swag Shop are essentially labels or keywords assigned to products to help organize and categorize them. They make it easier for customers to find specific items by grouping similar products together.
- Token Value: Set the amount of tokens the customer will require to redeem the merchandise.
- Age Restricted Topics: Select or add age-restricted products if the campaign alerts will only be going to age-verified customers. This option is used to ensure that certain campaigns are only accessible to customers who have been age verified. This is particularly important for products or promotions that are legally restricted to certain age groups, such as alcohol, tobacco, or adult content. By using the Age Restricted Topics feature, you can confidently promote age-sensitive products while adhering to legal requirements and maintaining responsible marketing practices.
- Short Description: The short description is for internal use only and does not appear on the app or website.
- Product Description: Description of the product that you are offering. This description is visible to customers.
Attributes Tab
If one product comes in multiple colors/flavors/sizes, you do not have to enter them individually; you can add them all under one product name by switching to the "Attributes" tab.
Figure 1.3
Use Attributes: Refer to the On/Off toggle switch. When this attribute is turned Off, only the UPC and quantity are required. If it's turned On, additional attributes are displayed.
Figure 1.4
Figure 1.5
- Click on the "Add Attribute" button. The "Choose Attribute" pop-up window will be displayed.
- Click on the drop-down menu; the options to select or add a new attribute will be displayed.
Figure 1.6
- To add a new attribute, click on "Add New Attribute."
Figure 1.7
- Enter the name of the attribute you would like to add as a custom attribute.
- Select the Attribute Type from the drop-down menu:
- Dropdown
- Radio Buttons
- Swatches
- Click on "Apply."
- Click on the "Add Value" button and enter the value name in the Contents textbox.
Figure 1.8
- If you have selected "Swatches" as an attribute, you will have options to add colors.
- To add more values, click on "Add Value" again.
Figure 1.9
Inventory/Options – Attribute Values
Figure 1.10
- UPC / PLU: Enter the UPC code for the item.
- Quantity: Enter the number of quantities you have in stock.
- Override Type: (Optional) You can either increase tokens, decrease tokens, or replace tokens.
- Token Override: Enter the token value you want to override.
Options Tab
Figure 2.0
- Max Redemptions Allowed Per Day: This setting controls the limit on how many times a customer can redeem tokens within a single day. You can customize this limit for individual items if you need to override the Global settings.
- Max Allowed Per Purchase: This setting defines the maximum quantity of an item that a customer can purchase and redeem in a single transaction. If needed, you can apply custom settings for specific items to override the Global limits.
- Has Age Limit: Refer to the Yes/No toggle switch. When this setting is set to Yes, the option to specify the age limit will be displayed.
- Age Limit: Enter the age limit. By default, the age limit is set to 18.
- Expiration: Refer to the Yes/No toggle switch. Toggling yes will allow you to specify the time.
- Expiration Time: If enabled, a small banner will appear on the product, indicating the time remaining until it expires (e.g., in hours, days, weeks, or months). This banner is visible on both the website and app.
- Shipping Type: There are 4 options to select from; whichever option the user selects here will be visible to the customer to select from on the website and application.
- Use category settings
- Allow standard shipping and in-store pickup
- Force in-store pickup only
- Force standard shipping
Manage Balance Types
The balance type is a separation of the token bucket in which the tokens will be placed upon earning from the campaign.
Figure 2.1
- Click on "Manage" to view the list of balance types.
Figure 2.2
- Select store(s) from the Results list.
- Click on the Right Arrow button.
- Click on "Apply."
Images
Figure 2.3
- To add an image to the item, click on the "Choose Files" button.
- Browse to select an image.

Note: Only .jpg, .jpeg, and PNG files are allowed to be uploaded.
- Once the merchandise item is configured, the same item will be displayed in the Loyal-n-Save front-end portal, under the Merchandise section as shown below:
Figure 2.4
Once the merchandise item is created in Control Center, the next step is for customers to redeem or gift this item through the mobile app or the program’s website.
Redeem & Gift Merchandise Item Using the Web Portal
In a Swag Shop, redeeming a merchandise item or sending it as a gift generally follows a straightforward process, like other online or physical retail experiences.
Here’s a step-by-step guide to help you redeem a merchandise item or send it as a gift through website:
Redeeming Merchandise Item
- On the Loyal-n-Save portal, click on the "Swag Shop" option from the left navigation.
Figure 2.5
- Refer to the "Stores" tab and click on "Merchandise." The list of available merchandise items from all the stores will be displayed.
Figure 2.6
- The details available on the merchandise item are as follows:
- Number of reviews posted for that merchandise item.
- Amount of tokens required to redeem that item.
- Option to redeem merchandise item.
- Option to gift merchandise item.
- Option to add that merchandise item to the Wishlist.
- If you are aware of any available item, you can search it by entering the item name in the Search By Keyword field.
- You can sort the items by the following methods:
- Popular
- Tokens: Low to High
- Tokens: High to Low
- Date: Newest First
- Date: Oldest First
- You can sort the merchandise items by Stores. Once you select any store from the drop-down, an option to select the Category will be displayed.
- Also, you can filter the merchandise items by reward tokens.
- Click on one of the merchandise items displayed.
- Enter the number of items you want to redeem.
Figure 2.7
- To redeem the item, click on the "Redeem" button.
Figure 2.8
- The option to pick the balance amount will be displayed. Enter the needed balance amount and click on "Next."
- After clicking on "Next," you'll be directed to the page where you can choose your shipping method.
- You can choose between two shipping options: Standard Shipping or In-Store Pickup.
- If you select "Standard Shipping," you'll need to choose from the available addresses for delivery.
- If the address you wish to deliver is not listed in the available addresses, you can add a new address by clicking on the "Add New Address" button.
- Once you click on the "Add New Address" button, a pop-up window will be displayed to enter the address details.
- Enter the address details and click on "Save."
- If you select "In-Store Pickup," you'll need to choose a store location where you can pick up the item yourself.
- Once you select the address, click on "Next."
- Verify the address details and product details.
- Optionally, you can enter the note and click on "Redeem Now."
Sending a Merchandise Item as a Gift
- To send an item as a gift, click on any item that you want to send as a gift.
- Enter the number of items you want to send.
- Once you enter the number of items, click on "Send Gift."
- Enter the needed Balance Amount and click on "Next."
- Select any of your friends to receive the gift.
- Pick a delivery date to send that item as a gift.
- Optionally, enter a message to the friend.
Figure 2.9
- Click on "Next."
- Verify the item details and click on "Gift Now."
- The list of items that have been sent to others as a gift will be displayed in Swag Shop > Gifts > Sent.
- Also, once the item has been sent as a gift, you will receive an email with the item details and option to view gift history.
- Click on "View Gift History." You will be redirected to Swag Shop > Stores > History page. Here, the items you have redeemed and the gifts you've sent will be listed.
- Similarly, if you receive a gift from another user, you will receive an email with the item details and the option to view gifts. Refer to the sample email shown below:
- The item(s) that you have received as a gift will be displayed in the Swag Shop > Gifts > Received.
- You can either accept or reject the gift using the Yes, Accept or No, Thank You options.
- Once you click on "Yes, Accept," an option to choose a shipping address will be displayed.
- Optionally, you can add a new address by clicking on the "Add New Address" button.
- Enter the address details and click on "Save."
- Select the address and click on "Save." The gift will be successfully accepted.
- To reject the gift, click on "No, Thank you."
- A confirmation pop-up will be displayed. Click on "Yes."
- The gift will be successfully declined.
Redeem & Gift Merchandise Item Using the Mobile App
In a Swag Shop, redeeming a merchandise item or sending it as a gift generally follows a straightforward process, like other online or physical retail experiences.
Here’s a step-by-step guide to help you redeem a merchandise item or send it as a gift through mobile application:
Redeeming Merchandise Item
- On the Loyal-n-Save application, click on the "Swag Shop" option available on the home screen.
- Refer to the "Stores" tab and click on "Merchandise."
- The list of available merchandise items will be displayed from all the stores.
- The details available on the merchandise item are as follows:
- Number of reviews posted for that item.
- Number of tokens required to redeem that item.
- Option to redeem merchandise item.
- Option to gift merchandise item.
- Option to add that item to the Wishlist.
- To filter the merchandise item by using the filter option, click on the Filter icon.
- To sort the merchandise items by the following options, click on "Sort."
- Low to High
- High to Low
- Popularity
- Newest First
- Oldest First
- You can sort the merchandise items by Stores. Once you click on Stores and select any store, the option to select the Categories & Tags will be enabled.
- Select the Categories and Tags.
Toggle ON the Wishlist if you want to view only the items that have been moved to the Wishlist.- Toggle ON the Filter by Reward Tokens to set the range of tokens required to redeem the merchandise item.
- Once you filter the items, click on the Checkmark as shown in the image below:
Figure 2.10
- The list of merchandise items will be displayed according to the filters set.
Figure 3.0
- Click on the "Redeem" button.
Figure 3.1
- The option to select merchandise item number will be displayed.
- If you scroll down, you will have an option to select a review rating and leave a note.
Figure 3.2
- Select the rating, enter the review note, and click on "Submit Review."
Figure 3.3
- Once you submit the review, click on "Redeem Now."
Figure 3.4
- The option to pick the balance amount will be displayed. Enter the needed balance amount and click on "Next."
- Once you click on "Next," you'll be moved to the confirmation screen where you need to select the shipping method.
.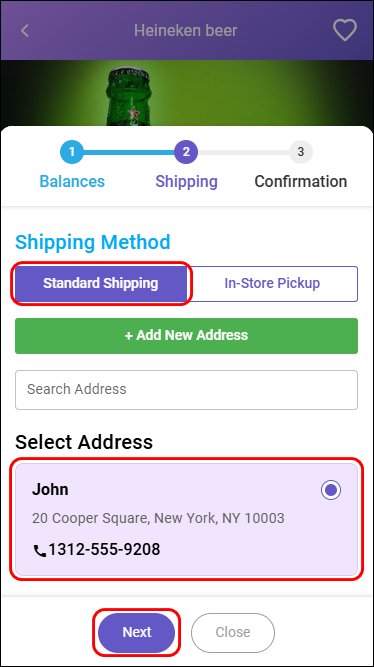
Figure 3.5
- You can choose between two shipping options: Standard Shipping or In-Store Pickup.
- If you select "Standard Shipping," you'll need to choose from the available addresses for delivery.
- Click on "Next."
- If the address you wish to deliver is not listed in the available addresses, you can add a new address by clicking on the "Add New Address" button.
Figure 3.6
- Once you click on the "Add New Address" button, a pop-up window will be displayed to enter the address details.
- Enter the address details and click on "Save."
Figure 3.7
- If you select "In-Store Pickup," you'll need to choose a store location where you can pick up the item yourself.
- Once you select the address, click on "Next."
Figure 3.8
- Optionally, you can enter a note before redeeming the merchandise item.
- Once you verify the item and token details, click on "Redeem Now." An email will be sent to the registered address with an option to view the order details.
Figure 3.9
- Click on the "View Order" button. You'll be redirected to the Loyal-n-Save application, and the actual item will be displayed.
- To view the redeemed items, scroll down the page to the My Coupons section as shown in the image above:
- Click on the Right Arrow on the My Coupons page.
NOTE: The merchandise items will not have a label called Digital.
Sending Merchandise Item as Gift
- To send a merchandise item as a gift, click on "Gift."
Figure 4.0
- Once you click on "Gift," you will have the option to select the number of items you want to send as gift.
Figure 4.1
- If you scroll down the page, you will have the option to select a review rating and leave a review note.
Figure 4.2
- Select the rating, enter the review note and click on "Submit Review."
Figure 4.3
- Once you provide a rating and review note, click on "Gift a Friend."
Figure 4.4
- Enter the needed balance amount and click on "Next."
Figure 4.5
- Select any of your friends to receive the gift.
- Pick a date to send the gift.
- Optionally, enter a message to the friend.
- Click on "Next."
Figure 4.6
- Verify the item details and click on "Gift Now."
Figure 4.7
- To view the list of items that have been sent to others as a gift, select Swag Shop > Gifts > Sent tab.
Also, once the merchandise item has been sent as a gift, you will receive an email with the item details and the option to view gift history. Refer to the sample email shown below:
Figure 4.8
Similarly, if you receive a merchandise item as a gift from another user, you will receive an email with the item details and the option to view gifts. Refer to the sample email shown below:
Figure 4.9
- The items that you have received as a gift will be displayed in the Swag Shop > Gifts > Received.
- To view the item details, click on "VIEW GIFT."
- You can either accept or reject the gift using the ACCEPT THIS GIFT or REJECT THIS GIFT options.
How to Create a Digital Coupon
To create a coupon in Control Center, perform the following:
- Step 1: Log into Control Center
- Step 2: Choose Loyalty
- Step 3: Choose Swag Shop
- Step 4: Choose Items
Figure 5.0
- In the Swag Item window, click on the "Add New" button.
Figure 5.1
This is where you can create the coupon that you want your customers to redeem or gift with the available tokens they have in their account.
- Swag Item Type: Select the Swag item type from the drop-down menu.
- Merchandise
- Coupon
Item Details Tab - Coupon
Figure 5.2
- Coupon Name: This will display the name of the coupon for internal identification and tracking.
- Coupon Type: The Coupon Type drop-down displays three options:
- Dollar Amount Off: Indicates a discount that provides a fixed monetary reduction on the total purchase amount or on specific items. For example, a coupon might offer "$5 off" on a minimum purchase of $50 or "$10 off" on selected products. This type of coupon directly reduces the cost by the specified dollar amount, rather than applying a percentage discount.
- Coupon Value: Enter dollar amount off.
- Percentage Off: A "Percentage Off" coupon type provides a discount based on a percentage of the total purchase amount or specific items. This type of coupon reduces the cost by a certain percentage, offering savings that scale with the purchase amount.
- Coupon Value: Enter the percentage amount off.
Free Item: Selecting this coupon type allows customers to receive a specified item at no cost.- Category: Select the category for which you want to create this coupon.
- Tags: Select or add tags to identify the coupon.
- Token Cost: Set the amount of tokens the customer will require to redeem the coupon.

Note: The textbox allows a maximum of 6 digits, with 999999 being the highest value. If more than 6 digits are entered, such as 1234567, the system will automatically change the value to 999999 to ensure it stays within the allowed limit.
- Header Name: The header name entered here appears below the product name on the products page. Text appears bold on coupon. The max character limit for a header name is 24. You can add up to 3 header lines.
- Text: This line(s) appears on the individual product page and on the coupon itself. The maximum character limit for text lines is 24. You can add up to 5 text lines.
- Expiration Type:
- Never Expires: Indicates that the coupon does not expire.
- Static Date: Indicates that the coupon has a designated expiration date and time (coupon expiration date and time).
- Days After Issue: Indicates that the coupon is valid only for the number of days mentioned.
- Once Per Sale: Yes/No toggle switch. When this option is turned off, the coupon of the same type can be used more than once during the transaction.
- Can be combined with other coupons: Yes/No toggle switch. Allow the coupon to combine with another coupon.
- Apply on single item: Yes/No toggle switch. When enabled, the coupon can only be applied to a single item, allowing only single items from the item whitelist to be used as coupon filters.
Attributes Tab
Figure 5.3
- On the "Attributes" tab, enter the number of coupons available. (Minimum value is 1.)
Options Tab
Figure 5.4
- Max Redemptions Allowed Per Day: Defines the maximum number of times a specific coupon can be used per day.
- Max Allowed Per Purchase: Defines the maximum number of times a specific coupon can be used per purchase.
- Expiration: Yes/No toggle switch. Toggling Yes will allow you to specify the time.
- Expiration Time: Here, you can set the expiration period of how long this coupon will be available on the Swag Shop to redeem using reward tokens.
Manage Balance Types
The balance type is a separation of the token bucket in which the tokens will be placed upon earning from the campaign.
Figure 5.5
- Click on "Manage" to view the list of balance types.
Figure 5.6
- Select store(s) from the Results list.
- Click on the Right Arrow.
- Click on "Apply."
Images
Figure 5.7
- To add an image to the coupon, click on the "Choose Files" button.
- Browse to select an image.
Note: Only jpg, jpeg, and PNG files are allowed to be uploaded.
Manage Coupon Filters
Coupon filters are used to identify the products that are eligible for a coupon.
Figure 5.8
By default, “All Items” is used when no other lists are set up. It is recommended that at least one blacklist or whitelist be defined on each campaign. The blacklist and whitelist cannot be used together for the same type. You can have a Category Whitelist and Item Blacklist working together.
- Whitelists – Items you want to include.
- Blacklists – Items you want to exclude.
A combination of blacklists and whitelists is available from the Select Coupon Filter drop-down list:
- All Items (grayed out)
- Item Whitelist or Item Blacklist
- Department Whitelist or Department Blacklist
- Category Whitelist or Category Blacklist
- Manufacturer Whitelist or Manufacturer Blacklist
- Brand Whitelist or Brand Blacklist
- Tag Whitelist or Tag Blacklist
Figure 5.9
- Once you select a filter from the drop-down, the "Manage" button will appear. From there, you will be able to add items/products.
- Click on the "Manage" button.
Figure 6.0
- Select item(s) from the Results list.
- Click on the Green Arrow to move the items to the select list.
- Click on "Apply."
Once the coupon is configured, the coupon will be displayed in the Loyal-n-Save portal and app, under the "Coupons" section, as shown in the web portal below:
Figure 6.1
Once digital coupons are created in Control Center, the next step is for customers to redeem or gift these coupons through the mobile app or the program’s website.
Redeem and Gift a Digital Coupon Using the Web Portal
In a Swag Shop, redeeming a coupon or sending it as a gift generally follows a straightforward process, similar to other online or physical retail experiences. Here’s a step-by-step guide to help you redeem a coupon or send it as a gift through the program’s website:
Redeeming a Digital Coupon
- On the Loyal-n-Save portal, click on the "Swag Shop" option from the left navigation.
Figure 6.2
- Click on the "Stores" tab and then click on "Coupons." The list of available coupons from all the stores will be displayed.
Figure 6.3
- The details available on the coupon are as follows:
- Number of reviews posted for that particular coupon.
- Amount of tokens required to redeem the coupon.
- Option to redeem coupon.
- Option to gift coupon.
- Option to add a coupon to the Wishlist.
- You can also search for available coupons by entering the coupon name in the Search by Keyword field.
- Coupons can be sorted by the following methods:
- Popular
- Tokens: Low to High
- Tokens: High to Low
- Date: Newest First
- Date: Oldest First
- Coupons can also be sorted by stores. Once you select any store from the drop-down, an option to select the Category will be displayed.
- Also, you can filter the coupons by reward tokens.
Figure 6.4
- Enter the number of coupons you want to redeem.
- To redeem the coupon, click on the "Redeem" button.
Figure 6.5
- The required balance amount will be automatically picked from the available balance. Click on "Next."
- Once you click on "Next," you'll be moved to the Confirmation page.
Figure 6.6
- Verify the email address and click on "Next."
- Optionally, you can enter a note before redeeming the coupon.
Figure 6.7
- Once you verify the coupon and token details, click on "Redeem Now." An email will be sent to the registered address with the one-time-use barcode.
Figure 6.8
- Click on the "VIEW COUPON" button. You'll be redirected to the Loyal-n-Save portal, and the actual coupon will be displayed.
Figure 6.9
- Customers can print coupons using the "Print" option or download the coupon as an image using the "Download" option.
The "Print" option is only available from the web portal.
- Digital coupons that are redeemed will be displayed in the My Coupons > Digital Coupons tab.
Figure 7.0
Sending a Coupon as a Gift
- To send a coupon as a gift, click on "Send Gift."
Figure 7.1
- Enter the needed balance amount and click on "Next."
Figure 7.2
- Select any of your friends to receive the gift.
- Pick a date to send the coupon as a gift.
- Optionally, enter a message to the friend.
Figure 7.3
- Click on "Next."
Figure 7.4
- Verify the coupon details and click on "Gift Now."
- The list of coupons that have been sent as a gift will be displayed in Swag Shop > Gifts > Sent.
Figure 7.5
- For coupons that have been sent as a gift, you will receive an email with the coupon details and the option to view the gift history.
Figure 7.6
- Click on "VIEW GIFT HISTORY." You will be redirected to Swag Shop > Stores > History page. The items you have redeemed and the gifts you've sent will be listed here.
Figure 7.7
- To view the gift details, click on any one gift.
Figure 7.8
- Click on Gift Information tab, and you will see the following details:
- Status: Indicates the current state of the gift. The statuses include Accepted, Rejected, and Pending.
- Customer Email: Displays the email address of the customer who received the gift. This allows easy identification of the recipient and facilitates communication if needed.
- Customer Name: Shows the full name of the customer associated with the gift. This personalizes the record and helps in tracking customer-specific information.
- Showing At: Displays the date and time when the gift is sent.
- Gift Expiration: Specifies the expiration date of the gift, after which the gift can no longer be claimed or redeemed by the customer. By default, the gift expiration date will be 15 days from the date the gift is sent.
- Coupon Expiration: Details the expiration date of the coupon linked to the gift. This ensures that customers are aware of the timeline within which they need to use the coupon.
- Coupon Description: Provides a summary or detailed information about the coupon, such as the type of discount, value, or specific conditions for its use.
- If you receive a coupon as a gift from another user, you will receive an email with the coupon details and the option to view the gift.
Figure 7.9
- The coupons that you have received as a gift will be displayed in the Swag Shop > Gifts > Received.
Figure 8.0
- You can either accept or reject the gift using the "Yes, Accept" or "No, Thank You" options.
- Once you click on "Yes, Accept," the gift will be accepted successfully.
- To reject the gift, click on "No, Thank You."
Figure 8.1
- A confirmation pop-up will be displayed. Click on "Yes."
- The gift will be successfully declined.
Redeem and Gift a Digital Coupon Using the Mobile App
In a Swag Shop, redeeming a coupon or sending it as a gift generally follows a straightforward process, similar to other online or physical retail experiences.
Here’s a step-by-step guide to help you redeem a coupon or send it as a gift through the mobile application:
Redeeming a Digital Coupon
- From the Loyal-n-Save application, click on the "Swag Shop" option available on the home screen.
Figure 8.2
- Go to the "Stores" tab and click on "Coupons."
Figure 8.3
- The list of available coupons from all the stores will be displayed.
Figure 8.4
- The details available on the coupon are as follows:
- Number of reviews posted for that particular coupon.
- Number of tokens required to redeem that coupon.
- Option to redeem coupon.
- Option to gift coupon.
- Option to add that coupon to the Wishlist.
Figure 8.5
- To filter the coupons, click on the Filter icon.
Figure 8.6
- To sort the coupons by the following options, click on "Sort":
- Low to High
- High to Low
- Popularity
- Newest First
- Oldest First
Figure 8.7
- You can sort the coupons by stores. Once you click on "Stores" and select any store, the option to select the Categories and Tags will be enabled.
- Select the Categories and Tags.
- Toggle Wishlist ON if you want to view only the coupons that have been moved to the Wishlist.
- Toggle Filter by Reward Tokens ON to set the amount of tokens required to redeem the coupon.
Figure 8.8
- Once you filter the items, click on the Checkmark as shown in the above image.
- The list of coupons will get displayed according to the filters set.
Figure 8.9
- To redeem the coupon, click on the "Redeem" button.
Figure 9.0
- The option to select the number of coupons will be displayed.
Figure 9.1
- If you scroll down, you will have an option to select a review rating and leave a note.
- Select the rating, enter the review note, and click on "SUBMIT REVIEW."
Figure 9.2
- Click on "Redeem Now."
Figure 9.3
- The option to pick the balance amount will be displayed. Enter the needed balance amount and click on "Next."
- Once you click on "Next," you'll be moved to the confirmation screen.
Figure 9.4
- Click on "Next."
Figure 9.5
- Optionally, you can enter a note before redeeming the coupon.
- Once you verify the coupon and token details, click on "Redeem Now." An email will be sent to the registered address with the one-time-use barcode.
Figure 9.6
- Click on the "VIEW COUPON" button. You'll be redirected to the Loyal-n-Save application, and the actual coupon will be displayed.
Figure 9.7
- You can share the coupon using the "Share" option or download the coupon as an image using the "Download" option.
- The digital coupons that are redeemed will be displayed in the My Coupons section.
Figure 9.8
- To view the redeemed coupons, scroll down the page to the My Coupons section as shown in the image above:
Figure 9.9
- Click on the Right Arrow on the My Coupons page. Select "Digital Coupons." The coupons will be labeled as Digital.
Sending a Coupon as a Gift
Figure 10.1
- To send a coupon as a gift, click on "Gift."
Figure 10.2
- Once you click on "Gift," you will have an option to select a review rating and leave a review note.
- Select the rating, enter the review note, and click on "SUBMIT REVIEW."
Figure 10.3
- To send the coupon as a gift to a friend, select the number of coupons and click on "Gift A Friend."
Figure 10.4
- Enter the needed balance amount and click on "Next."
Figure 10.5
- Select any of your friends to receive the gift.
- Pick a date to send the coupon as a gift.
- Optionally, enter a message to the friend.
- Click on "Next."
Figure 10.6
- Verify the coupon details and click on "Gift Now."
Figure 10.7
- To view the list of coupons that have been sent as gifts, select Swag Shop > Gifts.
Figure 10.8
- Select the "Sent" tab.
- Also, once the coupon has been sent as a gift, you will receive an email with the coupon details and the option to view the gift history. Refer to the sample email shown below:
Figure 10.9
- Similarly, if you receive a coupon as a gift from another user, you will receive an email with the coupon details and the option to view the gift. Refer to the sample email shown below:
Figure 11.0
- Also, you will receive a notification on your mobile app as shown below:
Figure 11.1
- To view the gift details that you have received, click on the notification.
Figure 11.2
- You can either accept or reject the gift using the "ACCEPT THIS GIFT" or "REJECT THIS GIFT" options.
Related Articles
Item Reports
1. Overview The "Item Report" is a detailed summary that tracks all transactions associated with a specific campaign within a selected date range. This report provides information about the performance of the campaign by listing every transaction ...Swag Shop Items Report
Overview The "Swag Shop Items Report" provides a comprehensive analysis of the shop's performance over a specific period. This report aims to offer a comprehensive overview of the items redeemed by customers, including detailed information on the ...Swag Shop Dashboard
Overview The "Swag Shop Dashboard" provides an overview of redemptions, a detailed breakdown of order statuses, a list of highest-spending customers, insights into top-selling categories, a ranking of the top 5 selling products, and comprehensive ...Swag Shop Purchases
Swag Shop Purchases The Shop Purchases section provides users with a comprehensive overview of their past transactions within the loyalty shop, including both digital and physical. This feature helps users track the status and history of their ...Item Simulator
1. Overview The "Campaign Item Simulator" allows users to validate how specific products will behave within a campaign. It provides a detailed breakdown of reward calculations based on selected items and locations. 2. Reaching the "Campaign Item ...