Discount Spiff Report
Discount Spiff Report
Reports -> Sales Reports -> "Discount Spiff"
Store employees can play a vital role in selling the items, especially during checkout. Employees can earn some commission by selling the items to customers when the discount is applicable.
When the discount is configured from Control Center, the store admin or sales manager can enable the discount commission for the POS employee/cashier who will get the commission if the discount is triggered during the checkout.
Figure 1
The "Discount Spiff Report" provides data on commission (spiff) when the discount is triggered. It also helps to calculate the employee's earnings (spiff) within the specific date range. The "Discount Spiff Report" will show the 6 types of data in the report.
1. Reaching the "Discount Spiff Report"
To reach the "Discount Spiff Report," follow the below steps:
- Step 1: Log into Control Center
- Step 2: Choose Point of Sale
- Step 3: Choose Reports
- Step 4: Choose Sales Reports
- Step 5: Choose Discount Spiff
By clicking "Discount Spiff," you will be redirected to the Discount Spiff Report" page with the report type and relevant filter options.
Figure 3
Initially, you will see the "Report Data is Empty" message. You need to select the date range to check the Discount Spiff Report sales data in the report.
2. Report Type
You can check the Discount Spiff data as per the different parameters by selecting the report type. You can see the total 6 different parameters to check the Discount Spiff data in the report:
- Spiff Discount Summary
- Spiff Discount Summary by Employee
- Spiff Discount Summary Group by Store
- Spiff Discount Details
- Spiff Discount Details by Employee
- Spiff Discount Item Details
2.1 Spiff Discount Summary
When you navigate to the report page, the "Spiff Discount Summary" report type will be selected by default.
Figure 5
By generating the report, you will see the following data in the tabular view:
- Discount Name: This column represents the name of the discount that was configured in the "Discounts" module.
- Spiff Qty: This column represents the spiff quantity that was triggered and counted for the discount during checkout.
- Spiff Amount: This column represents the applicable spiff amount ($) as per the Discount Commission (Spiff Amount & Commission Trigger Type) setup.
2.2 Spiff Discount Summary by Employee
Select the "Spiff Discount Summary by Employee" report type to get the Discount Spiff Report data for the employees who earned the commission.
Figure 6
After selecting the type and generating the report, you will see the following employee-wise data in the tabular view:
Employee Name: You can see the name of the employee and the total earnings summary details under the name. It is also possible that the employee can earn spiffs from more than one different discount.
- Discount Name: This column represents the name of the discount that was configured in the "Discounts" module.
- Spiff Qty: This column represents the spiff quantity that was triggered and counted for the discount during checkout.
- Spiff Amount: This column represents the applicable spiff amount ($) as per the Discount Commission (Spiff Amount & Commission Trigger Type) setup.
2.3 Spiff Discount Summary Group by Store
Select the "Spiff Discount Summary Group by Store" report type to get the Discount Spiff Report data for stores. 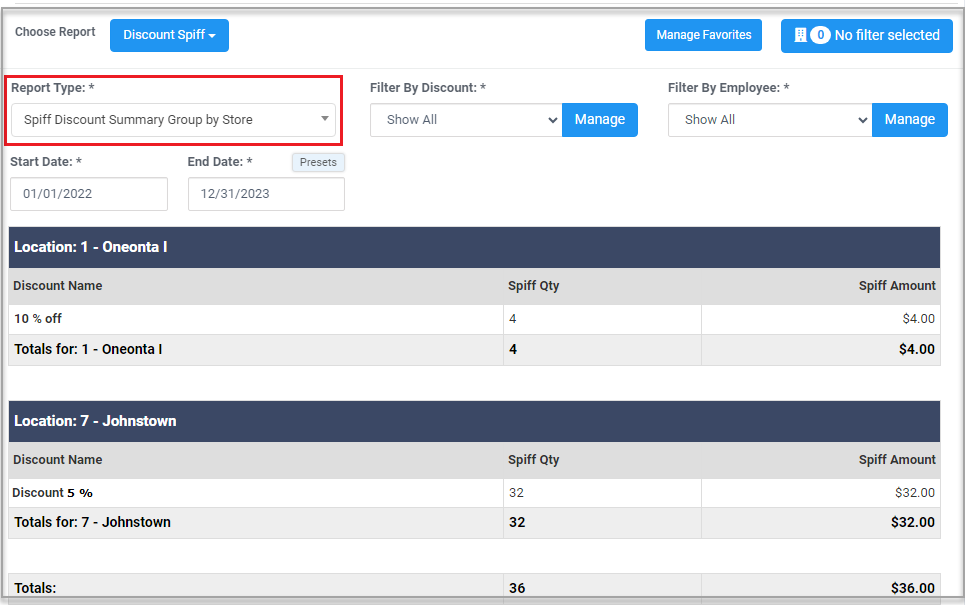 Figure 7
After selecting the type and generating the report, you will see the following store-wise data in the tabular view:
Location (Store) Name: You can see the name of the store and the earnings details. It is also possible that multiple discounts have the discount commission configured.
- Discount Name: This column represents the name of the discount that was configured in the "Discounts" module.
- Spiff Qty: This column represents the spiff quantity that was triggered and counted for the discount during checkout.
- Spiff Amount: This column represents the applicable spiff amount ($) as per the Discount Commission (Spiff Amount & Commission Trigger Type) setup.
2.4 Spiff Discount Details
Select the "Spiff Discount Details" report type to get the transaction details in which the discount commission was triggered. 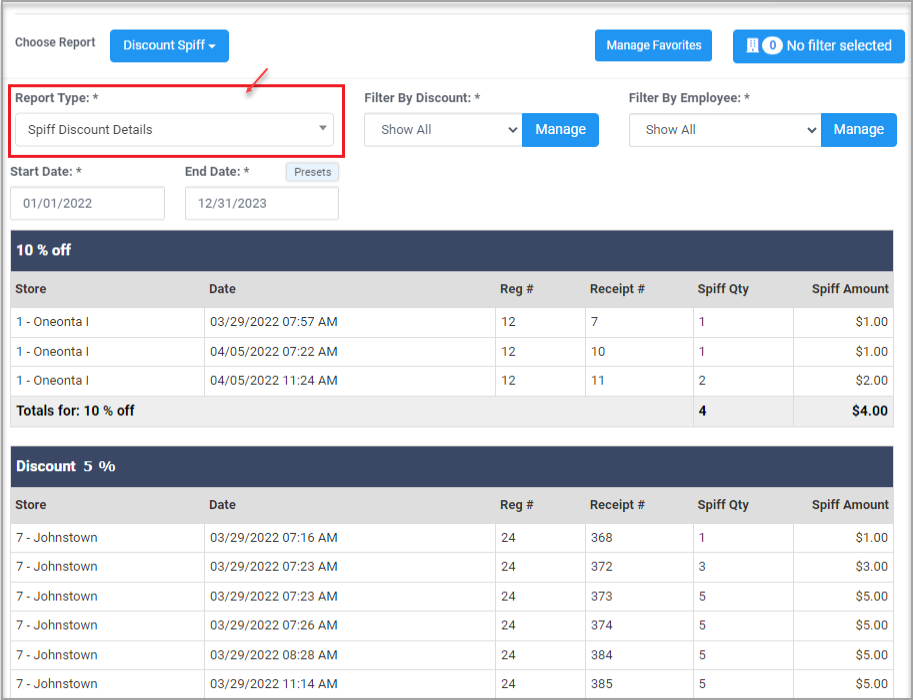 Figure 8
After selecting the type and generating the report, you will see the following discount-wise data in the tabular view:
Discount Name: You can see the discount name and the transaction details of the discount commission. It is also possible that the discount commission is applicable to multiple stores.
- Store: This column represents the store name where the discount commission was triggered on the transactions.
- Date: This column represents the date and time span when the transaction was initiated with a discount commission.
- Reg #: This column represents the register number of the transaction.
- Receipt #: This column represents the receipt number of the transaction.
- Spiff Qty: This column represents the spiff quantity that was triggered and counted for the discount during checkout.
- Spiff Amount: This column represents the applicable spiff amount ($) as per the Discount Commission (Spiff Amount & Commission Trigger Type) setup.
2.5 Spiff Discount Details by Employee
Select the "Spiff Discount Details by Employee" report type to get the transaction details for the employees to check the earned spiff amount as per the transaction details.
Figure 9
After selecting the type and generating the report, you will see the following discount-wise data in the tabular view:
Employee Name & Discount: You can see the employee's name and the applicable discount commission for the discount. It is also possible that the employee earned the spiff from more than one discount.
- Store: This column represents the store name where the discount commission was triggered on the transactions.
- Date: This column represents the date and time span when the transaction was initiated with a discount commission.
- Reg #: This column represents the register number of the transaction.
- Receipt #: This column represents the receipt number of the transaction.
- Spiff Qty: This column represents the spiff quantity that was triggered and counted for the discount during checkout.
- Spiff Amount: This column represents the applicable spiff amount ($) as per the "Discount Commission" (Spiff Amount & Commission Trigger Type) setup.
2.6 Spiff Discount Item Details
Select the "Spiff Discount Item Details" type to get the item details on which the discount commission was triggered.
Figure 10
After selecting the type and generating the report, you will see the item-wise following data in the tabular view:
Discount: You can see the item-wise discount spiff's derails under the specific discount name under which the item was selected and the discount commission was set up.
- UPC: This column represents the UPC code for an item.
- Item Name: This column represents the item name on which the discount commission was triggered during checkout.
- Spiff Qty: This column represents the spiff quantity that was triggered and counted for the discount during checkout.
- Spiffs Given: This column represents the applicable spiff amount ($) as per the Discount Commission (Spiff Amount & Commission Trigger Type) setup.
3. Filter Options
You can filter the discount spiff data in the report by selecting the different filter options to get the exact record in the report.
3.1 Filter By Discount
Select the specific discount to get the discount spiff data in the report for that. By clicking the "Filter by Discount" option, you can select the specific discount(s) for which you want to check the discount spiff records in the report.
Figure 11
- Select and move the discounts from the left side (Results) to the Selected List.
- After selecting the discount(s), click on "Apply," and then you can generate the report and check the desired discount spiff data by selected cashiers.
3.2 Filter By Employee
- Select the specific employee to get the discount spiff data in the report for that.
- By clicking the "Filter by Employee" option, you can select the specific employee(s) for whom you want to check the discount spiff records in the report.
Figure 13
- You can tick the checkbox of the employee(s) from the left side and move to the right side under the "Selected List" to get the discount spiff data.
Figure 14
- After selecting the employee(s), generate the report and check the desired discount spiff data.
3.3 Filter by Location
- You can filter the "Discount Spiff" data in the report by selecting a specific location or location group. From the top-right corner, there's a Filter button to select the particular location(s)/location group(s).
Figure 15
By clicking that button, the "Manage Filters" button will pop up to select the location/location group to filter the House Account Balance data in the report accordingly.
1. Select the store (location) records and/or location group records from the list.2. If you have already saved the filter for the specific location/location group, you can select it by clicking the "Manage Filters" button.Figure 16
3. Store records/location group records can be seen on the left side. Tick the checkbox for the record and move it to the right side under Selected List.4. Clear selection if you want to remove all the records under the Selected List. You can also remove a single record from the list.5. Once the records are selected, click the "Apply" button and generate the report, or click the "Save Filters" button to save for future use.
After generating the report, the discount spiff data can be seen as per the selection (filter location/location group).
Figure 17
3.4 Date Range
You can filter your sales data in the report by selecting the date range as well as specific times.
- Date Range
By clicking the edit box, you will be taken to a tiny calendar where you can select a specific date range. You can also manually enter the date in mm/dd/yyyy format.
- Presets
Presets label is provided to select the specific duration/interval to generate the category sales data with that.
Figure 18
If you want the sales data in the report for a specific time duration (until morning/evening), you can select the particular time (hours and minutes) from the date selection.

In this way, you can check the discount spiff that was triggered during the sales transaction by filtering the report type as well as the filter option to get the data in the report.
Related Articles
Discount Spiff Report - Store Employee
Discount Spiff Report Overview A "Discount Spiff Report" in the FTx Cloud POS system offers detailed tracking of sales made during spiff promotions, where specific items are sold at a discount for the customer, accompanied by a bonus or commission ...Uplift Sales Report - Store Employee
Uplift Sales Report Overview The "Uplift Sales Report" in FTx Cloud POS provides insights into employee performance related to spiff commissions. Spiff campaigns are configured through "Commissions," where selected items are tied to commission ...Discount Details Report
Discount Details Report Overview The "Discount Details Report" offers a comprehensive breakdown of all discounts applied within the system. It includes essential information such as UPC, Pricebook, Old Price (before discount), and New Price (after ...Manual Discount Report
Manual Discount Report Overview The "Manual Discount Report" shows details about manually given discounts. During checkout, you can provide a manual discount to the customer. While a system discount may apply if relevant, a cashier can issue a manual ...Uplift Sales Report
Uplift Sales Report Overview The "Uplift Sales Report" will display the list of employees who won or lost a spiff commission. The spiff is set up from the Commission Campaign (Pricebook -> Commissions) and the employee will earn the commission ...