Discounts
Discounts Overview
System discounts are considered a method of discounting the retail price and/or the cost of a product(s) automatically by following a set of rules that must be met during a transaction. Discounts are diverse in how they can be configured, such as having day/time/store/quantity limits, different taxation rules, and house account rules.
The FTx system will automatically handle these discounts and give detailed reports on all different values.
This article includes discount creation, editing, deletion, and managing a discount in Control Center.
Reaching "Discounts"
To reach "Discounts":
- Log into Control Center
- Choose Point of Sale
- Choose Pricebook
- Choose Discounts/Buydowns
- Choose Discounts
Figure 1
Understanding "Discounts" Layout
Please see the image below labeled Figure 2 for a description of the buttons and fields that appear on the screen.
Figure 2
1. Add New: This button will bring up the New Discount Creation Form allowing you to start creating your new Discount.
2. Edit Discount: This button will open the Edit Discount Form for an existing discount.
3. View Notes: This displays the created notes about any change in discount with a timestamp, note, and user who made the change.
4. Copy Discount: This button will help you copy the selected discount.
5. Delete: This button lets you permanently delete the discount record from Control Center.
6. Mass Update: This button will update a list of discounts that have already been created in a go.
7. Manage Discount Groups: This button will help you manage (add, edit, and delete) discount groups.
8. Manage Discount Sets: This button will help you manage (add, edit, and delete) discount sets.
1. Adding a New Discount
Follow the steps mentioned below to add a new discount:
- Click on the “Add New” button highlighted in Figure 2 above to create a new discount.
- The form highlighted in Figure 3 will appear on your screen.
Figure 3
1. Tabs
1.1 Details Tab:
2. Fields
2.1. Name: Give a unique name to the newly created system discount that will be visible on the order receipt.2.2. Scan Data Name: The entered name is defined for the discount Scan Data Report.2.3. Discount Group: This field allows you to group the created discount with the selected group from the drop-down discount group.2.4. Discount Set: By default, it is NULL/empty. Any system discount can be added to a discount set, but only one discount per set can activate, regardless of the toggles, such as stackable.2.5. Online Title: It allows you to add the title that they want to display as a Discount Title other than the Name of the discount (Max. 75 characters allowed).2.6. Online Description: This text field allows you to add a description of how the Discount would be applicable.(Max. 500 characters allowed), i.e., a kind of instruction/explanation that the customer can easily understand.2.7 Type: This button helps you define the type of discount from the list of options. See Figure 4.Figure 42.7.1. Dollar Off Each: When the quantity is met, this discount type gives a Dollar Amount Off on each item. The quantity option represents the number of items required for the discount to apply. The amount option will be the value to discount from the items.Figure 4.12.7.2. Percentage Off Each: This discount gives a percentage off on each item. The quantity option represents the number of items required for the discount to apply. The amount option will determine the value to discount from the items based on the percentage of their retail price.If the Or More toggle is turned ON, it means the discount will trigger if the customer buys an item for a set quantity or more. For example, if the value for QTY field is 10 and the Or More toggle is turned ON, when the customer buys 10 or more items on which a discount is applied, they will get a set Percentage Off on each item.Figure 4.22.7.3. Buy X Get Y Free: Using this discount option, you can set up a Buy X get Y Free deal. The buy option allows you to choose the quantity that is required to trigger this deal, and the quantity option is the amount you will give free once we hit the trigger amount.Figure 4.32.7.4. X items for Y Dollars: With this discount type, you can set up an X Items for Y Dollars deal using this option. The buy option allows you to choose the quantity that is required to trigger this deal, and the for option is the amount we will mark the products (together). Example: 2 Items for $3.Figure 4.42.7.5: Buy X Get Y% Off: This discount type sets up a Buy X Get Y% Off deal. This allows you to choose the quantity of items that is required to trigger this deal (X) and the percent off (%) from the discounted items.Figure 4.52.7.6: Buy X get Y for Z Dollars: This discount option allows you to set up a buy X get Y for Z Dollars discount type. The Buy X option allows you to choose the quantity required to buy. The Get Y option is the number of items being given the total price of Z Dollars.Figure 4.62.7.7. Spend X Dollars on Y Products & Get Z Products for Free: This discount type The Spend X Dollars and the Y Products options allow you to set the amount and number of products that are required to trigger this deal. Z Products is the list of items you will get free.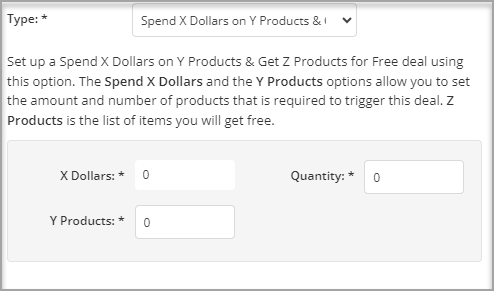 Figure 4.72.7.8. Spend X Dollars and Buy Y Products & Get Z Dollars Off Each: This discount type allows the set up for Spend X Dollars (on Trigger Items) and Buy Y Products (Discounted Items) & Get Z Dollars Off each (Discounted Items) using this option. Spend X Dollars on trigger items and Y Products as the number of discount products that are required to trigger this deal. With this discount, Z Dollars Off Each will be taken off per discounted product.
Figure 4.8
2.7.9. Spend X Dollars (on Trigger Items) and Buy Y Products (Discounted Items) & Get Z% Off Each: This discount lets you set up a Spend X Dollars (on Trigger Items) and Buy Y Products (Discounted Items) & Get Z% Off each (Discounted Items) using this option. Spend X Dollars on trigger items and Y Products as the number of discount products that are required to trigger this deal. Z% Off Each will be taken off each discounted product.

If the Or More toggle is turned ON, it means the discount would trigger if a customer spent the set amount of dollars or more. For example, if the value for X dollars is 100 and the Or More toggle is turned ON, so when the customer spends $100 and Or More on discounted products, they will get a set percentage off on each discounted item bought.
Figure 4.9
3. Manage Assignment:
See Figure 3 above.
- Manage Assignment: This part is also called location assignment. You can assign or remove location(s) or location group(s) from the Manage Location Assignment section.
- When you assign location(s) or location group(s) to a discount, the users of those location(s) or location group(s) will be able to see the added discount in their system.
- The system assigns all location(s) and location group(s) to a discount. You can assign only the required location(s) or location group(s) to a discount group if needed.
- Follow the steps mentioned below to assign a location(s) or location group(s) to a discount group:
- Click "By Locations" or "By Location Groups" from the Select Locations drop-down as per your requirements.
Figure 5
- Click on "Manage." Figure 5.1 will appear.
- Use this Search box to search for a specific location.
- Use this drop-down to view the locations that have a specific pricebook zone.
- Use this drop-down to view the locations based on three parameters: All Locations, Only Active, and Only Deleted.
- The Results section shows the list of locations. By default, it shows all locations. If you have made specific selections in 1, 2, or 3, it will show the location list accordingly.
- Select the locations you need to assign to the discount.
- Click the green Arrow button to move the selected locations to the Selected List.
See Figure 5.1:
- If you want to remove the whole selection, click the "Clear Selection" button. You can remove any record from the list by clicking the Remove (x) icon.
- Click "Apply" to apply the selection.
- Delete Single Store Location: This button will help clear the location adjacent to the "Delete" button, and the discount will no longer be applied to that location.
4. Discount Filters:
See Figure 3
This part allows you to add discount filters with respect to trigger option.
Figure 61: Add Filter Type: This filter dropdown allows you to choose the method of what items are in the discount, either by choosing specific items (that are assigned manually) or by a department/tree categorization of item(s). See Figure 6.1.2: Clear All: This button will clear all the filters listed below in the list below.3: Manage Filter: This button will help you manage the filters for items to be selected under the discounted item filter.
Figure 6.1
Manage Filters (Fields and Buttons)
- Results: This is a list of items displayed that can be selected for the discount that is being created.
- Move Next Button: This button lets you move ahead with the selection of the items.
- Selected List: This side of the form displays a list of selected items.
- Clear Selection: This button helps you clear the complete selection of the items.
- Delete Single Selection: This button is for deleting a single item from the selection.
- Various Buttons: With these buttons, you can manage the data filled in the Manage Filter Form.
- Change All Discount Multiplier Values: This button helps you change all values for discount multipliers for all the selected items in one go.
With respect to the Discount Type, the Discount Multiplier multiplies the discount value when the discounted items are purchased.
Figure 6.2
- You can change the discount multiplier value as per the requirements.
- Then, click on the "Apply" button to apply to changes made; to cancel, click "Cancel."
- Apply: This button will apply the changes made in the main Manage Filter Form, as highlighted in Figure I.
- Close: This button will help you close the form without saving the form.
7. Remove Single Product: This button will let you delete a single item selected once filtered.
4.1. Trigger Options:
(See Figure 2).
Figure 74.1: Trigger Quantity: While creating a discount, you can enter a certain quantity of items in this textbox that will trigger a discount. By default, it will be selected as None. The discount trigger depends on the below-mentioned options.
- Trigger List: Choosing this option will only activate the discount if it is set for a selected list of items.
Figure 7.11. Trigger Quantity: This button sets the trigger quantity to activate the discount for the trigger list of items.2. Manage: This button will help manage and select the items that are to be added under the Trigger Items List.
- Coupon: Choosing this option will only activate the discount for any discount coupon.
Figure 7.21. Add: This button will add a new row for coupons for different stores.
- Type: This field describes the discount type, i.e., online, store, or both.
- Coupon Code: The coupon code is generated by the auto-generate button.
- Description: The description serves to explain the specifics of the coupon discount type, e.g., 10% off.
2. Auto-Generate: This button will auto-generate the coupon code.3. Download: This button will let you download the coupon in QR or barcode format. But for that, you will have to save the changes first.Figure 7.2.1
- For this, click on the "Save" button featured on the top-right corner of the Discount form.
- Once done, click on the "Download" button to download the coupon in QR code or Bar Code form.
Figure 7.2.24. Delete: This button will delete the created coupon.
- Trigger List and Coupon: With this option, the condition for triggering the discount will be set for both options, i.e., there has to be a triggering list of items and a discount coupon for the discount coupon to trigger.
Figure 7.3
- Trigger List or Coupon: With this option, the condition for triggering the discount will set either of both options, i.e., there has to be a triggering list of items or a discount coupon for the discount coupon to trigger.
Figure 7.4
5. Save & Close Buttons:
These buttons help you save the changes made in the Discount Form or even close the form once the changes are saved.
1.2. Discount Schedules Tab
Follow the steps mentioned below to schedule a discount:
- Click the “Schedules” tab highlighted in Figure 3 above to schedule a discount.
- The form highlighted in Figure 8 will appear on your screen.
Figure 8
Fields:
- Start Date: This field lets you choose a start date from the attached calendar for the discount date for it to be active in the future.
- End Date: This field helps you select an end date from the drop-down calendar attached, after which the discount becomes inactive.
- Use Schedule: If this toggle is set to YES, this activates the discount for selected days and selected time ranges. Generally, this feature is used to drive more business during times when business is slower than usual to drive in more customers.
Figure 9
1.3. Options Tab
- Click the “Options” tab highlighted in Figure 3 above to set different attributes for the discount.
- The form highlighted in Figure 10 will appear on your screen.
Figure 10
- Receipt Text: This would be the text that will be displayed on the receipt after applying the discount.
- Priority: This field is related to the Stackable toggle explained below.
- Limit Per Transaction: The value in this field decides how many times the discount can be allowed per transaction. If this field is 0, it implies unlimited. In other cases, if the value is 1 or 2, then only 1 and 2 discount attempts are allowed per transaction.
- Stackable: If this toggle is set to YES, it implies that multiple discounts can be allowed on the same product in a single transaction. If this toggle is set to NO, then the system is going to use the PRIORITY. Whatever is the higher priority, the higher being 1, this will be the discount that will be applied.
- For example: Let's say you have two discounts of 5 cents and 10 cents. Under both of these discounts, you have the same product. If the 10-cent discount has PRIORITY Level 1 and the 5-cent discount has PRIORITY Level 2, on both, the Stackable toggle is set to NO. Whenever you ring that product up, which is part of both discounts, the 10-cent discount will be applied because the 10-cent discount is a higher priority. If the Stackable toggle is set to YES, then both discounts will be applied.
- Inherit Tax Settings from Group: This toggle, if set to YES, means that tax settings will be inherited from the group.
For this, if in the POS setting, Default Discounts to Inherit Settings from Group is set to YES, then you cannot customize tax settings for any discount. By default, it will inherit the properties until set otherwise in Settings & Panels. See Figure 11.Figure 11
If you wish to customize the tax settings for discounts, then set this toggle to NO and manage settings for Reimbursable Discounts and Apply Tax Before Discount.
- Reimbursable Discount: If the discount is offered by the manufacturer, then it is reimbursable to the store by the manufacturer. Turn this toggle ON to apply this setting to this discount.
- Apply Tax Before Discount: Depending on the location, discounts may or may not be taxed; it is generally dependent on the Tax code at that location. If this toggle is set to NO in a scenario wherein you have purchased a one-dollar item with a 10-cent discount, the remaining 90 cents will be taxed. If this is set to YES, then you are taxed before the discount is applied.
- Apply to Cost: If this is set to YES, then in addition to reducing the retail price, it will also reduce the cost, and if it is toggled to YES, it functions as a buydown, i.e., the discount will be applied to both the cost and the price.
- Inventory Clearance: This option is by default set to NO. If this is set to YES, then it will look into the items assigned to this discount and essentially clear them out. As soon as you sell those products out, this will archive (disable) the discount, as well as set the item to Inactive.
- In Scan Data Report: If this is set to YES, The sales details will appear in the Scan Data Report being sent to RJR or Altria If set to NO, sales details will not appear in the Scan Data Report.
- Discount Commission: If this is set to YES, the Spiff Amount field gets visible. And now this transaction will act as an uplift sale. It will offer a discount as per the discount type selected and will also offer the Spiff Amount commission to the cashier.
- Spiff Amount: This field will only be visible if the Discount Commission field is set to YES. When set to YES, the dollar amount set as spiff will be given out to the cashier when sales are promoted and this discount is used.
- Commission Trigger Type: The commission has 3 trigger types:
Figure 12
- On Each Discount Item (Once): When the commission trigger type is set to On Each Discount Item (Once), Discount Type is selected as Buy X (i.e., 4) and Get Y (i.e., 2) Free. When the discount is triggered during a transaction in a situation where the customer bought the same set of items with a discount, for example, the customer bought 10 items of the same kind, and the discount gets triggered twice. So, for Buy X (i.e., 4) and Get Y (i.e., 2) Free discount type for the same set of items, the cashier will get the set commission only for one discount type trigger.
- However, in other scenarios, if different sets of items are bought with different discount types, the cashier would get the set commission for each trigger.
- On Each Discount Items (Repeated): If the commission trigger type is set to On Each Discount Item (Repeated), then the cashier would get the set commission on each discounted item that they sell.
- On Each Overall Discount Fired: If "Each Overall Discount Fired," then the cashier would get the set commission for the overall discounts applied.
- Max Qty to Spiff: This field is to set the maximum number of spiffs that is allowed to the cashier in a single transaction, triggering different discounts.
- Scan Data Classification: The scan data can be classified into the categories mentioned in the drop-down menu. See Figure 13 below. You can pick it as Automatic/None, MultiPack, Account Funded, or Manufacturer Funded. This information is dictated by RJR or Altria.
Figure 13
- Scan Data Code Override: This field lets you override the scan data code for the scan data report.
- Require Loyalty: If this is set to NO, the discount doesn't require loyalty. Any customer is eligible for a discount. If this is set to YES, then it means a registered loyalty customer has to be tied to the transaction for a discount. Setting it to YES also requires actions on the below-mentioned options:
- Registered in Past X Days: This field gets activated when the Require Loyalty toggle is set to YES. With this field, the discount will require loyalty, but it also has to satisfy the Registered in Past X Days condition. Fill in the value of days for the registered customer.
- Customer Daily Limit*: If the limit is set to 1, then only one discount can be taken advantage of by the customer in a 24-hour period.
- Customer Weekly Limit*: If the limit is set to 1, then only one discount can be taken advantage of by a customer in a 7-day period.
- Customer Total Limit*: This would be the total number of discounts that can be taken advantage of by a customer during the time period of the discount, ranging from the start date to the end date.
- Require House Level: When this toggle is set to YES, the discount will require the house account level information. It also activates House Account Level to select the house level from.
- House Account Level: Choose the house account level from the attached drop-down list.
There are different levels that can be created in the House Account Discount Level. Let's say you select discount Level 2, which is set with a 10.00 percent discount. If the discount is selected for Discount Level 2 for a particular house account, then the house account customer can purchase the product with a 10% discount on the price.
Figure 14
- Store Limit: This limit is the total limit of the discount that a store can render during the time period of the discount, ranging from the start date to the end date.
- Overall Limit: This limit is the total number of discounts that are divided or offered to all the stores.
- Enable Loyalty Club: If this toggle is set to YES, the discounts will only be applicable to loyalty customers.
- Club Trigger Qty: If set to YES, the discount will only activate when the set item trigger quantity is bought.
Figure 15
- Manage: This button lets you select and add a loyalty customer to the discount.
Figure 15.1
- Once the list is applied, it appears as displayed in Figure 15.2.
Figure 15.2
- You can manage discounts for loyalty customers from here.
- Accounting Code: This is your general ledger code for account for discount. See Figure 10 above.
- Export Description: The export information is pulled from the accounting. See Figure 10 above.
- Disable Sending Alert: If this is set to YES, it will not send the discount expiration notification to the store. See Figure 10 above.
2. Editing a Discount
Follow the steps mentioned below to edit a discount:
- Click on the Edit button highlighted in Figure 2 above to edit a discount.
- The form highlighted in Figure 16 will appear on your screen.
Figure 16
The fields are explained above under the Adding Discount section.
1. Copy Discounts: This button helps you copy the discount that you are editing. (Explained below under heading #4.)
2. Printing Discounts: This button lets you print the discount in PDF, CSV, and Excel form.
Figure 16.1
- Include Header: If this toggle is set to YES, then only you will be able to see the below-mentioned two fields. Setting this to YES also means it will include the Discount Name as the header of the file on every page.
- Repeat Headers On Every Page: Include Header Must be set to YES to allow this to work. If set to YES, The Header information will display on each page printed.
- Print Title On Every Page: Include Header Must be set to YES to allow this to work. IF set to YES, the Title will print on each page.
- Figure 16.2 displays a sample discount in PDF form with all three above-mentioned toggles set to True.
Figure 16.2
3. Add/View Notes:
Add Notes
This feature lets you add a quick note for each change to an existing discount.
Follow the steps:
- Click on the Add Notes button highlighted in Figure 17 below to add discount notes.
Figure 17
- Write the note explaining it under 255 characters.
- Click "Add" to save the note.
View Notes
This option lets you view the created notes history about any change in the previously created discount with a timestamp, note, and user who made the change.
Follow the steps:
- Click on the View Notes button highlighted in Figure 2 above as well as in Figure 17.1 below for reference to view discount notes.
Figure 17.1
- The form highlighted in Figure 17.2 will appear on your screen.
Figure 17.2
4. Copying a Discount
- Click on the “Copy Discount” button (see Figure 2) to copy the attributes of the current discount to another.
- On clicking, a form shown in Figure 18 appears. Fill in the name of the copied discount in the textbox.
Figure 18
Figure 18.1
- Click on "OK," and the discount will be copied.
5. Deleting a Discount
Follow the steps mentioned below to delete a discount record:
- Click on the “Delete” button highlighted in Figure 2 above to delete a discount.
- The dialog box highlighted in Figure 19 will appear on your screen.
- Click "Yes, Delete" to continue the process of deleting the discount record.
- Click “Cancel” to close the pop-up and skip the deletion process.
6. Mass Updates
Follow the steps mentioned below to update the selected discounts or discount group at once.
- Click on the "Mass Update" button highlighted in Figure 2 above to update discounts on a mass level.
- The dialog box highlighted in Figure 20 will appear on your screen.
Figure 20
- Check the discount name you wish to edit/update.
- To select the "n" number of discounts, hold the Ctrl button and click to select multiple discounts.
Mass Update's Fields and Buttons:
1. List: This is a list of all the discounts created in the system.
2. Attributes: These are the critical attributes of the system discount that can be managed according to needs.
2.1. Alter Date Ranges: You can alter the date ranges only when the associated value with the toggle trigger is set to ON. See Figure 20.1. This allows you to change the date range in terms of days, weeks, and months.
Figure 20.1
There are three methods by which you can alter the date range of the discount:
1) Change Date Range: You can change the date range of the created discount with this Alter Date Range option. This option offers you the liberty to change the start or end date of the discount duration.2) Extend Date Range: This option lets you extend the date of discount by X number of days, weeks, and even months.3) Change End Date: This is another option that will help you alter the date range by changing only the end date of the discount period.
2.2: Change Stackable To: If the preceding toggle is set to ON, then you are allowed to change the value of "Change Stackable To" True or False as needed in the selected discounts.
2.3: Change Apply Tax To: If the preceding toggle is set to ON, then you are allowed to change the value of "Change Apply Tax to" True or False in the selected discounts.
Figure 20.2
2.4: Change Require Loyalty To: If the preceding toggle is set to ON, then you are allowed to change the value of "Change Require Loyalty To" True or False in the selected discounts.
2.5: Change in Scan Data Report To: If the preceding toggle is set to ON, then you are allowed to change the value of "Change in Scan Data Report To" True or False in the selected discounts.
2.6: Delete Discount: This toggle, if set to ON, will allow you to delete the selected discounts.
2.7 Apply Location Changes: Whenever the related flag is set to ON, then you will have the ability to replace the existing locations for which the discount is applied to the selected location(s) from the "Manage" button.
3. Manage: This button will help you replace the existing location(s) with a new location(s) for the selected discounts.
4.1. Cancel: This button allows you cancel all the changes made in the dialog box and takes you back to the previous form.
4.2. Update Selected Discounts: This button will help save and update all the selected discounts to new attributes.
7. Manage Discount Groups
Discounts with similar attributes are grouped as one.
Follow the steps mentioned below to manage the discount group:
- Click on the "Manage Discount Groups" button highlighted in Figure 2 above to manage the discount groups.
- The dialog box highlighted in Figure 21 will appear on your screen.
Figure 21Fields and Buttons:1. Discount Group List: This list presents you with a list of discount groups that have already been created.2.1 Assign Discounts: This button helps you assign discounts from the list of created discounts to the discount groups.
Figure 21.1
2.2 Edit: This button will let you edit/update the discount group name.
2.3 Delete: This button will help you delete the selected discount group.
3.1 Add Discount Group: This button will bring up a popup allowing you to create a new Group.Figure 21.2.Figure 21.2
- Name: This field is for setting up a name for the discount group.
- Apply Tax Before Discount: Depending on the location, discounts may or may not be taxed; it is generally dependent on the Tax Code of that area. If this toggle is set to NO in a scenario wherein you have purchased a one-dollar item with a 10-cent discount, the remaining 90 cents will be taxed. If this is set to YES, then you are taxed before the discount is applied.
- Accounting Code: This field requires the general ledger accounting code for the discount group.
- Reimbursable Discount: If the discount is offered by the manufacturer, then it is reimbursable to the store by the manufacturer. Turn this toggle ON to apply this setting to this discount group.
3.2: Close: See Figure 21 above, This button will discard all the changes made in the dialog box and close it.
8. Manage Discount Sets
Only the highest priority discount in a discount set will be applied in a transaction on the POS.
Follow the steps mentioned below to manage the discount set:
- Click on the "Manage Discount Sets" button highlighted in Figure 2 above to manage the discount set.
- The dialog box highlighted in Figure 22 will appear on your screen.
Figure 22
1. Add Discount Sets: This button is for adding a new discount set by giving it a name.
2. Discount Sets Name List: This list presents you with a list of existing discount sets that have already been created.
3. Assign Discounts: This button helps you assign discounts from the list of created discounts to the discount sets. See Figure 22.
4. Edit Discount Sets: This button will help you edit/update the discount group name.
Figure 22.1
5. Delete Discount Sets: This button allows you to delete the selected discount set.
Related Articles
System Discounts Report
System Discounts Report Overview This report is multiple reports in one and gives different formats, groupings, details, and summaries of system discounts applied in transactions. Different types of filters can also be configured, depending on your ...Flash Report
Flash Report Reports -> Sales Reports -> "Flash Report" The "Flash Report" will allow you to check the following configurations: - Buydowns - Commissions - System Discounts - Loyalty Campaigns You can check the configuration records that are already ...Product List Report
Product List Report Overview The "Product List Report" lists products based on a variety of filters with their applicable details and pricing from specific pricebook zones. 1. Reaching the "Product List Report Report" To reach the "Product List ...Receipt Settings
Receipt Settings Overview POS -> POS Device Global Settings -> "Receipt Settings" "Receipt Settings" is related to printing the details in the customer's receipt after the sales transaction is successfully completed. When the sales transaction is ...Accounting Export Utility
Accounting Export Utility Overview Accounting Export Utility puts all of your sales information directly into the hands of your accountants by exporting data to your accounting system using different export formats, e.g., Standard CSV, Excel, ...