Enabling Tips Using FTx Cloud POS for a Bar Location
Enabling Tips Using FTx Cloud POS for a Bar Location
The method by which one may utilize the Tip functionality when using FTx Cloud POS is as follows:
Section 1 - Initial Configuration
The very first thing you want to do is create an Open Department so that the tips in question can be tracked accordingly.
See Figure 1.0. You also want to create a Payout Account for the tips, which can be done by navigating to Point Of Sale > Maintenance> Tenders and then clicking on the "Pay In/Out Accounts" tab at the top of the page.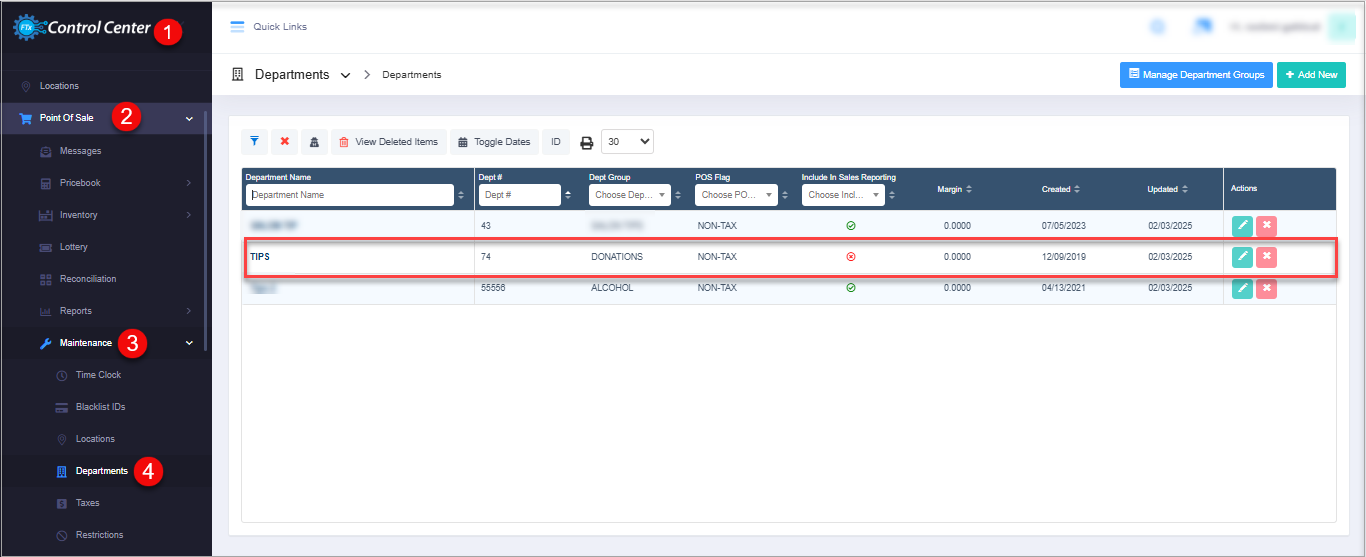
See Figure 1.0. You also want to create a Payout Account for the tips, which can be done by navigating to Point Of Sale > Maintenance> Tenders and then clicking on the "Pay In/Out Accounts" tab at the top of the page.
Figure 1.0
See Figure 1.1. Once you've created the Payout Account and assigned it an appropriate mandatory Account Code. You should now be clear to begin adding the required POS panel buttons.
Figure 1.1
To get to the panels, navigate to Point Of Sale >> Maintenance >> Settings & Panels and choose "POS Panels" at the top of the page. Select the panel set you wish to work on. See Figure 1.2.

Figure 1.2
Figure 1.2
Clicking the Edit/Modify button on POS Panel list page will open up the Edit POS Panel screen.
Figure 1.3

To add a new button, click the (+) icon in the figure below.
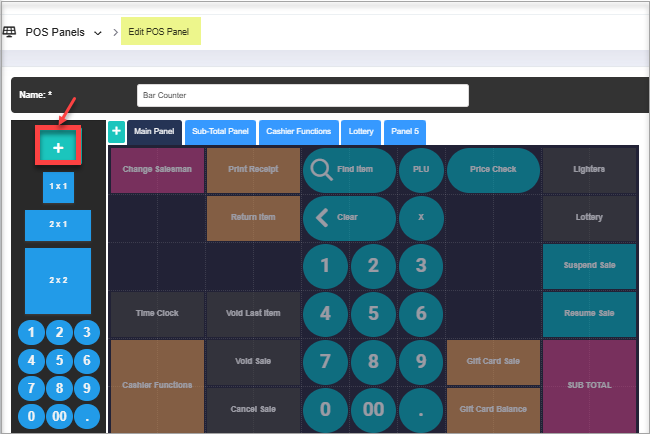
Figure 1.4
Click the button, then select "Choose Action" to open the Button Settings screen.
Click the button, then select "Choose Action" to open the Button Settings screen.
Figure 1.5
The first two buttons you will want to add will be a "Suspend Sale" and "Resume Sale" button. See Figure 1.6 below.
This will allow you to continually suspend and resume a sale, which then allows you to add sale items to the sale as many times as you wish/the customer wishes. For example, one could use this in order to open up a bar tab for a customer.
This will allow you to continually suspend and resume a sale, which then allows you to add sale items to the sale as many times as you wish/the customer wishes. For example, one could use this in order to open up a bar tab for a customer.
Figure 1.6
1. Suspend Sales Button Settings: Choose the button type as Suspend Sales from the drop-down list.
Figure 1.7
2. Resume Sales Button Settings: Choose the button type as Resume Sales from the drop-down list.
Figure 1.8
Next, you will want to add a "Print Sale" button. See Figure 1.9. This button will allow you to print out a receipt detailing all line items associated with the customer's open tab/consecutive purchases, which also has two additional fields: Tip and Total fields, respectively.
The customer will now be able to, utilizing a pen, fill out their desired tip amount as well as the resultant total with the tip amount.
The customer will now be able to, utilizing a pen, fill out their desired tip amount as well as the resultant total with the tip amount.
Figure 1.9
3. Print Sale Button Settings: Choose the button type as Print Sales from the drop-down list.
Figure 1.10
The next step is to create a Tip button. This will effectively be an "Open Department" button, which should be assigned to the TIP Department we created earlier. To use this button, you will first want to input the tip amount specified by the customer using the numerical pin pad on the display.
Once you've entered the desired tip amount, you may now press the "TIP" button. This, in turn, will allow you to add the specified tip amount as a separate line item on the final customer receipt to be tendered out as cash, credit, or debit (as per usual).
Once you've entered the desired tip amount, you may now press the "TIP" button. This, in turn, will allow you to add the specified tip amount as a separate line item on the final customer receipt to be tendered out as cash, credit, or debit (as per usual).
Figure 1.9
4. Tip Button Settings: Choose the button type as Open Department from the drop-down list.
Figure 1.10
Finally, once you've reached the end of the given shift and/or day, this is where you will want to create and utilize a Payout Tip button. See Figure 1.11. The "PAYOUT TIP" button will effectively be a payout button that will be assigned the "TIP PAYOUT" payout account we created earlier. This will, in turn, allow you to pay out tips to your employee(s) as needed.
5. Payout Tip-Manager Only Button Settings: Select Button Type as Pay Out, and under Account, choose the Payout Account that corresponds to its account code created in the Pay in/out Account.
Figure 1.12
This concludes the entire setup process for using tips with PAX credit card terminals and/or any credit card terminals that do not inherently support tips.
Related Articles
Whitelist Requirement for FTXPay
Whitelist Requirements for FTXPay When using FTXPay, there are some settings that need to be addressed on the network side of the equation. Below are the ports that need to be open as well as the websites that need to be added to the whitelist if you ...