Incomplete Broad Count Report
Incomplete Broad Count Report Overview
An "Incomplete Broad Count Report" shows up to 7 days of results for which stores have not submitted and/or started their broad count for the given days in the date period. The report can be filtered with different filters to obtain different resultant reports per requirement.
1. Reaching the "Incomplete Broad Count Report"
To reach the "Incomplete Broad Count Report," follow the steps below:
- Step 1: Log into Control Center
- Step 2: Choose Point of Sale
- Step 3: Choose Reports
- Step 4: Choose Inventory Reports
- Step 5: Choose Incomplete Broad Count Report
Figure 1.1
2. Understanding the "Incomplete Broad Count Report" Layout
You will see the "Report Data is Empty" message initially. You need to select the date range to check the Incomplete Broad Count Report. See Figure 2.1.
Figure 2.1
3. Generating the "Incomplete Broad Count Report"
- When you navigate to the page, you will see the options pre-selected by default. You can generate the Incomplete Broad Count Report for the selected date range.
- For this, you will have to select the location, status, and number of days.
Figure 3.1
The report will display the definition name with the associated date for the selected location.
3.1 Filter Items:
Filter Items allows you to display the report with two options:
- Show All: This option displays all the records of the incomplete broad count in the selected date range for the selected location, order, and status.
- Filter by Broad Count Definition: This option allows you to choose a specific broad count definition in the selected date range.
Figure 3.2
- Manage Filter screen: Use this screen to custom select a broad count definition and display the definition-specific Incomplete Broad Count Report.
- Manage Filter screen: Use this screen to custom select a broad count definition and display the definition-specific Incomplete Broad Count Report.
Figure 3.3
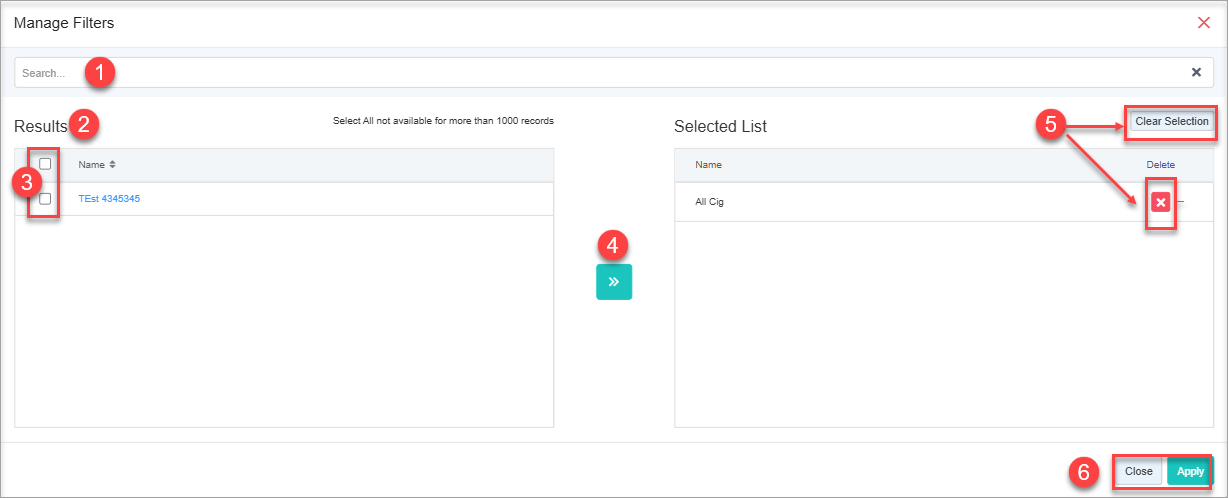
Manage Filter Screen Information:
1. Search: Use this search bar for a specific result.
2. Results: Here, you see the relevant list of cashiers to generate custom-cashier-based data results. You can search for a specific cashier in the Search bar.
3. Checkboxes: Select the required products by checking the appropriate checkboxes.
4. Arrow: Click the green Arrow button to move the selected records to the Selected List area.
5. Clear Selection: Click the "Clear Selection" button to remove the whole selection. To remove any record from the list, click the Remove (X) icon.
6. Apply/Close: Apply or close the custom filter.
- Apply: Click the "Apply" button for the selected parameters. The system will navigate you to the Incomplete Broad Count Report home screen. Click "Generate Report." The system will generate reports based on your selection.
- Close: Use this button to exit the Manage Filters screen.
Figure 3.4
4. Group By:
Let's see how to check the Incomplete Broad Count Report by grouping it by location. You will see a "Group By Location" drop-down from which you can select either "Location" for grouping the incomplete broad count data in the report.
Figure 4.0
- None: By default, "None" will be selected, which implies the report data will be displayed without any grouping. See Figure 4.0.
- Location: If you select "Location," the data in the Incomplete Broad Count Report will be displayed location-wise (stores) for each store. See Figure 4.1.
Figure 4.1
5. Status:
This field has the attached drop-down menu for "All" and "In Progress" status types. Select the option for which you wish to display the report.
Figure 5.1
6. Days
This field has an attached drop-down calendar that shows up to 7 days of results. Select the number of days to display the report for the given days in the date period.
Figure 6.0
7. Scheduling a Report
FTx Cloud POS supports report automation. You can configure a report and schedule it. The system will send the scheduled report to the indicated email IDs at the defined frequencies (daily, weekly, bi-weekly, monthly, quarterly, etc.).
8. Printing/Exporting a Report
You can print or export any report according to your requirements. When you use the Print function, the system creates and opens the report's PDF file in a new tab. You can download the soft copy or print the paper copy according to your requirements.
9. Manage Favorites
FTx Cloud POS allows quick access to the reports you need to view frequently through "Favorite Reports." You can save a report as a favorite and manage all your favorite reports from any of the report screens using the "Manage Favorites" button.
Related Articles
Broad Count Report
Broad Count Report Overview The Broad Count is a submodule within the Inventory Count feature that enables customers to record item counts at a higher, more generalized level. This approach significantly reduces the time and effort required compared ...Broad Count Definitions
Broad Count Definitions Overview Broad counts are similar to cycle counts, which do not use existing inventory definitions but rather use Broad Count Definitions. These broad count definitions support filters based on a single department or single ...Broad Counts
Broad Counts Overview "Broad Counts" allows the users to perform the stock verification process at a very broad level, thus allowing them to save time. Broad Counts will not use existing inventory definitions but rather new Broad Count definitions. ...Cycle Count Coverage Report
Cycle Count Coverage Report Overview Reports -> Inventory Reports -> "Cycle Count Coverage" The store admin/executive manages the inventory of the store using a POS system handheld device to count the inventory periodically. At the time of counting ...Cycle Count Totals Report
Cycle Count Totals Report Overview Reports -> Inventory Reports -> "Cycle Count Totals" The store admin/executive needs to count the inventory of the store using a handheld POS device. It is the definitive way to accurately perform inventory counts ...