Invoice Summary
Invoice Summary Report Overview
The "Invoice Summary Report" shows a basic invoice summary for all invoices in the selected date range. At first glance, this report displays the total Invoice Amount, Surcharge Amount, Misc Fee, Prepaid Sales Tax, Supplier Deposit, and Total Amount. You can view further details if required. You can use various filters and sorting functionalities as per your requirements.
In this article, you will see:
- Generating the "Invoice Summary Report" for the selected date range.
- How to apply the custom filter and other filter options to filter the records in the "Invoice Summary Report."
1. Reaching the "Invoice Summary Report"
To reach the "Invoice Summary Report," follow the steps below:
- Step 1: Log into Control Center
- Step 2: Choose Point of Sale
- Step 3: Choose Reports
- Step 4: Choose Inventory Reports
- Step 5: Choose Invoice Summary
See Figure 1.1. You will see many types of inventory reports that will be useful to your retail business. By clicking the "Choose Report" drop-down menu, you will see the different types of inventory reports.
Figure 1.1
2. Understanding the "Invoice Summary Report"
Figure 2.1 shows how to select the Invoice Summary Report by clicking the "Choose Report" drop-down menu. 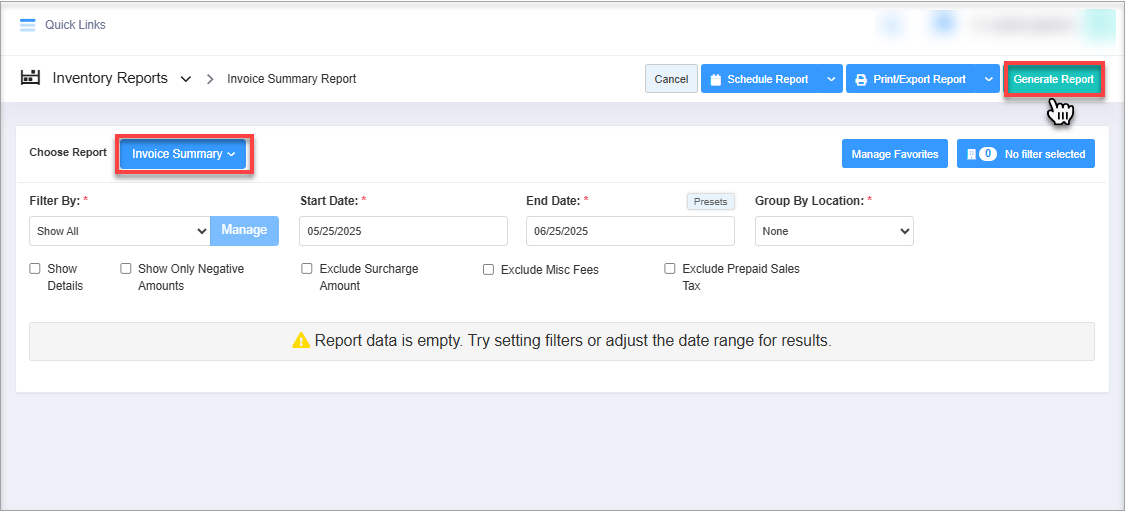 Figure 2.1
Once you click "Invoice Summary," you will be redirected to the Invoice Summary Report screen, where you can see relevant filtering and sorting options. By setting a date range and various filters, you can generate or custom-generate the report.
3. Generating the "Invoice Summary Report"
To generate the Invoice Summary Report, follow the steps below. (See Figure 2.1 above.)
- Navigate to Inventory Report and select Invoice Summary Report from the Choose Report drop-down.
Please follow the steps below to generate the Invoice Summary Report:
- Select the date range and click "Generate Report" to view the invoice report for all vendors and locations.
- You can use the filters to view the invoice summary for specific vendors. You can also use the Group By Location and Checkbox filters as per your requirements. These filters are explained in the latter part of the article.
- Click "Generate Report" whenever you change your selection in any field to view the updated report.
When you click the "Generate Report" button after selecting the date range, the system will show the summary of all invoices, as shown in the image below. You can use the filters as per your requirements, to be more specific.
Check the Show Details checkbox and click the "Generate Report" button again to view the detailed summary report, as shown in Figure 3.2.
Fields Information:
- Store: Name of the store is displayed here.
- Invoice #: This column displays the invoice number on which the ordered product(s) is listed.
- Invoice Date: This column displays the invoice date shown on the invoice.
- Applied Date: This column displays the date on which the invoice was applied to your system.
- Vendor: This column displays the name of the vendor for whom the Invoice Summary Report is for.
- Invoice Account: This is the total number of items on the invoice.
- Surcharge Amount: This column displays the surcharge amount, if there is any.
- Misc Fee: This column displays the miscellaneous fees, if any, applied to the items listed on the invoice.
- Prepaid Sales Tax: This column displays the amount of prepaid sales tax, if there is any.
- Supplier Discount: This column displays the retailer's discount from the vendor. This amount may reduce the total invoice cost but doesn't affect the item's last cost.
- Supplier Deposit: This column displays the deposit fee for that vendor's part. This amount may inflate the total invoice cost but doesn't affect the item's last cost.
- Total Amount: This field displays the total amount, including all the item prices, fees, taxes, and surcharges.
- Applied: This field helps identify whether the particular invoice is applied or not.
3.1. Filter Options:
FTx Cloud POS provides you the flexibility to view the Invoice Summary Report records as per your needs using various filter options. You can use any single filter or combination of multiple filters to configure the report per your specific requirements.
3.1.1 Custom Filters
The Custom Filter enables you to select a specific parameter (filter) to get the desired records in the Invoice Summary Report. You will find the two options in the Filter By drop-down selection:
- Show All: By default, this option will be pre-selected. It considers all parameters to generate the report. The "Manage" button is disabled for this option.
- Filter By Vendor: To customize and get the vendor-specific data, you need to select the Filter By Vendor option. Once you select it, the "Manage" button will be enabled to set up the filters.
By default, the system will select Show All. Please follow the steps below to set the custom filters.
1. Select the Filter By Vendor option in the Filter By filter, as shown in Figure 3.1.1. The "Manage" button will be enabled.
2. The Manage Filters screen will appear, as shown in Figure 3.1.2.
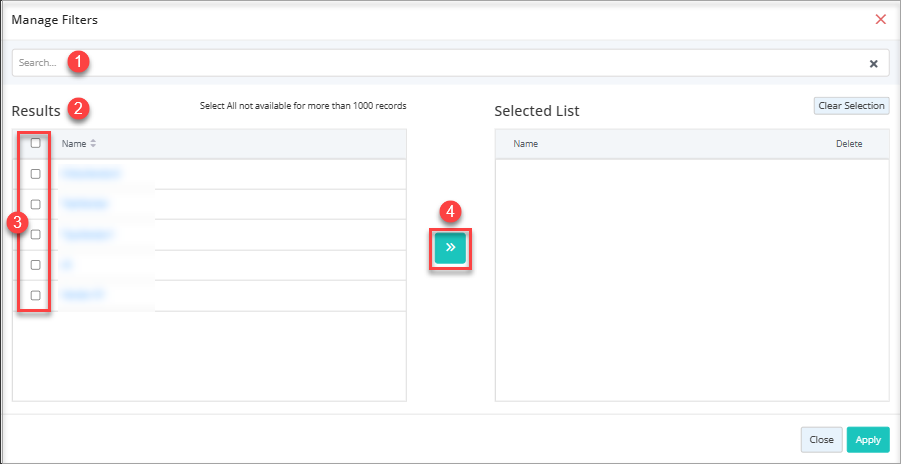 Figure 3.1.2
The Manage Filters screen shows the list of vendors.
1. You can also search any vendor record from the list by entering the text in the Search box.2. Associated vendor results will be displayed.3. Choose the vendors you wish to include in the report by selecting the corresponding checkboxes.4. Click the green Arrow button to move the selected vendor records to the selected list. The Manage Filters screen will look like the one shown in Figure 3.1.1.3.
- If you want to remove the whole selection, click the "Clear Selection" button. You can remove any record from the list by clicking the Remove (x) icon.
- Click "Apply" to apply the selection.
The system will show the Invoice Summary Report home screen with your selected vendors. Click "Generate Report" to generate the report. The system will only show the records related to the selected vendors. The selected vendors' names will be displayed in the Selected Filter Types, as shown in Figure 3.1.4.
Figure 3.1.4
You can mark the Show Details checkbox and click "Generate Report" again to view the detailed report for the selected vendors. The report will show the details as shown in Figure 3.1.5.
Figure 3.1.5
3.2 Date Range
You can select the Start Date, End Date, and particular time for both dates to be specific about the report records by following the steps below.
- Click inside the Start Date field. The drop-down calendar will appear as shown in Figure 3.1.6. Select the specific date and time. You can also manually enter the date in MM/DD/YYYY format.
- Click inside the End Date field and follow the same process.
Figure 3.1.7
- Click "Generate Report."
3.3 Presets
Use the Presets drop-down to select the specific duration/interval, i.e., Today, Yesterday, This Week, Last Week, etc., to generate the Invoice Summary Report as shown in Figure 3.3.1.
- Please click on the required timeframe and then click "Generate Report." The system will generate and show the report as per your selection.
3.4 Group By Location:
The Group By Location filter lets you view the records segregated by Locations or Location Groups. By default, the system selects "None." Click the "Group By Location" drop-down highlighted in Figure 3.4.1 to change it.
You can select either Location or Location Group from the Group By Location drop-down menu to group the invoice summary records.
1. By Locations: If you select Location, the system will display records grouped according to Locations, as shown in Figure 3.4.2.
You can mark the Show Details checkbox and click "Generate Report" to view the details. The system will show all detailed records grouped according to Location, as shown in Figure 3.4.4.
2. By Location Group: It groups data by predefined location groups, and it is useful for regional or zone-based reporting.
You can mark the Show Details checkbox and click "Generate Report" to view the detailed report. The system will show all detailed records grouped according to Locations, as shown in Figure 3.4.6.
4. Filter by Store & Location Groups
The Store and Location Group filter enables you to view the Invoice Summary report for selected stores (Locations) and Location Groups. Please follow the steps below to apply the Store & Location Group filter.
1. Click the "No Filter Selected" button in the top right, highlighted in Figure 4.1.
2. The Manage Filters screen will appear as shown in Figure 4.2.
1. You can select the saved custom filter from the Manage Filters drop-down selection (if any). The "Manage Filters" button will open the list of saved custom filters.2. You will see two tabs: "Store" and "Location Group." Select the required tab i.e., store, to see the Invoice Summary Report for the specific stores.3. The Manage Filters screen will show the relevant list for the selected tab. For example, if you have selected the Store tab, it will show the list of all stores. You can use the Search bar to search for a specific store.4. Select the store by checking the checkbox.5. Move the selected stores to the Selected List area using the Arrow button. You can see the moved records under the Selected List area.
You have an option to remove the moved Store or Location Group names before you apply or save the filter.
1. If you want to remove the whole selection, click the "Clear Selection" button. You can remove any record from the list by clicking the Remove (x) icon.2. Apply or save the custom selection.
- Click the "Apply" button. The system will redirect you to the Invoice Summary Report home screen.
The No Filter Selected button will show the number of selected Stores or Location Groups as shown in Figure 4.4. Click "Generate Report" to generate the report for the selected stores.
- If you click the "Save Filters" button, the Name screen will appear. Enter a desired friendly name and click "OK."
- The filter will be saved. When you need to use this saved filter, you can use the Manage Filters drop-down as shown in Figure 4.6.
Figure 4.6
- If you need to delete the filter, open the Manage Filters screen again and click the "Manage Filters" button.
- Click on the custom filter you wish to delete, then click "Delete."
Figure 4.7Figure 4.8
- A warning message will appear. Click "OK."
5. Checkbox Filters:
- Show Details: As its name suggests, the Invoice Summary Report shows the invoice-related information in a summarized format. The Show Details filter enables you to view the information in detail. Please refer to 3. Generating the Invoice Summary Report to learn how the Show Details filter works. See Figure 3.1 above.
- Show Only Negative Amounts: Use the "Show Only Negative Amounts" checkbox to view records with negative amounts, typically indicating item returns to the vendor. Select the checkbox and click "Generate Report" to proceed.
Figure 5.1
- You can check the Show Details checkbox and click "Generate Report" again to view the detailed report.
- Exclude Surcharge Amounts: Use the "Exclude Surcharge Amount" checkbox to remove invoices with surcharges from the report. Then click "Generate Report" to apply the filter.
Figure 5.2
- You can check the Show Details checkbox and click "Generate Report" again to view the detailed report.
Exclude Misc Fees: Use the "Exclude Misc Fees" checkbox to remove invoices with miscellaneous fees from the report. Then click "Generate Report" to apply the filter. 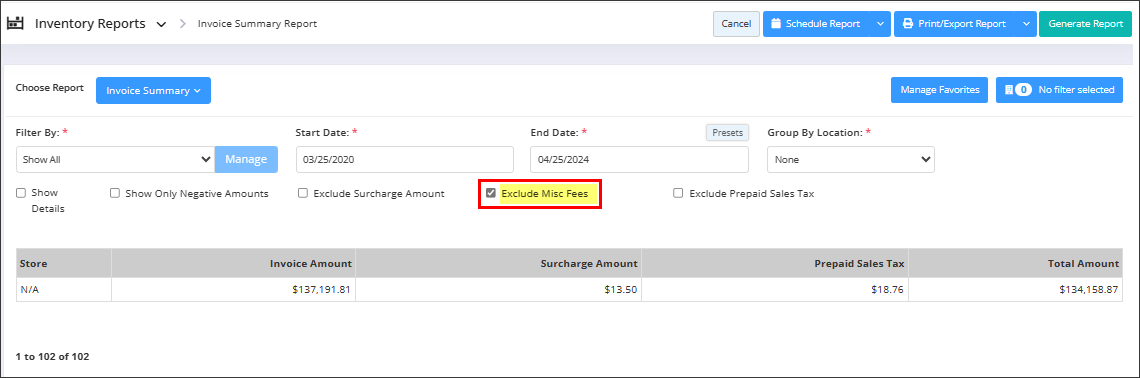 Figure 5.3
- You can check the Show Details checkbox and click "Generate Report" again to view the detailed report.
- Exclude Prepaid Sales Tax: Use the "Exclude Prepaid Sales Tax" checkbox to remove invoice records with prepaid sales tax from the report. Then click "Generate Report" to apply the filter.
Figure 5.4
- You can check the Show Details checkbox and click "Generate Report" again to view the detailed report.
6. Scheduling a Report
FTx Cloud POS supports report automation. You can configure a report and schedule it. The system will send the scheduled report to the indicated email IDs at the defined frequencies (daily, weekly, bi-weekly, monthly, quarterly, etc.
7. Printing/Exporting a Report
You can print or export any report according to your requirements. When you use the Print function, the system creates and opens the report's PDF file in a new tab. You can download the soft copy or print the paper copy according to your requirements.
8. Manage Favorites
FTx Cloud POS allows quick access to the reports you need to view frequently through "Favorite Reports." You can save a report as a favorite and manage all your favorite reports from any of the report screens using the "Manage Favorites" button.
Related Articles
Invoice Summary Report - Store Employee
Invoice Summary Report Overview The "Invoice Summary Report" gives a basic invoice summary for all invoices in the selected date range. At first glance, this report displays the total invoice amount, surcharge amount, miscellaneous fee, prepaid sales ...Invoice Export
Invoice Export Overview It is essential for a retail business to keep an eye on vendor-wise and location-wise invoices. "Invoice Export" enables you to export invoices for the combination of selected vendors and location(s) or location group(s) for ...Summary Sales Report
Summary Sales Report Overview As a sales manager or super-admin user, you need to keep an eye on the overall sales and earnings from different payment modes during the specific date range. This will help you create strategies and discounts to boost ...Lottery Reconciliation Summary Report
Lottery Reconciliation Summary Report Overview The "Lottery Reconciliation Summary Report" article provides a comprehensive overview of lottery activity across selected locations, based on the chosen filters and date range. It includes detailed ...Invoice Detail Report
Invoice Detail Report Overview The "Invoice Detail Report" lists all items received in a date range for a specific location and vendor, giving details of each item and the invoice that it was attached to. Multiple different types of filters and ...