Negative Cashier Report
Negative Cashier Report
Reports -> Sales Reports -> "Negative Cashier"
Once the customers are done picking out the products that they want to buy in the retail store/shop/mall, they need to reach the counter to check out all the products and make the payment for their purchase. Many times, it happens that the customer wants to remove a product from the purchase list because of a shortage of cash, or changes his/her mind and asks to remove the product that he/she would not buy. So, the cashier needs to remove that product from the transaction and take that physical product out. Now, the total amount will be reduced, and the customer will be able to complete the payment.
In another case, the customer changes their mind and asks to cancel the entire purchase. The cashier needs to clear the scanned products by performing a couple of actions from the POS.
In the first case, canceling (voiding) a product from the purchase, while in the second case, canceling the entire purchase. Both cases will be noted as “Negative Transactions” in the FTx POS System. FTx Cloud POS provides a detailed "Negative Cashier Report" that provides the data for the void sales, canceled sales, or return of the items that occurred at the POS by the cashier.
> What Are Negative Transactions?
When the cashiers perform the following actions at the POS during a customer's checkout, that's called Negative Transactions:
Void Item/Sales | Cancel Sales | Return Item | No Sales
Figure 0.0
In this document, you will see:
- How to check the negative sales report for the specific cashiers and use the Custom Filter option- Different filter options, i.e., store-wise, for the specific Reg Z, and many other options- How to check the receipt details in which the negative transaction occurred
1. Reaching the "Negative Cashier Report"
To reach the "Negative Cashier Report," follow the steps below:
- Step 1: Log into Control Center
- Step 2: Choose Point of Sale
- Step 3: Choose Reports
- Step 4: Choose Sales Reports
- Step 5: Choose the Negative Cashier
See Figure 1.1 to understand the navigation better.
Then, from the Choose Report drop-down sales report list, select "Negative Cashier."
Figure 1.1
2. Understanding the Negative Cashier Report Layout
By clicking "Negative Cashier," you will be redirected to the "Negative Cashier Report" page with relevant filter options.
Figure 1.2
By selecting the “Negative Cashier” report type, the users can see the custom filter and bifurcation (checkbox) options. You will see the "Report data is empty" message initially.
3. Generating the "Negative Cashier Report"
When you navigate to the Negative Cashier Report page, you will get some of the options pre-selected by default. By clicking the "Generate Report" button, the report data will display the negative transactions that occurred at the POS by the cashier as per the selection of the date range and filter options.
Figure 3.1
After generating the report, you will see the negative sales transactions data in the report for the selected store where the cashiers were working.
- Total Negative Transactions by the Cashier
You can see the summary details at the top (as a title) that display overall negative transaction details for the specific cashier as per the selection of the store. You can see the total number of negative transactions along with the $ amount value individually.
- Receipt-Wise Negative Transactions
You will see the receipt-wise negative transaction details in tabular format. You can see the Register Number, Reg. Z No., and period on the header.
The following transaction details can be seen in tabular format:
- Item Name: An item on which the cashier has performed a negative transaction as the customer asked to void/cancel/return.
- Quantity: Number of quantities that were voided/cancelled/returned.
- Total Retail: Total retail amount as per the retail price of the item and multiplied by quantity.
- Transaction Type: A type of negative transaction, whether an item was voided/canceled/returned at the POS during checkout.
- Reason: If a cashier added a reason for performing the negative transaction, it can be seen here.
By scrolling down, you can see the negative transaction data in the report for all the cashiers who work for the selected store.
3. Report Filter Options
Now, let's see how to set up the report filter options to generate the negative cashier report with specific data.
3.1 Filter By Cashier
You can check the negative transaction data in the report for the specific cashier.
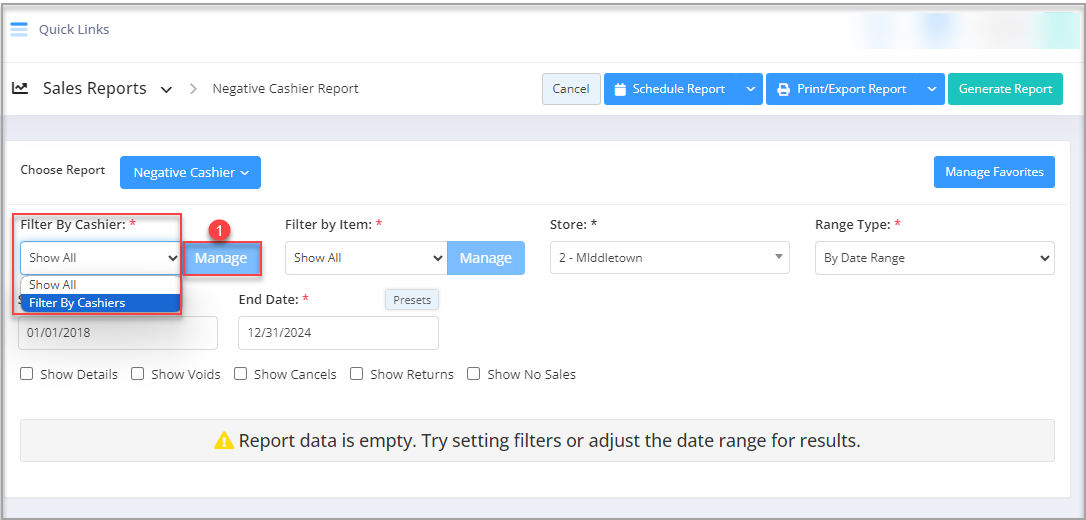
Figure 3.1.1
By clicking the "Filter By Cashiers," a pop-up will appear with the list of the cashiers.
1. You can select more than one cashier by ticking the checkbox of the cashier's name. You can also search for the cashier's name.2. You must click on the green arrow icon to move the selected cashier(s) under "Selected List."
Figure 3.1.2
3. You can remove any selected cashier name by clicking the Remove icon, or remove all the selected cashiers from the list by clicking the "Clear Selection" button.
4. Once the cashier's selection is done, click the "Apply" button to get the negative sales transaction for the selected cashier(s).
- After selecting the cashier(s) from the filter list, click "Generate Report" to get the negative sales transactions in the report.
Figure 3.1.3
You can see the list of the selected cashiers and their negative sales transaction details.
3.2 Custom Filter
You can filter the data by selecting specific parameters to check the negative sales transactions in the report. You will see the Filter Items drop-down option, from which you can select the specific data (parameters) to generate the report according to them.
You will find the two options from the Filter Items drop-down selection:
- Show All: By default, this option will be pre-selected. It considers all the data (parameters) to generate the report. The "Manage" button will be disabled for this option.
- Custom Filter: To customize and get the specific data for the report, you need to select the "Custom Filter" option. Once you select it, the "Manage" button will be enabled to set up the filters.
By clicking the "Manage" button, a Manage Filters window will pop up. You will see the following details:
1. You can select the saved custom filter from the drop-down selection (if any). The "Manage Filters" button will open the list of the saved custom filters. You will see the different tabs to filter the data (parameters) to select the records for the negative transactions. You can select the required data by navigating the other tabs individually.2.1.You can see the list of records for the selected tab (i.e., UPC). You can also search any record from the list by entering the text in the "Search" edit box.2.2.You will find the checkbox along with all the product names (UPC). You need to select the record by ticking the checkbox.3. After selecting the record(s), move to the "Selected List" area on the right side by clicking the green right-side arrow (>>) button.
Figure 3.2.1
4. You will have one flag to decide whether you want to "Include" or "Exclude" the selected records when the report is generated.
- Include: If the flag is selected to "Include," it means the negative cashier report will be generated by applying the selected records.
- Exclude: If the flag is selected to "Exclude," it means the negative cashier report will be generated but ignore the selected records. It will consider the selected records that need to be excluded and consider the left-side records for reports.
5. If you want to remove the whole selection, click the "Clear Selection" button. You can remove any record from the list by clicking the Remove (x) icon.
6. You can generate the report by clicking the "Apply" button, or you can click the "Save Filters" button to save the custom filter for future use.
 In this way, the "Custom Filter" options (tabs) help to customize the records and set up the parameters to get only the required data for the report. Similarly, you can filter and set up the records for other tabs (parameters).
- Once the items are selected, click on "Apply" to save the changes and apply them.
Figure 3.2.2
Figure 3.2.3
3.3 Select Store
You can browse a store list to check the negative transaction data in the report by selecting the specific store.
Figure 3.3.1
Select the store, and by clicking the "Generate Report" button, the negative transaction data for the cashier(s) will be generated in the report.
Figure 3.3.2
You can select the store from the list and check the negative transaction that was performed by the cashiers who work there.
3.4 Range Type
There are two options provided to check the negative sales report by "Range Type":
By Date Range | By RegZ Range
Figure 3.4.1
3.4.1 By Date Range
When you are redirected to the Negative Cashier Report page, "By Date Range" will be selected by default.
By clicking the edit box of the date, you will get a tiny calendar to select the specific date range. You can also enter the date manually as per mm/dd/yyyy format.
- Start Date: This option lets you choose the start date of the selected date range.
Figure 3.4.1.2
- End Date: This lets you choose the end date for the selected date range.
Figure 3.4.1.3
If you want to get Register Z details for the specific time duration (until morning/evening), you can also select the particular time (hour & minutes) from the date selection. After selecting the date & time, click the "Done" button.
- Presets: It is provided to check the report for a specific duration.
Figure 3.4.1.4
In this way, you can get the negative transactions in the report by selecting a specific date range.
3.4.2 By RegZ Range
When you select "By RegZ Range," the Register # (number) and the Z # (Register Z Number) drop-down selections will be visible.
- Register #: Register numbers are the POS system at the specific stores. Based on the store selection, the register number record(s) will be populated in the Register # list.
- Z # (Register Z Number): As per the selection of the store and Register #, the Z # records will appear in the drop-down list that was performed at POS by the cashier before closing the shift.
Figure 3.4.1.5
You will get the "Register #" list as per the selection of the store. You can check the negative transaction for the specific register of the store.
Figure 3.4.1.6
You will get the "Z #" list as per the selection of Register # where the Reg Z was generated. You must select the Reg Z (shift) record from the list to check the negative transaction data for that specific shift (Reg. Z).
Figure 3.4.1.7
By generating the report, you will see the negative transaction for the cashier as per the "Register #" and the "Z#" (shift) under that Register #.
Figure 3.4.1.8
In short, if you want to check the negative transaction data for the specific shift by the cashier, you can select "By RegZ Range." You will see negative transactions for the specific shift (Z#).
3.5 Bifurcation (Checkbox) Filters
You can generate the negative cashier report by checking/unchecking the checkboxes if you want to bifurcate the negative transaction data.
By default, the following checkboxes will be checked when you navigate to the report page:
- Show Details: If checked, you will see the summary with the number of negative transactions, discount details, the value of the negative transaction in $ amount, and the individual receipt details. If you are unchecked, you will just get the number of negative transactions & $ the amount of that transaction in tabular format.
- Show Voids: If checked, you can see the voided items during the checkout.
- Show Cancels: If checked, you can see the entire canceled sales during the checkout.
- Show Returns: If checked, you can see the returned item details during the checkout.
- Show No Sales: If checked, you can see the no-sales details when the cashier opened the drawer without a sale. If any note is added while performing the No Sale, it can also be seen in the Reason column.

As per the permission, the cashier can open the drawer even without sales transaction from the POS panel.
Opens the cash drawer without a sale. Requires the cashier to have No Sale permission.
4. Show Pre/Post Receipts
You can also check the receipt details individually just by clicking on the “Show Pre/Post Receipts” hyperlink from the negative cashier report itself.
Figure 4.1
By clicking that hyperlink, the users will be redirected to the new browser tab that displays receipt details (E-Journal Report). From here, the users can see the negative sales in the receipt details to check what happened at that time.
Figure 4.2
“Pre/Post Receipt” shows the transaction details with all the necessary details such as cashier name, Register, Receipt No., and others.

In this way, you can easily check negative sales such as canceled, voided, and returned sales from the Negative Cashier Report by applying multiple custom filter options at the same time to get the required negative cashier report.
5. Scheduling a Report
FTx Cloud POS supports report automation. You can configure a report and schedule it. The system will send the scheduled report to the indicated email IDs at the defined frequencies (daily, weekly, bi-weekly, monthly, quarterly, etc.).
6. Printing/Exporting a Report
You can print or export any report according to your requirements. When you use the Print function, the system creates and opens the report's PDF file in a new tab. You can download the soft copy or print the paper copy according to your requirements.
7. Manage Favorites
FTx Cloud POS allows quick access to the reports you need to view frequently through "Favorite Reports." You can save a report as a favorite and manage all your favorite reports from any of the report screens using the "Manage Favorites" button.
Related Articles
Negative Cashier Report - Store Employee
Negative Cashier Report Overview The "Negative Cashier Report" in the FTx Cloud POS lists negative actions taken in a specified store and date range. Negative actions include voids, cancellations, returns, and no sales. It shows all transaction ...Negative Items Report
Negative Items Report Overview The "Negative Items Report" shows records of products that have undergone any negative transaction (void, cancellation, and return) for the selected date range. This article includes information about: How to generate a ...Negative Items Report - Store Employee
Negative Items Report Overview The "Negative Items Report" shows records of products that have undergone any negative transaction (void, cancellation, and return) for the selected date range. This article includes information about: How to generate ...Item Returns Report
Item Returns Report Overview The Item Returns Report lists all products customers return to a specific store. It allows you to configure various filters to suit your needs. The system then displays records of returned products based on the chosen ...Item Returns Report - Store Employee
Item Returns Report Overview The Item Returns Report lists all products customers return to a specific store. It allows you to configure various filters to suit your needs. The system then displays records of returned products based on the chosen ...