PM/UST Retail Scan Data Report
PM/UST Retail Scan Data Report Overview

- To include Buydowns and Discounts information along with sales data in the report, you need to configure a few settings for each discount and buydown created for tobacco products in the "Discounts" and "Buydowns" module.
- Also, ensure the "Hide Scan Data Options" setting in Product/General Settings (Maintenance>>Settings & Panels >> POS >> Product/General Settings) is set to "No."
- Configure a single FTP/SFTP and send a unified scan data report file for all locations.
- PM/UST Retail Scan Data Report overview
- How to create a single FTP/SFTP
- How to view the run history of scan data
- How to generate scan data files
Reaching the "PM/UST Retail Scan Data Report"
- Step 1: Log into Control Center
- Step 2: Choose Point of Sale
- Step 3: Choose Reports
- Step 4: Choose Scan Data
- Step 5: Choose PM/UST Retail Scan Data
1. Understanding PM/UST Retail Scan Data Reports
 Please see Figure 1.1 to know all the information needed to be filled out in the RJR Scan Data Exports.
1. Report Name & Notification List2. FTP Configuration3. Promotions4. Report Options: Settings5. Report Options: Loyalty Codes6. Filters7. Action Buttons
1.1. General Information:
- Report Type: This field lets you select the scan data report format type as RJ Reynolds Scan Data, PM/UST Retail Scan Data, or ITG Retail Scan Data. Here, you have to pick PM/UST Scan Data.
- Notification List: Here, the email of the person is mentioned who is to be notified when the scan data report is sent to the manufacturer.
1.2. FTP Connection:
- Single FTP/SFTP Connection: If this toggle is set to "Yes," then a single scan data file is generated for all the locations. If this is how the manufacturer wants the file, then establish the FTP connection as per the details provided by PM/UST needed to establish the FTP connection (explained below).
If the toggle is set to "Yes," then all the business locations will be selected, and the scan data file will combine the data from all these locations into one file.Figure 1.2.1

- Enable Auto Send: This is a toggle that, when set to "Yes," enables you to auto-send the PM/UST file on their server every week. If set to "No," you can generate scan data files manually with the "Generate Files" button (the process is explained below). Once you enable it, the Auto Send At field will appear, as Figure 2.1.0 shows. Select the day and enter the time for scheduling the auto-send feature for a particular day and time.
Figure 1.2.2
- Method: Choose the method of making the connection with the PM/UST server. The drop-down selection: FTP| SFTP| FTP Active.
- Port: Enter the port number that was provided by the PM/UST, e.g., 21, that is utilized by your store.
- FTP Site: Enter the IP address (or domain) where the file will be placed on the server.
- Username: Enter the user name for logging into the FTP site.
- Password: Enter the password to access the site.
- Folder: This field requires the mention of the FTP folder where the generated file is to be kept.
Once done, click on the "Save" button in the top right corner.Test FTP/SFTP Connection: This button lets you test the FTP/SFTP connection once it is established. See Figure 1.2.3.Figure 1.2.3

- In case the Single FTP/SFTP Setup is set to "No," you can configure specific location(s) as highlighted in Figure 1.2.4.
Figure 1.2.4
1.2.1. Add New Config:
This button lets you establish the FTP connection for the selected location(s).Figure 1.2.2.11. Location Field and FTP ConfigurationThe field for Location Field and FTP Configuration and the steps to configure the FTP connection are the same as above.But you can add/configure locations for the scan data from Manage Location Assignment. (explained below).2. Manage Location Assignments:Under this section, the locations are selected and configured for sending location-specific data. You can either choose All, By Locations, or Location Group.Figure 1.2.2.2
- If you choose "All," the system will add all your store locations. But if you choose "Locations," follow the below-mentioned steps to select and apply the location selection. See Figure 1.2.2.3.
Figure 1.2.2.3
- Find Location: Use this Search box to search for a specific location by name or location number.
- Pricebook Zones: You can filter the location records results by pricebook zones. Make the selection as needed.
- All Active: This is a drop-down that helps you choose the location type as All, Only Active, or Only Deleted.
- Results: This section shows the list of selected parameters. For example, if you have chosen the Store tab, it will show a list of stores.
- Selection Checkboxes: You must select the required stores by ticking the checkbox.
- Arrow: Click the green Arrow button to move the selected stores to Selected List.
- Clear: Click the "Clear Selection" button to remove the whole selection. To remove any record from the list, click the Remove (x) icon.
- Apply: Click "Apply" to apply the selection for generating the report, or you can click on "Close" to discard changes.
Figure 1.2.2.4
- Once done, click on "Save Config" to save the changes made.
3. Custom Location SettingsThis section is useful when you create a config for each location. You can enter customized fields per location, and if a field is left blank, it will use the base report options.Figure 1.2.2.5
- Management Account: This information is provided by Philip Morris and filled here.
- Chain Name: The chain name information also comes from the manufacturer (Philip Morris).
1.2.2. Location-Specific Actions:
These are common actions that are common for all the configured locations.Figure 1.2.2.6
- Download: This button is for the corporate side users who download and verify the report data. When you click on this button, the form highlighted in Figure 1.2.2.7 will be displayed.
Figure 1.2.2.7
- Send: This button is to send the scan data over the FTP/SFTP connection on the PM/UST server.
- Edit: This button lets you help in editing the FTP connection and the configured location(s).
- Remove: This button will remove the configured location.
1.3. Promotions
- Discounts: This tab lists all active discounts in the scan data report, including Discount Name, Start Date, and End Date.
Figure 1.3.1
Figure 1.3.2
- Buydowns: The "Buydowns" tab lists all active buydowns in the scan data report, including Buydown Name, Start Date, and End Date.
Figure 1.3.3
To ensure the buydown is included in the scan data report, make sure to enable the "Include in Scan Data Report" toggle on the Edit Buydowns page.Figure 1.3.4
1.4. Report Options: Settings
Figure 1.4.1Fields Description:
- Management Account: This information is provided by Philip Morris and filled here.
- Chain Name: The chain name information also comes from the manufacturer (Philip Morris).
- Include Loyalty: This is the flag for including a customer's loyalty information.
- Generate PM Data: If this toggle is set to "Yes," it will include the products' scan data from Philip Morris beginning with specific UPC.
- Generate UST Data: If this toggle is set to "Yes," it will include the products' scan data from the UST manufacturer beginning with a unique UPC.
- Generate AOM Data: This toggle, if set to "Yes," will "All Other Manufacturers," and it will also allow you to pick the departments to send.
- Hide Age Verification Info: This is the flag; if set to "Yes," it will not include (or will hide) the age verification methods details in the scan data file that were used to while buying the products.
Include Header: Enabling this toggle to Yes will support scan data file generation with or without column headers. When enabled, the PM/UST scan data file includes headers such as:
Management Account Number, Week Ending Date, Transaction Date, Transaction Time, Transaction ID Code, Store Number, Store Name, Store Address, Store City, Store State, Store Zip +4 Code, Category, Manufacturer Name, SKU Code, UPC Code, SKU/UPC Description, Unit of Measure, Quantity Sold, Consumer Units, Multi-Unit Indicator, Total Multi-Unit Discount Quantity, Total Multi-Unit Discount Amount, Retailer-Funded Discount Name, Retailer-Funded Discount Amount, Coupon Discount Name, Coupon Discount Amount, Other Manufacturer Discount Name, Other Manufacturer Discount Amount, Loyalty Discount Name, Loyalty Discount Amount, Final Sales Price, Store Telephone, Store Contact Name, Store Contact Email, Product Grouping Code, Product Grouping Name, Loyalty ID/Rewards Number, Truncated Consumer Mobile Phone Number, Age Validation Method, Manufacturer Offer Name, Manufacturer Offer Amount, Purchase Type, Reserved Fields
Note: Reserved fields remain blank when headers are included. This option affects file formatting only. Enable headers when required for PM/UST reporting or validation.
1.5. Report Options: Loyalty Codes:
- PM Loyalty UPC: This is the UPC code for the loyalty customers for Philip Morris.
- Single Code: This option will merge the loyalty codes for all the locations as one in the scan data file but still differentiate them as Loyalty UPC, Club UPC, Both UPC, and Single UPC codes.

- Loyalty UPC: This is the default loyalty code used in the majority of promotions. It is used for Manufacturer Funded discount types.
The "Require Loyalty" toggle is to be set to "Yes" for this to apply.Figure 1.5.1
- Club UPC: This is dictated by "Enable Loyalty Club" which tracks purchases of an item over multiple transactions. It will include a loyalty club discount, but NOT multi-pack.
Figure 1.5.2
- Both UPC: This option means it includes both a multi-pack and a loyalty club discount. This UPC is used in this case.
The "Require Loyalty" toggle is to be set to "Yes" for this to apply.Figure 1.5.3
- Single UPC: This is a single "Manufacturer Funded" discount from Altria. You can see the image below for the classification. It's basically a type of promotion manufacturers run. Some loyalty promotions are multiple items, like 10 cents off each 2X you buy, etc. When a single code is used, this is the code that is generally exported for scan data.
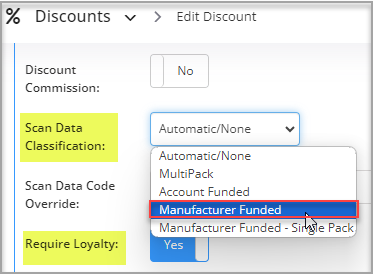 Figure 1.5.4
- Location-Based Codes: This helps you include separate loyalty codes location-wise.
Figure 1.5.5
- Click on "Manage Locations" to set the loyalty codes location wise.
- Skoal Loyalty UPC: This is similar to PM loyalty codes. Refer to the section above.
- Copenhagen Loyalty: This is similar to PM loyalty codes. Refer to the section above.
- ON! Loyalty UPC: This is similar to PM loyalty codes. Refer to the section above.
- L&M Loyalty UPC: This is similar to PM loyalty codes. Refer to the section above.
1.6. Filters:
- Add Filter: This button lets you add (filter) items in the scan data file that you precisely need to generate files for.
- From the Add Filter Type, choose the item type from the drop-down as shown in Figure 1.6.0.
Figure 1.6.0
- Depending upon the selection made from the drop-down displayed in Figure 1.6.1, you can manage the selection as below:
Figure 1.6.1
- Manage Filters: As per the selection, you can manage item filters by following the steps explained below:
Figure 1.6.2
- Find a Product: Use this Search box to search for a specific product by name or UPC.
- All Items: This is a drop-down that helps you choose the product type - All items, child items only, parent item, or standalone items.
- Results: This section shows the list of selected parameters. For example, if you have chosen the "Store" tab, it will show a list of stores.
- Selection Checkboxes: You must select the required stores by ticking the checkbox.
- Arrow: Click the green Arrow button to move the selected items to Selected List.
- Clear Selection: Click the "Clear Selection" button to remove the whole selection. To remove any record from the list, click the Remove (x) icon.
- Click "Apply" to apply the selection for generating the report, or you can click on "Close" to discard changes.
The added products will be displayed as highlighted in Figure 1.6.3.Figure 1.6.3
1.7. Actions Buttons
Figure 1.7.1
- Cancel: This button lets you cancel the changes you make at any time.
- View Run History: This button lets you view the scan data history log. For more information, please refer to 3. View Run History.
- Generate Files: This button generates the scan data files. For more information, please refer to 2. Generate Files.
- Save: This button lets you save the changes you make at any time.
2. Generating PM/UST Retail Scan Data Files
- Make the export format settings as required and explained above.
- Click on the "Generate Files" button.
- The form highlighted in Figure 2.0.
- Time Frame: The manufacturer wants the scan data file to be sent the same day every week. Hence, the time frame generally is one week, and if the Enable Auto Send toggle is set to True, it will auto-send the report that same day every week.
- Close: This button lets you exit the Generate File form.
- Download File: This button lets you download the file.
- Send: This button will export the scan data file to the Philip Morris server.
3. View Run History
- Type: This is the format of the scan data report; it is PM/UST in this case.
- Run Type: This is the run type of the report, whether it was downloaded or sent over FTP/SFTP.
- Ran At: This is the date and timestamp when the report was sent or downloaded.
- Start Date: This is the start date of the predefined time frame of sending over the report.
- Stop Date: This is the stop date of the predefined time frame of sending over the report. The timeframe is most often set to 1 week.
- File Name: The name of the scan data file is mentioned here.
- Actions: The actions mainly include the "Download" button for downloading the file. See Figure 3.0 for reference.
- Cancel: This action exits you from the form.
4. FTx Academy Training Course
Watch this FTx Academy video to learn how to set up and submit PM/UST scan data reports for your store.Check out this FTx Academy video to learn how to set up and manage scan data discounts.To gain a more comprehensive understanding, sign up for the FTx Academy training program — enroll in the courses and explore the topic lesson by lesson and reinforce your learning with quick quizzes at the end of each module.