Price Exceptions
Price Exceptions Overview
In retail, there are times when you may need to offer a different price for a product at specific locations for a limited period due to business needs. FTx Cloud POS allows you to create price exceptions, giving you the flexibility to apply temporary pricing changes across locations. These exceptions can be added or removed at any time, helping you respond quickly to market conditions or promotional strategies.
"Price Exceptions" enables you to:
- Create a price exception to set the different prices for the same product at various locations in a single operation.
- Manage the price exceptions.
1. Reaching "Price Exceptions"
- Step 1: Log into Control Center
- Step 2: Choose Point of Sale
- Step 3: Choose Pricebook
- Step 4: Choose Products
- Step 5: Choose Price Exceptions
2. Understanding the "Price Exceptions" Layout
- Please refer to Figure 2.1 and the description of the buttons and fields below to understand the layout of "Price Exceptions."
Figure 2.1Column Titles: Each column title indicates the type of information in the column. You can filter the list using any title if you want to search for specific price exceptions.1.1: Print All Price Exception: This button lets you print all price exceptions.1.2: Add New: This button enables you to add a new price exception.2.1: Edit Price Exception: This button enables you to edit the price exception.2.2: Print Price Exception: This button enables you to print the price exception.2.3: Delete Price Exception: This button enables you to delete the price exception.
3. Creating a Price Exception
You can set different prices for the same product at different locations in a single operation by creating a price exception. Please refer to "3.1 How Does the Overall Process Work?" to learn about the price exception workflow.
3.1 How Does the Overall Process Work?
"Price Exceptions" works as explained below:
- You create a price exception.
- You create the Price Exception Level using three parameters: Static Price (define a specific price), Add a Dollar (add a specified dollar to the current price) and Subtract a Dollar (subtract a specified dollar from the current price). Can add multiple levels if required.
- You add products to the price exception. You can select the products using five parameters: Items, Department, Manufacturer, Tags, and Categories.
- You add a level price for each price exception level.
- You assign a Price Exception Level to a location or location group.
- The FTx POS will show the new price as per your location and level price mapping.
For example:
- If you have assigned "Level 1" to Location A, the POS devices at Location A will show the price as per "Level 1" for all added products.
- If you have assigned "Level 2" to Location B, the POS devices at Location B will show the price as per "Level 2" for all added products.
3.2 Creating a Price Exception
Please follow the instructions below to create a new price exception:
- Click "Add New," shown in the top right corner in Figure 2.1.
- The Create Price Exception screen will appear, as shown in Figure 3.2.1 below.
Figure 3.2.1
The Create Price Exception screen can be segregated into five sections:
- [1] General Information
- [2] Manage Price Exception Levels
- [3] Manage Exception Items
- [4] Manage Exception Locations
- [5] Action Buttons
[1] General InformationName: Enter a friendly name for the price exception.[2] Manage Price Exception LevelsUse the Manage Price Exception Levels section to add or remove the required Price Exception Levels.
- The Manage Price Exception Levels section shows "Level 1." Use the "Add Level" button to add more levels. You can add up to Level 6.
Figure 3.2.2
- Select the level type using the Type drop-down. The details in [3] Manage Exception Items explain more about level and level type.
[3] Manage Exception ItemsUse the Manage Exception Items section to:
- Add products to the price exception. You can select the products using five parameters: Items, Department, Manufacturer, Tags, and Categories.
- Remove products from the price exception.
- Update the level price for Price Exception Level.
Please follow the steps below to select the products for which you want to create a price exception.
- Click the Manage Items button.
- The Manage Exception Items screen will appear, as Figure 3.3.3 shows.
Figure 3.3.3
- The Column Titles in the Manage Exception Items screen show the Price Exception Levels along with the product information.
- Add the products using the "Add Items" or "Add Items by Type" buttons.
- When you click the "Add Items" button, the Manage Filters screen will appear, showing the product list. Select the required products.
- When you click the "Add Items by Type" button, the Select Type pop-up screen will appear, as Figure 3.3.4 shows. The drop-down on the screen will show four options: Department, Manufacturer, Tags, and Categories.
Figure 3.3.4
- Select the required parameter from the drop-down, i.e., "Department," and click "Apply." The Manage Filters screen will appear and show the list of departments. Select the required department.
- Below is an example of selecting products using the department as Type.
- Select Department in the Select Type pop-up screen, as Figure 3.3.4 shows, and click "Apply."
- The Manage Type Filters screen will appear, as Figure 3.3.5 shows.
Figure 3.3.51: Select the departments for which you need to create the price exception.2: Click the green Arrow button to move the selected locations to Selected List.
- The Manage Type Filters screen will look like the one shown in Figure 3.3.6.
Figure 3.3.61: If you want to remove the whole selection, click the "Clear Selection" button. You can remove any record from the list by clicking the Remove (x) icon.2: Click "Apply" to apply the selection.
- The Add Level Prices screen will appear, as Figure 3.3.7 shows.
Figure 3.3.7Enter the level price for each level. For example,
- If you have selected level type "Static Price" for "Level 1," enter a static price, i.e., $10. The system will consider $10 as a new price for all selected products.
- If you have selected level type "Add a Dollar" for "Level 2," enter one to add $1 to the current price. The system will add $1 to the current price of all selected products and create a new price for them.
- If you have selected level type "Subtract a Dollar" for "Level 3," enter two to subtract $2 from the current price. The system will subtract $2 from the current price of all selected products and create a new price for them.
Note: When you assign these levels to a location or location group, the POS systems at that location or location group will show this new price when the product is scanned.
- The system will add the level price and all products from the selected department to the price exception, and the Manage Exception Items screen will look like the one shown in Figure 3.3.8. You can close the screen at this point in time.
Figure 3.3.8You can use the buttons and tabs available in the Manage Exception Items screen to perform some significant actions, as explained below.1.1: Preview Zone: Use this drop-down to view the products belonging to a specific pricebook zone.1.2: View Tabs: Use these tabs to switch records' views between the List View and Tile View.2.1: Add Items: Use this button to add more products to the price exception.2.2: Add Items by Type: Use this button to add more products to the price exception based on Department, Manufacturer, Tags, and Categories.2.3: Mass Update: Use this button to update the level price of a single, multiple, or all products.
- Select the required record(s) and click the "Mass Update" button.
- The Mass Update Exception Level screen will appear, as Figure 3.3.9 shows.
- Select the level from the drop-down, add the new level price, and click "Apply."
2.4: Remove Selected: Use this button to remove the selected products from the price exception.
2.5: Remove All: Use this button to remove all products from the price exception.
- The Manage Exception Items will show the added products, as Figure 3.3.10 shows.
Figure 3.3.10
- Please follow the same process to add the products using the other types, such as Manufacturer, Tags, and Categories.
[4] Manage Exception LocationsThe Manage Exception Location section lets you assign the price exception level to a location or location group. Please follow the steps below to do the same.
- Click the "Add Location Group" or "Add Location" button as per your requirements. For example, click the "Add Location Group" button.
Figure 3.3.11
- The Add Location Group screen will appear, as Figure 3.3.12 shows.
Figure 3.3.12
- Select the price exception level from the Level drop-down.
- Select the required location group from the Select Location Group drop-down.
- The Add Location Group screen will appear, showing the respective locations' list, as Figure 3.3.13 shows.
Figure 3.3.13
- Select the locations and click "Apply."
- The system will assign the selected price exception level to the selected locations. The Manage Exception Location will show the mapping, as Figure 3.3.14 shows.
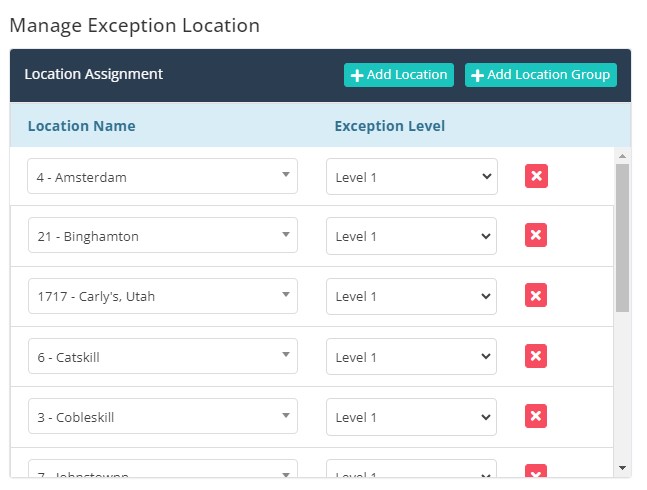 Figure 3.3.14[5] Action ButtonsFigure 3.3.15
The action buttons enable you to take various actions, as described below:
- Cancel: This button lets you cancel the price exception or the changes made in the price exception.
- Save & Close: If you click the "Save & Close" button, the system will save the price exception and navigate you to the Price Exception screen.
- Save & New: If you click the "Save & New" button, the system will save the price exception and open the new Create Price Exception screen, where you can add another price exception.
- Save: This button lets you save the changes you have made at any point.
4. Editing the Price Exception
Please follow the steps below to edit a price exception:
- Click the Edit button highlighted in Figure 2.1 to edit the price exception.
- The Edit Price Exception screen will appear, as shown in Figure 4.1.
Figure 4.1Additional Buttons:
- Print: This button lets you print the price exception.
- Delete: This button lets you delete the price exception.
You can perform the following changes:
- Adding or deleting a Price Exception Level from the Manage Exception Levels section.
- Adding or removing the products from the Manage Exception Items sections.
- Changing the level price for some products or all products in the Manage Exception Items sections.
- Changing the location and price exception mapping from the Manage Exception Location section.
- Make the required changes and click "Save & Close."
- The system will save the changes you made and show the Success message.
5. Printing the Price Exception
Please follow the steps below to print the price exceptions:
- Click the "Print All Price Exception" button highlighted in Figure 2.1.
- The Print Report screen will appear, as Figure 5.1 shows.
Figure 5.1
- Export Type: Select the export type: PDF, CSV, or Excel.
- Include Header: Enable this button to include the header in the printout.
- Repeat Headers On Every Page: Enable this button to repeat the header on every printout page.
- Print Title On Every Page: Enable this button to print the title on every printout page.
- Show Cost: Enable this button to view the product cost in the report.
- Show Locations: Enable this button to view the respective locations in the report.
- Click "Start Print."
- PDF, CSV, or Excel will open in a new tab. Download it using the Download icon and print it using the Print icon. Below is a sample report:
Figure 5.2
- You can also use the "Print" button available in the Edit Price Exception screen to open the Print Report screen and print the price exception.
6. Deleting a Price Exception
You can delete the exception from the Price Exceptions home screen and the Edit Price Exception screen.
Please follow the steps below to delete a price exception:
- Click the Delete button shown in Figure 6.1.
Figure 6.1
- A warning dialog will appear with two related options, as shown in Figure 6.2.
Figure 6.2
- Click "Yes, Delete" to continue deleting the price exception.
- Click “Cancel” to close the pop-up and skip the deletion process.
- To delete the adjustment record from the Edit Price Exception screen:
- Click the Edit icon highlighted in Figure 2.1.
- The Edit Price Exception screen will appear, as Figure 4.1 shows.
- Click the "Delete" button. The warning dialog will appear, as Figure 6.2 shows.
- Click “Yes, Delete” to continue deleting the price exception.
- Click “Cancel” to close the pop-up and skip the deletion process.
Related Articles
Price Exceptions - Store Employee
Price Exceptions Overview At times, certain products may be priced differently at specific store locations for a limited period due to business needs. These temporary pricing changes are called price exceptions. While you cannot create or modify ...Store Override Price Report
Store Override Price Report Overview The "Store Override Price Report" displays the items and their related data that have gone through price overriding at a store and in the selected date range. Price overriding can be done at the POS at any store ...Scheduled Price Change Report
Scheduled Price Change Report Overview The "Scheduled Price Change Report" displays only the scheduled cost or price change data for each pricebook zone. Manually adjusted price records are excluded. You can apply various sorting and filtering ...Auto Price Changes
Auto Price Changes Overview "Auto Price Changes" allows you to implement a trigger that will update the price when the cost changes done via invoice based on preset parameters. This article will focus on setting up and utilizing the "Auto Price ...Price Change Report
Price Change Report Overview In the retail business, changing the product's price is common for various reasons. FTx Cloud POS provides the Price Change Report, including both the cost change and the price change for the selected date range, so that ...