Processing Sales and Payments on POS – Classic
Processing Sales and Payments on POS Overview
A POS transaction manages how customers purchase goods and services in a retail establishment. It can occur in person or online, and receipts can be generated electronically or in print.
This article includes information about:
- Processing sales using different payment methods.
- Processing payments using different methods.
1. Processing Sales
FTx Cloud POS offers all the required features that help you process sales in different situations.
FTx Cloud POS supports customer registration and loyalty programs.
1.1 Ringing Items on POS
1.1.1 Scanning or Manually Adding Items to the Sale
- Scanning an item: When you scan it, it is automatically added to the sale.
- Adding an item manually: If scanning the product is difficult, manually enter the product UPC or PLU and click "Enter."
- Searching for an item in POS: You may need to search for a specific item on the POS in cases such as when a customer tells you to add it during the sale or when you find difficulty in scanning a product due to its damaged barcode sticker, etc.
- You can use the "Item Search" button for a specific item.
Figure 1.1.1.1
- The Find Item screen will appear, as Figure 1.1.1.2 shows. Search for the products you want to add to the order.
Figure 1.1.1.2
- Search By: The Search By drop-down lets you select the information type you want to insert in the search bar. You can choose from Description, UPC, Upc Expanded, Vendor Part, and Everywhere.
Figure 1.1.1.3
- Search Bar: The Search bar lets you enter the keywords based on which you want to search for the product.
- Make appropriate selections for the "Search By" and "All Products" dropdowns, enter the keywords in the search bar, and click the "Find" button. Based on your input, the item list will appear, as Figure 1.1.1.5 shows.
Figure 1.1.1.5- Click on the desired item's name and click "Ok." The system will add the selected item to the sale.
- If the item you selected has multiple prices, the system will prompt you to select the price.
1.1.2 Selecting Kits
To cater to the customer's specific requirements, the retail business creates kits that can be added to the sale in one go. For example:
- Kit of the raw material item to prepare a specific dish.
- Kit of ready items to fulfill festive requirements such as Christmas or Thanksgiving Day.
Your store may occasionally brief you about available kit options. However, you can easily view and select a kit to add to the sale.
- Click the "All Kits" button on your POS.
- The POS | Create Order screen will appear. Click the "Add To Cart" button to add the kit to the sale. Proceed with the payment.
Figure 1.1.2.1
1.1.3 Processing Remote Sales
There are times customers may call in and order in advance and then come later to collect the order. The Remote Sales feature in FTx Cloud POS makes it easy for store employees to handle such situations. The store employee can scan the products via handheld as a remote sale and start the order. When the customer arrives, they go to the register. The cashier can see the scanned order in the POS device's Remote Sales section and proceed with the payment.
- Click the "Remote Sales" button on your POS. The POS | Remote Sales screen will appear, displaying the list of all remote sales. Select the sale you want to proceed with and click "Ok." The system will show the selected sale as a current sale. Proceed with the payment.
Figure 1.1.3.1
1.1.4 Handling Open Department Items
An Open Department Sale in a point-of-sale (POS) system
refers to a transaction where the salesperson enters a sale without predefined
inventory or product codes. Instead, the sale is linked to a general department(s.)
- Enter the item's price amount and click the "Open Department" button on your POS.
- If the corporate employee has allocated only one department as the open department, the Open Department Description screen will appear. If there are predefined descriptions in place, select an appropriate description from the Description drop-down and click "OK." Otherwise, type in a proper description. The system will log the sale as the open department sale. You can continue scanning the other products or processing the payment.
Figure 1.1.4.1
- If the authorized corporate employee has allocated multiple departments as open departments, the Department Price Prompt screen will display the department names and the amount you entered, as Figure 1.1.4.2 shows. You can change the amount if required.
- Click the applicable department name. The Open Department Description screen shown in Figure 1.1.4.1 will appear. If there are predefined descriptions in place, select an appropriate description from the Description drop-down and click "OK." Otherwise, type in a proper description. The system will log the sale as the open department sale. You can continue scanning the other products or processing the payment.
Figure 1.1.4.2
1.1.5 Ringing Age Restricted Items
Selling age-restricted items responsibly demonstrates
ethical and social responsibility by ensuring individuals' and society's
safety, health, and well-being.

FTx Cloud POS offers multiple options to handle the sale
of an age-restricted item. Your POS system will show the workflow defined
by the corporate employee. This section briefly describes the next processes
when you scan an age-restricted product.
Mandatory License Scan Workflow on POS:
If the corporate employee keeps it mandatory to scan the driver license/government ID, the system will show the Age Verification screen, as Figure 1.1.5.1 shows. The cashier must scan the customer's driver's license/government ID to sell the product.
- If the customer has an ID that cannot be scanned, the manager can proceed with entering the ID details manually.Figure 1.1.5.1
- When the manager clicks the "MGR Override" button, the Age Verification Override screen will appear, as Figure 1.1.5.2 shows.
Figure 1.1.5.2
- When the manager clicks three of the checkboxes shown in Figure 1.1.5.2, the Manager Login | Keypad screen will appear.
Figure 1.1.5.3
- When the manager logs in, the Age Verification screen will look like the one shown in as Figure 1.1.5.4. The manager can manually enter the date or click the "Visually Verified" button to complete the age verification process.
Figure 1.1.5.4
POS Workflow When License Scan is Not Mandatory:
If the corporate employee doesn't make it mandatory to scan the driving license/government ID, the system will show the Age Verification screen, as Figure 1.1.5.4 shows. The cashier scans the customer's driver's license/government ID, adds the date of birth manually, or uses the "Visually Verified" button to sell the product.
Customer Facing Device Message
- If there is a customer-facing device (CFD), it will show the age restriction-related message configured by the corporate employee. Figure 1.1.5.5 is an example of such a message.
Figure 1.1.5.5
1.1.6 Handling Sales for a House Account
What is a house account?A house account is a store-managed charge account that allows approved customers to purchase on credit. Customers associated with the specific account can buy products and pay later, typically through a monthly billing cycle or on any other payment terms.
- Retailers often offer this option to trusted individual clients, corporate buyers, or regular customers who prefer simplified and recurring billing.
- Unlike bank-issued credit cards, retailers establish credit limits, payment terms, and policies. House accounts are also utilized for internal staff purchases or promotional transactions.
Please follow the steps below to process sales for a house account:
- Click the House Lookup button on your POS.
Figure 1.1.6.1
- The POS | Phone Number Entry screen will appear.
Figure 1.1.6.2
- Enter the customer's registered phone number and click "Search" to search the customer or the "Lookup" button to open the customer's screen directly.
- Select the customer and continue with the sales as a regular sales.
- However, if the corporate employee has enabled the "Credit Hold" setting for any house account, the system will not proceed with the sale further.
1.2 Void/Suspend/Cancel Sale
1.2.1 Void Items on Sale
When you void one or more items from the sale, the system removes those items from the sale, and you can continue. You have two options: "Void Last Item" and "Void All Items."
Figure 1.2.1.1
- Void Last Item: During the sale process, the customer may tell you to remove a specific item from the sale immediately after you have scanned it. You can click the "Void Last Item" button. The system will delete the item from the sale.
- Void All Items: During the sale process, the customer may tell you to remove all items or multiple items you have scanned so far and start the scanning process again with different items. Click the "Void All Items" button. The Select Items To Void screen will appear. Select the items you need to void and click the "Void" button. The system will delete the selected items from the sale.
Figure 1.2.1.2
1.2.2 Suspending a Sale
The Suspend Sale function lets you suspend for a while so that you can resume later.
- When to suspend a sale: A situation may occur when you are in the middle of the sale, and the customer says they have forgotten the wallet and will return soon. Or the manager's intervention is required in a sale, and there is a queue at your till point. So, the manager wants to continue the sale using another register. In such situations, it is suggested that the sale be suspended.
- When you cancel a sale, the system removes it, and you cannot retrieve it. When you suspend a sale, the system clears your screen, and you can proceed with the next sale. However, you can retrieve the suspended sale when you want.
- Scan all items and click the "Suspend Sale" button on your POS panel.
Figure 1.2.2.1
- The Suspend Sale Name screen will appear. Add the relevant description to easily identify it when resuming the sale, and click "Ok."
Figure 1.2.2.2
1.2.4 Resuming a Sale
Please follow the steps below to resume a sale.
- Click the "Resume Sale" button on your POS panel.
Figure 1.2.4.1
- The Resume Sale screen will appear, listing all suspended sales. You can select the "All Suspended Sales" or "Only Register Suspended Sales" option to view the suspended sales list.
- Click on the required sales record to select it. The Details section will show the details of the selected sale. Click "Ok" to resume the selected suspended sale.
Figure 1.2.4.2
- A warning screen will appear, as Figure 1.2.4.3 shows. Click "Close."
Figure 1.2.4.3
- The system will resume the sale. Please proceed with the regular sales and payment process.
Figure 1.2.4.4
1.2.4 Canceling a Sale
The Cancel Sale function lets you cancel the sale. Please follow the steps below to cancel the sale when you have already scanned the item(s.)
- Please click the "Cancel Sale" button on POS.
Figure 1.2.4.1
- The system will cancel the sale and show the Success message.
Figure 1.2.4.2
1.3 Discounts & Tax Exemption
1.3.1 Applying Percentage Discounts
- The authorized user from Control Center defines discounts. If the discount is set for specific items, the POS will automatically calculate it during the sale.
- However, to accommodate the changing business needs, FTx Cloud POS allows the authorized user to set a choice-based % discount on selected departments if required. The authorized users select the department(s) and discount percentage in the Control Center.
- When you scan the item from the selected department, you can choose to apply the set discount by clicking the "% Off" or "% Discount" button. Your store will inform you if they have put such a discount.
1.3.2 Applying Tax Exemption
- Customers such as government entities, Non-Governmental Organizations (NGOs), schools, etc., are eligible for tax exemption.
- To apply the tax exemption, scan all items and click the "Tax Exempt" button.
- The Tax Exempt Information screen will appear. Add the required information in the fields and click "Ok." The system will remove the tax from the sale.
Figure 1.3.2.1
Figure 1.3.2.2
1.4 Editing Item Quantity
Please follow the steps below to edit the item's quantity during the sale.
- Click the Expand icon highlighted in Figure 1.4.1.
Figure 1.4.1
- The Full Receipt screen will appear, as Figure 1.4.2 shows. Click the respective Edit link.
Figure 1.4.2
- The Change Quantity screen will appear. Edit the item's quantity based on your requirements and click "Ok." The system will update the item's quantity on the sale.
Figure 1.4.3
2. Processing Payments
2.1 Choosing Payment Method
Just For Your Information:
Many stores apply dual pricing. This means customers pay a bit more when they pay using credit cards. When the corporate employee decides to apply dual pricing, they can make the following choices:
- For which department do they want to apply dual pricing? They can choose to apply dual pricing for all departments or selected departments.
- Many FTx Cloud POS users generally apply dual pricing for tobacco-related products. However, it is their choice. FTx Cloud POS provides the feature to configure dual pricing based on your specific requirements.
- How much more does the customer pay using a credit card — for example, 2%, 5%, etc.?
- Define which tenders will be considered equivalent to cash. The corporate employee can consider other payment methods, such as gift cards and coupons, that are equivalent to cash.
- Set the default payment method.
Please Note:
- If the corporate employee enables the dual pricing function and doesn't set any default payment method, the system will prompt you to choose a payment method, as explained in this point.
- The system will not prompt any such message if the corporate employee doesn't enable the dual pricing function. You can proceed with your sale without making any selections.
How the corporate employee's preference appears on POS:
- If the corporate employee has applied the dual pricing setting and not opted for any default payment method, the POS | CHOOSE METHOD OF PAYMENT screen will appear when you open the POS panel. Please select the payment method.
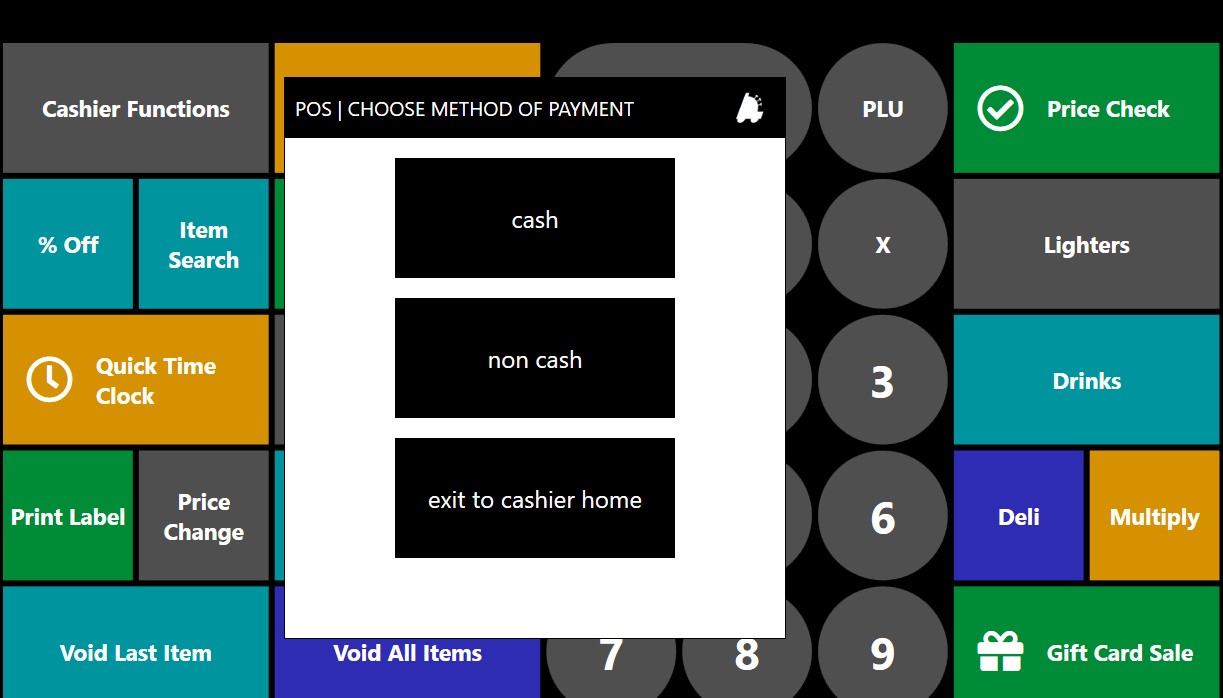 Figure 2.1.1
- As Figure 2.1.2 shows, the system will highlight the selected payment method. To change the payment method, please click on the other payment method.
Figure 2.1.2
- The system will show a Confirmation message, as shown in Figure 2.1.3. Click "Yes" to change the payment method.
Figure 2.1.3
2.2 Processing Payments
The Sub-Total panel lets you process the payment.
To view the due amount and payment options, click the "Sub Total" button located on the Main panel. This will
open the Sub-Total panel, as illustrated in Figure 2.2.1. You can then use the
appropriate buttons to proceed with your payment.
Figure 2.2.1
2.2.1 Cash Payment
- Click the "Cash" function key.
- When tendering exact cash, click "OK" on the Change Due dialog.
- When tendering partial cash, enter the cash amount in the Cash dialog and click "OK."
2.2.2 Card Payment
- Press the "Tender" button configured for credit card sale payments.
- The card reader will wait for the card to be presented. Have the customer either enter the card for chip or tap to pay.
- If the sale is successful, the register will alert you visually and, if configured to do so, with a sound as well.
2.2.3 Other Payment Methods
The Sub-Total Panel will show buttons for all tenders being accepted at your store. You can click the required button and process the payment. You may come across various payment methods such as:
- Manufacturer Coupon: A manufacturer coupon is a discount or promotional offer provided directly by a product's manufacturer, rather than the retailer selling the product. It is a tool used to encourage consumers to purchase specific products by offering a price reduction, cashback, or other incentives.
- Store Coupon: A store coupon is a discount or promotional offer provided directly by a retailer rather than the manufacturer of a product. Stores use store coupons as a marketing tool to attract customers, increase foot traffic, and encourage purchases at their locations or online stores.
- Loyalty Points/Coupons: Loyalty points (or loyalty coupons) are a type of reward retailers offer as part of a loyalty program to encourage repeat purchases and build long-term customer relationships. Customers earn points based on their spending or engagement with the retailer, and these points can be redeemed for discounts, free products, or other benefits. When you click "View Coupons" in "Customer Profile," you can view all pending loyalty coupons. Select the required coupon and click "Apply" to proceed with the payment.
Figure 2.2.3.1
- Gift Cards: A Gift Card is a prepaid card with a specific amount of money. It can be used to make purchases at a specific store or business. It's like giving someone a preloaded card instead of a gift. You can sell a gift card and accept the payment via a gift card.
- Digital Coupons: The customer can buy various digital coupons from the FTx web interface.
- If the customer is already registered with the system, you can search for the customer, find the list of coupons available to them, and redeem the coupon.
- If the customer is not registered with the system, you can register them first and then redeem the coupon.
2.2.4 Multiple Payment Methods in a Single Transaction.
The customer may wish to pay using multiple methods. Use the Sub-Total panel's flexibility to accommodate the customer's payment preferences.
For
example, suppose the total bill is $66, and the customer wants
to use the store coupon to pay $25. In this case, you can process the payment using the following:
- Navigate to the Sub-Total panel. Enter 25 as a tender amount on the POS and click the "Store Coupon" button. (Depending on the coupon type, you may or may not need to scan the coupon.)
- The system will prompt you to choose the item you want to apply the store coupon. Choose the item and click “Apply.”
- The system will deduct $25 from the bill. You can select the following payment method: If the customer wants to pay using a debit card, click the "Debit Card" button, insert the debit card in the card terminal, and request that the customer enter their PIN carefully.
- Once the transaction is completed, the system will generate the receipt.
2.3 Accepting a House Account Payment
Please follow the steps below to accept the house account payment:
- Enter the amount and click the "House Account Payment" button.
- The system will prompt you to search for the customer.
- Search the customer and proceed with the transaction.
Related Articles
POS Panels - Layout & Buttons – Classic
POS Panels - Layout & Buttons Overview A POS panel is the primary interface of a point-of-sale system, enabling cashiers or business operators to process transactions efficiently. It is a combination of hardware and software that provides essential ...FTx Cloud POS Step-by-Step Guide – Classic
FTx Cloud POS Step-by-Step Guide FTx Cloud POS is a cloud-based point-of-sale (POS) solution that provides comprehensive business management capabilities through a single tool, featuring extensive integration capabilities for property management ...Processing Sales and Payments on POS – Modern
Processing Sales and Payments on POS Overview A POS transaction manages how customers purchase goods and services in a retail establishment. It can occur in person or online, and receipts can be generated electronically or in print. This article ...Daily Reconciliation – Classic
Daily Reconciliation Overview In retail business, there are two types of reconciliation processes: Shift Reconciliation: Each cashier, an employee of the store, performs this reconciliation at the end of their shift. Daily Reconciliation: The store's ...Cashier Action FAQs – Classic
Cashier Action FAQs FTx Cloud POS offers 100% configurable POS panels. Your store might have chosen to change the button's name or place. These FAQs show the standard names and navigations of the buttons, and they will certainly help you figure out ...