Product Subscription [Auto-Ship]
Setting up Product Subscription for FTx Commerce Products
The Subscribe & Save feature is designed to provide customers with a seamless and convenient shopping experience by enabling them to schedule recurring orders for their favorite products. With this functionality, customers no longer need to place orders manually each time, ensuring they never run out of essential items while also enjoying potential savings and exclusive benefits.
Subscriptions apply only to Delivery and Standard Shipping fulfillments and are not available for Store Pickup or Curbside Pickup.
This KB provides step-by-step guidance on setting up and managing the Subscription option for your e-commerce site/app.
1. Control Center (Admin Setup)
- Enabling Subscription and setting up Auto-Ship Days globally.
- Configuring the Subscription option at the product level and overriding globally set Auto-Ship Days.
- Setting up Subscription Discounts and defining the minimum recurring orders required to avoid a subscription cancellation charge.
- Managing Auto-Ship Days for multiple products using Mass Update.
2. Customers
- How customers can subscribe to products and receive auto-recurring orders based on their selected Auto-Ship Days (Order Frequency).
- Managing subscribed products to edit the subscription from the customer's profile.
3. Fulfillment
- How store employees can manage and track customer subscriptions from the Fulfillment Portal/App.
1. Reaching Subscription (Auto-Ship Days) Settings
Subscription can be enabled and set up the Auto-shipping days Control Center side only. So, when the customers access your online store’s site or app, they will get the subscription option for the products that are enabled for the subscription with the auto-shipping (auto-recurring order) days from the control center side.
To manage subscription and set up the Auto-Ship days, follow the below steps:
- Step 1: Log into Control Center
- Step 2: Click Point of Sale
Figure 1.1 - Step 3: Click FTx Commerce -> Settings
By clicking the "Settings" tab, you will find the "Enable Subscribe & Save" option with disabled switch by default. Enable the switch and set up the Auto-ship days for the subscription.
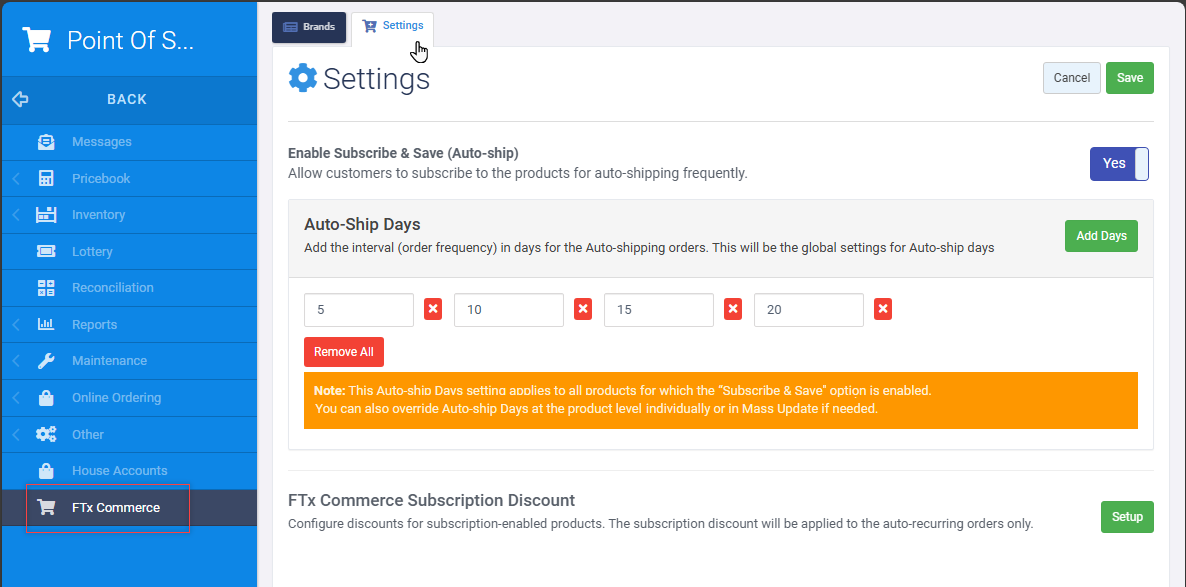
Figure 1.2
1.1 Setting up Auto-ship Days
As an admin user, you can configure Auto-Ship intervals globally, applying them to all E-Commerce-enabled products and the Subscribe and Save flag is already enabled. You can add up to 15 intervals, with a maximum of 365 days. Duplicate intervals are not allowed. To reset all selections, use the "Clear" button.
 Note: Auto-Ship intervals set via POS → FTx Commerce → Settings apply universally to all products. However, product-level overrides can be managed individually or via Mass Update.
Modifying Existing Auto-Ship Days
Any changes to existing Auto-Ship intervals require confirmation before saving, including updates or removals. Customers with active subscriptions will be unchanged their current Auto-Ship schedules. Updated intervals will apply only to new subscriptions.
Figure 1.1.1
1.2 Enable Subscriptions for Products
To offer subscription options on the e-commerce site/app, the "Subscribe & Save for Delivery & Shipping" switch must be enabled for each product individually. To reach subscription option for the products individually, follow the below steps:
- Step 1: Log into Control Center
- Step 2: Click Point of Sale -> Pricebook
- Step 3: Click Product Details -> FTx Commerce tab
You will find the "Subscribe & Save for Delivery & Shipping" switch that depends upon the Delivery and Standard Shipping fulfillment whether any of one is enabled.
Figure 1.2.1
Note: Auto-ship days set globally via "FTx Commerce → Settings" will apply to products only if this switch is enabled at the product level. Additionally, this switch can be enabled only if either Delivery or Standard Shipping (or both) is active for the product.Overriding Global Auto-Ship Days
Admin users can customize auto-ship intervals at the product level by enabling the "Override Auto-Ship Day Options" switch. Each product can have up to 15 custom auto-ship intervals.
Figure 1.2.2
Modifying Existing Auto-Ship Days
Changes to auto-ship intervals at both global and product levels trigger confirmation pop-up same as the Global-level Auto-ship days' confirmation pop-up. However, existing subscriptions remain unaffected unless the customers change them manually from their subscription details.
1.3 Mass Update for Auto-Ship Days
As an admin user, you can set Auto-Ship Days for a specific group of products, such as Categories or Departments, using the Mass Update module. This allows you to override the globally set Auto-Ship Days for multiple products in bulk.
- Step 1: Log into Control Center
- Step 2: Click Point of Sale -> Pricebook
- Step 3: Click Mass Update -> Select Products/Attributes (i.e. Category, Department, etc.)
Figure 1.3.1
- Step 4: Select relevant products to override
- Step 5 Choose Actions
- Step 6: Choose Update Fields for Mass Update
- Step 7: Choose Subscribe & Save for Delivery & Shipping in Actions
Figure 1.3.2
Now, when you reach the Override Auto Ship option, Enable the "Override Auto Ship" switch. Once the switch is enabled, set the auto-ship days that customers can choose when subscribing to the products. This ensures that subscription-based orders are placed automatically at the defined frequency.
Once the auto-ship days are added, click the "Apply Mass Update" button to apply the new Auto-Ship Days to the selected products. This process allows customers to subscribe to products with specific Auto-Ship Day options, ensuring automated recurring orders based on their selection.
Note: To update Auto-Ship Days via Mass Update, ensure that the "E-Commerce" and "Subscribe & Save..." options are enabled at the product level.1.4 Subscription Discount
As an admin user, you can configure subscription-specific discounts separately from standard product discounts. However, subscription discounts can only be set up when the Subscription feature is enabled at the global level (POS → FTx Commerce → Settings → Subscription). You can also have a quick access to navigate to the Subscription Discount from the Subscription Settings where a separate section is provided.
To set up the Subscription Discount, follow the below steps:
- Step 1: Click Login to Control Center
- Step 2 Click Point of Sale
- Step 3: Click Pricebook -> Discount & Buydowns
Figure 1.4.1
Setting Up Subscription Discounts
- Navigate to FTx Commerce Subscription settings, where you can configure discounts only for subscription-enabled products.
- Subscription discounts are applicable exclusively to auto-ship products, helping retailers offer savings to customers who subscribe.
- The Discount Type is pre-defined as "Subscribe & Save for FTx Commerce" and is read-only. Discounts can only be set as a percentage (% off).
Minimum Recurring Orders & Discount Reversal
- To prevent early cancellations, you can set a Minimum Recurring Orders value.
- Some customers may subscribe to a product to receive the subscription discount and then cancel before completing multiple recurring orders.
- If a subscription is canceled before meeting the minimum required orders, a subscription reversal charge (discount reversal charge) is applied to the customers.
- This serves as a safeguard to prevent retailers from potential losses due to misuse of subscription discounts.
Figure 1.4.2
2. FTx Commerce: Store Admin
The Subscription feature is available for Delivery & Standard Shipping fulfillments. but appear in read-only. However, a redirection link is provided to navigate to the Subscription Settings in the Control Center (CC), where admins can configure or update Auto-Ship Days globally.
Figure 2.1
3. Customer: Interaction with Subscribed Products
"How Customers Can Subscribe to Products and Manage Their Subscriptions"
Customers can subscribe to products by selecting their preferred auto-shipping days (order frequency) during checkout. They can efficiently manage their subscriptions through the "Manage My Subscription" menu in their profile, where they can:
- View, track, and modify their subscription details as needed.
- Monitor upcoming orders and make necessary adjustments.
Receive automated email notifications related to subscription:
- Subscription order confirmations
- Reminders for upcoming scheduled orders
- Payment failure alerts during auto-recurring order processing
Note: Only registered customers can subscribe to products and receive orders based on their selected auto-ship days. Guest users cannot place subscription orders. To subscribe, they must sign up and register on the e-commerce site or app.3.1 Subscription Option for Products
Customers can get the subscription options for any product based on the configuration settings in CC. The customers can subscribe for the products from following pages on E-Commerce site/app:
- Product Detail Page: Customers can view and select the "Subscribe & Save" option when redirecting to the product details page. Customers can directly add the product to the cart with the subscription option.
- Quick Shop Page: Customers can select the Subscription option from Quick Shop pop-up and add product to the cart with subscription option.
- Discount Page: Customers will get the "Subscribe" option instead of the Add to Cart if the Subscription discount is set for that product. They can directly product to the cart with auto-ship days selection from the Quick Shop pop-up.
- Cart Page: The subscription option is also visible in the cart before checkout. It comes with the subscription option along with auto-ship days selection if the customers already selected the Auto-ship days for auto-recurring orders.
Figure 3.1.1- Product Details page
Figure 3.1.1- Cart Page
3.2 Products with Subscription Discount
Customers can view subscription-specific discounts based on the set up in the Control Center. The subscription discount details are displayed on the following pages:
- Product Listing Page: If a subscription discount is set for a product, it appears as a ribbon/tag on the product listing page, highlighting the discount to customers.
- Product Detail Page: The subscription discount is displayed as a percentage value next to the "Subscribe & Save" label, allowing customers to see potential savings before selecting the subscription option.
- Discounts & Offers Page: Customers can view subscription discounts under the Discounts & Offers section. Unlike standard discounted products, a "Subscribe" button is displayed instead of the "Add to Cart" button, prompting customers to subscribe and benefit from auto-ship savings.
- Your Cart Page: The applicable subscription discount is shown in the cart before checkout, ensuring customers can review their savings before completing the purchase.
Figure 3.2.1
This visibility ensures that customers can easily identify and take advantage of subscription discounts across different stages of their shopping journey.
This visibility ensures that customers can easily identify and take advantage of subscription discounts across different stages of their shopping journey.
Note: If a "Minimum Recurring Order" is set for any Subscription Discount, the associated product will be displayed to customers with a tooltip icon informing them about the subscription cancellation charge. This ensures customers are aware of the minimum order commitment before subscribing and placing the order.Figure 3.2.2
3.3 Manage My Subscription
Customers can view and manage all their product subscriptions in the "Manage My Subscription" section from their profile. Various filtering options are available to help them easily manage specific subscriptions.
Listing Page
By clicking the Manage My Subscription button, customers will be redirect to their subscription listing page. From here, they can view and filter their subscribed products:
- Filter by Status: Customers can filter subscriptions based on their status [All | Active | Paused | Canceled].
- Filter by Upcoming: Customers can filter subscriptions based on upcoming deliveries. [Default | Next Week | Next Month | Custom Range].
- Search Option: Customers can search for their subscription using Product Name | Subscription ID.
Figure 3.3.1
Subscription Details Page
From the subscription listing page, a “View Details” option is provided for each product subscription record. By clicking on it, the customers can redirect to the subscription details page to view and manage the subscription information about their subscription, along with multiple options to modify their subscription settings.
Customers can view the following details on their subscription page:
- Status – Displays the current subscription status: Active, Paused, or Canceled.
- Subscription Started On – Indicates the date when the subscription began.
- Frequency – Shows the selected subscription frequency.
- Next Order – Displays the next scheduled subscription order date.
- Item Information – Includes product details such as name, quantity, price, and applicable discounts.
- Upcoming Orders – Lists the next four upcoming orders with their scheduled dates.
- Previous Orders – Provides details of past subscription orders.
- Fulfillment Type – Displays the selected fulfillment type for the subscription.
- Delivery Address – Shows the shipping address associated with the subscription.
- Payment Method – Displays the payment method used for the subscription.
Figure 3.3.2
Subscription Management Options
Customers can modify their subscriptions using the following options:
- Update Frequency & Schedule – Change the subscription frequency and next order date.
- Update Quantity – Modify the product quantity in the subscription.
- Skip Order – Skip an upcoming subscription order.
- Reschedule Order – Adjust the order schedule as needed.
- Resume Order – If an order was skipped, it can be resumed.
- Update Address – Change the shipping/delivery address.
- Update Payment Method – Modify the payment method for the subscription.
- Pause Subscription – Temporarily pause the subscription at any time.
- Cancel Subscription – Cancel the subscription at any time.
These options and filters ensure flexibility and convenience, allowing customers to manage their subscriptions effortlessly.
4. Fulfillment: Subscription Orders and Management
"How store employees can interact with subscription (auto-shipping) orders and manage customers subscription"
On the fulfillment side, store employees or fulfillment users can efficiently manage subscription orders. They can easily identify subscription-based orders from the listing page and use the Filter option to view only subscription (scheduled) orders during the order fulfillment process.
4.1 Identifying Subscription Orders
- Subscription Tag: Orders that are part of a subscription are marked with a "Subscribed" tag at the order-line level on both the Order Listing and Order Details pages. This tag remains visible throughout the fulfillment stages to ensure proper handling.
- Filtering Subscription Orders: A filter option allows users to list only scheduled subscription orders related to Auto-recurring/Auto-ship days based on the customer's selected frequency.
- Subscription ID Search: Store users can quickly search for a specific subscription by entering the Subscription ID in the global search. From the search results, they can directly access the subscription details.
Figure 4.1.1
4.2 Manage Subscriptions
The Manage Subscription section provides store users with a centralized view to monitor and manage customer subscriptions.
4.2.1 Subscriptions- Listing Page
The listing page provides store users with an overview of all customer subscriptions, displaying key details such as:
- Order Frequency (Auto-ship days)
- Quantity of Subscribed Products
- Subscription Activation Date
- Next Order Date (based on order frequency)
- Current Status (Active, Paused, Canceled)
- Actions available for each subscription [View, Skip Next Order, Cancel Subscription]
- Filtering Subscription Records
Figure 4.2.1.1
Store users can filter subscription records based on:
- Fulfillment Type: Filter by Delivery or Standard Shipping.
- Subscription Status: View subscriptions based on their current status:
- Active – Subscription is ongoing.
- Paused – Subscription is temporarily halted.
- Canceled – Subscription has been deactivated.
4.2.2 Subscription Details Page
The Manage Subscription Detail Page provides store users with a comprehensive view of subscription details, order history, and management options.
Subscription Details Include:
- Basic Details: Customer information subscribed product details, and subscription settings.
- Upcoming Orders: List of the next four scheduled subscription orders with delivery dates.
- Previous Orders: Complete history of past subscription orders.
- History: A log of all subscription changes since activation.
Figure 4.2.2.1
4.2.3 Actions on Subscription Orders
Store users can perform the following actions for customer subscriptions, ensuring flexibility in managing subscription changes:
- Skip: Skip an upcoming subscription order.
- Reschedule: Modify the delivery date for a subscription order.
- Resume: Reactivate a paused subscription.
- Cancel Subscription: Customers can request a cancellation, but a valid reason must be provided.
Figure 4.2.3.1
These features help fulfillment users efficiently track, modify, and manage subscription orders, ensuring smooth operations and customer satisfaction.
Note: Any action performed by store users (Skip, Reschedule, Resume, or Cancel) will be updated on the customer's subscription profile. Customers will receive email notifications whenever a subscription action is triggered by store users. The Subscription module offers a seamless and flexible approach to managing auto-recurring product orders for both customers and store employees, by setting up from the Control Center.
The Subscription module offers a seamless and flexible approach to managing auto-recurring product orders for both customers and store employees, by setting up from the Control Center.
Related Articles
Setting Up Delivery Fulfillment Globally
Setting Up Delivery Fulfillment Globally Settings -> Global Settings -> "Delivery" As a retailer or business owner, when you log in for the first time, you need to configure your fulfillment methods to allow customers to choose their preferred option ...Setting Up Delivery for Locations
Setting Up Delivery for Locations (Stores) The Delivery fulfillment option empowers customers to receive their orders directly at their doorstep. Retailers can configure the delivery settings at the location level, tailoring the experience for ...Setting Up Disclaimer for an Online Store
Manage Disclaimers "Prevent customers from navigating to online store (E-commerce site/Mobile App) without accepting disclaimer" As an admin user, you can add disclaimer records to ensure that your customers are well-informed and understand any ...Manage Online Store Settings
Manage Online Store Settings Settings -> General -> "Other Settings" (Product, Cart, and Checkout Settings) As a retailer, you can customize the features and restrictions about products, carts, and checkout pages to tailor the shopping experience for ...Setting Up Delivery Fee
Custom Delivery Fee If you have enough store team members who can handle the order delivery, you can select "Our Team" for "Who will deliver the orders?" If you have selected "Our Team," you also need to define your delivery coverage area by miles or ...