Product Tags
Product Tags Overview
Product tags are keywords that are used to describe the product and organize your inventory. Doing so makes it easier to categorize items, run a successful merchandising strategy, and surface products that match what customers are searching for at the store.
For example, the product tag labeled “Cigarette” can be used for all kinds of cigarettes. But the product tag “Cigarette Carton” gives a more precise meaning to it and can be used for cigarettes sold in carton packaging. Similarly, the tag labeled “Cigarette Pack” can be used for cigarettes sold in individual packs.
This article focuses on creating a new product tag and editing and deleting the existing product tag in Control Center.
Reaching "Product Tags"
To reach "Product Tags," follow the below steps:
- Step 1: Log into Control Center
- Step 2: Choose Pricebook
- Step 3: Choose Point of Sale
- Step 4: Choose Products
- Step 5: Choose Product Tags
Please see Figure 0.0 to understand the navigation better.
Figure 0.0
Understanding the "Product Tags" Layout
By clicking "Product Tags," you can see its page with various fields and buttons.
Buttons' Description:
1. Add New: This button lets you add a new product tag.
2. Manage Tag Groups: This button lets you manage product tag groups.
3. Edit Product Tag: This button lets you edit the product tag.
4. Delete Tag: This button lets you delete the existing product tag.
1. Adding a New Product Tag
Follow the steps mentioned below to add a new product tag:
- Click the “Add New” button in Figure 0.1 above to add a new product tag. See Figure 1.0.
- The form highlighted in Figure 1.0 will appear on your screen.
Figure 1.0
1. Tag Name: Enter the tag name to use in the product tree. Tag names will show in different categories.2. Tag Group: Choose the tag groups from the drop-down list of the existing tag groups.
- Enter the name of the tag and click on the "Save" button to save the product category. Click on the "Close" button to discard the changes and go back to the Product Tags page.
3. Action Buttons: These buttons are used to save, close, and cancel the changes made in the form.
2. Managing Tag Groups
Follow the steps mentioned below to manage the tag groups:
- Click the ”Manage Tag Groups" button highlighted in Figure 0.1 above to manage the product tag groups.
- The form highlighted in Figure 2.0 will appear on your screen.
Figure 2.0
1. Assign Tags: This button will add more tags to group them as one to the selected tag group. See Figure 2.1 below.
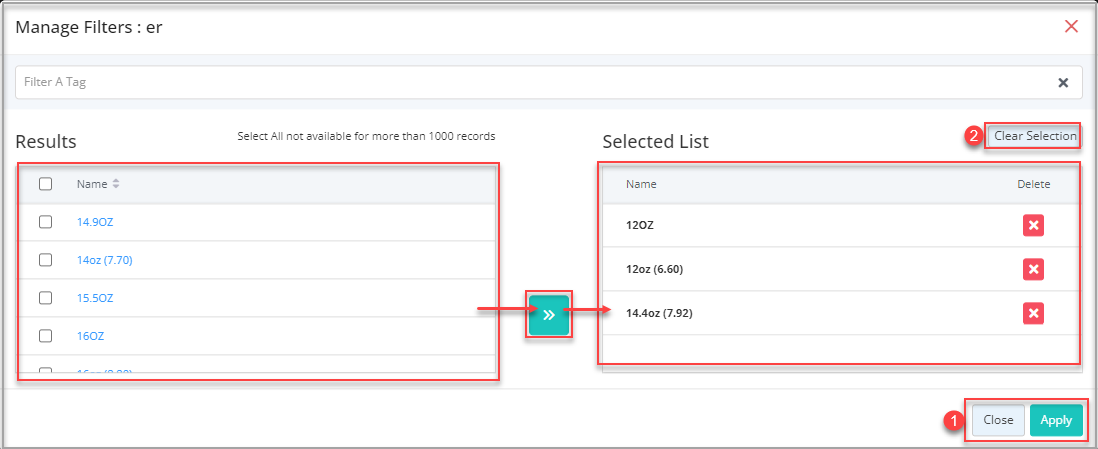
Figure 2.1
Figure 2.1
- Select the required number of tags and click Green Arrow to include them in your selection.
- Click Clear Selection to remove all items from Selected List.
- Click (x) next to an item to delete it individually.
- Click "Apply" to save changes or "Close" to discard them and return to the Manage Tag Groups window.
- A confirmation message will appear once the action is successful.
Figure 2.2
- Click on "OK." The selected/desired tags will be assigned to that tag group.
2. Edit Tags: This button will edit the existing tag group.
Figure 2.3
- Make the changes and click on the "Update" button to save the changes.
- Click on "Cancel" to discard the changes made.
- Delete Tags: This button will delete the selected tag group. See Figure 2.4.
Figure 2.4
- Click on "Yes" to delete the selected tag group.
- Add Tag Groups: This button will add a tag group. See Figure 2.5.
Figure 2.5
- Click on "Cancel" to discard the changes made.
3. Editing the Product Tag
Follow the steps mentioned below to edit the product tag.
- Click the “Edit” button highlighted in Figure 0.1 above to edit the existing product brand. See Figure 0.1.
- The form highlighted in Figure 3.0 will appear on your screen.
Figure 3.0
- Provide the required information in the fields. You can edit, save, and close it using the highlighted buttons, as shown in Figure 3.0.
4. Deleting the Product Tags
Follow the steps mentioned below to delete a product tag.
- Click the Delete button highlighted in Figure 0.1 above to delete a product tag.
- A warning dialog box will appear with two related options.
Figure 4.1
- Click “Yes, Delete” to continue the process of deleting the product tag.
- Click “Cancel” to close the pop-up and skip the deletion process.
Related Articles
Product Categories
Product Categories Overview A product category is a group of similar products that share related characteristics that help in organizing, promoting, and pricing products. With clear product categories, products are easier for customers to find and ...Product Brands
Product Brands Overview A product manufactured by a single manufacturer can be labeled with different brand names. While creating a product in Control Center, adding the manufacturer name and then adding all the brand names under that manufacturer ...Product Manufacturers
Product Manufacturers Overview It is often seen that many brands can fall under one manufacturer. Creating the product manufacturers correctly in the control center will ensure the easy inventory management. With FTx Cloud POS, you can select and add ...Product Links
Product Links Overview "Product Links" is where you can establish or remove the parent-child relationship between two products. FTx Cloud POS offers you the flexibility to establish or remove such links from two modules: "Products" and "Product ...Product Attribute Type
Product Attribute Type Overview "Product Attribute Type" is used to create the input type for the product attribute set in Control Center. This helps in entering the value of the product attribute as per the selected input type; e.g., for text, the ...