Remote Sale
Remote Sale Overview
"Remote Sale" shows you the list of all remote sales created using the handheld device at your locations.
The Remote Sale feature allows store employees to create sales in advance before the customer reaches the checkout counter. This is especially useful for phone orders, advance pickups, or large orders prepared on the sales floor.
Using a handheld device, an employee can scan items and create a remote sale record. When the customer is ready to pay, the cashier retrieves the remote sale at the POS and completes the transaction. This helps reduce checkout time and improve order accuracy.
When to Use Remote Sale
Remote Sale is ideal in scenarios where:
- Items are scanned and prepared in advance
- Orders are taken over the phone or scheduled for later pickup
- Store employees build the order using Control Center or a handheld device, while the transaction is completed and finalized at the POS
Reaching "Remote Sale"
- Step 1: Log into Control Center
- Step 2: Choose Point of Sale
- Step 3: Choose Pricebook
- Step 4: Choose Products
- Step 5: Choose Remote Sale
Figure 0.1 below will help you understand the navigation better.
Figure 0.1
Understanding the "Remote Sale" Layout
Please refer to Figure 0.2 and the description of the buttons and fields below to understand the layout of Remote Sale.
Figure 0.2
Column Titles: Each column title indicates the type of information in the column. You can filter the list using any title to search for a specific remote sale.
1: Add New: This button lets you add a new remote sale from Control Center.2: Edit Remote Sale: This button lets you edit the remote sale.3: Delete Remote Sale: This button lets you delete the remote sale.
1. Adding a New Remote Sale from the Control Center
Generally, the store employee creates the remote sale from the handheld device. However, you can create it from Control Center if required.
Please follow the steps below to create a remote sale from Control Center:
- Click on the "Add New" button highlighted in Figure 0.2.
- The Create/Add Remote Sale screen will appear, as Figure 1.0 shows.
Figure 1.0Fields and Buttons:
- Sale Description: Enter the sale description. It will help you identify the sale.
- Start Time: Select the date and time for the remote sale.
- The system shows the current date and time. Please click on the Start Time field if you need to change it. The calendar drop-down will appear. Please select the required date and time for it.
Figure 1.1
- Cancel: This button lets you cancel the remote sale or the changes made in the remote sale.
- Save & Close: If you click the "Save & Close" button, the system will save the remote sale and navigate you to the Remote Sale screen.
- Save & New: If you click the "Save & New" button, the system will save the remote sale and open the new Create Remote Sale screen.
- Save: This button lets you save the changes you have made at any point.
- Once you fill in and save the appropriate information, the system will create a remote sale, and the Edit Remote Sale screen will appear, as Figure 1.2 shows.
Figure 1.2Fields and Buttons
- Add Products: This button helps you add products to the remote sale.
- Cancel: This button lets you cancel the changes made.
- Delete: This button enables you to delete the remote sale.
- Once you create a remote sale, you need to add the products to it.
1.1 Adding a Product to a Remote Sale
- Click the "Add Products" button highlighted in Figure 1.2.
- The Add/Update Product screen will appear, as Figure 1.1.1 shows.
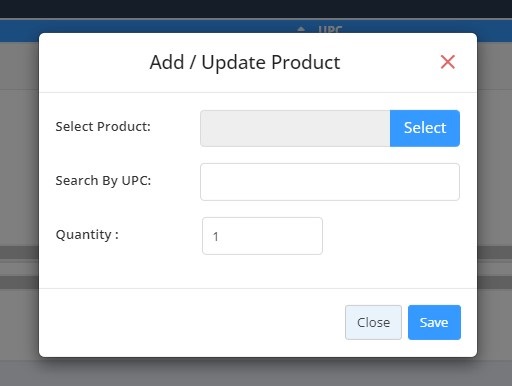 Figure 1.1.1
- Select Product: Use the Search button to search for the product. 1.1.1 Selecting a Product explains this button.
- Search By UPC: If you enter the product's UPC in this field and click the Enter key on your computer's keyboard, the system will fetch the product name and enter it in the Select Product field.
- Quantity: Enter the product's quantity you need to add to the remote sale.
- Save: Once you fill in the appropriate details, click this button to add the selected product to the remote sale.
- You can add products to the remote sale as per your requirements.
- Once the products are added, the Edit Remote Sale screen will look like the one shown in Figure 1.1.2
- Use the Edit button to edit the product details and the Delete button to delete the product from the remote sale.
Figure 1.1.2
1.1.1 Selecting a Product
Please follow the steps below to select products for the remote sale:
- Click the "Add Products" button highlighted in Figure 1.2.
- The Add/Update Product screen will appear, as Figure 1.1.1 shows.
- Click the "Search" button. The Select One Product screen will appear, as Figure 1.1.1.1 shows.
- Use the Search bar to search for a specific product. Click on the product name to select it and click "Apply."
Figure 1.1.1.1
- The Add/Update Product screen will show the added product, as Figure 1.1.1.2 shows. Enter the required quantity in the Quantity field and click the "Save" button.
Figure 1.1.1.2
- The system will add the product to the remote sale.
- Please follow the same process again to select multiple products, if required.
- Once the products are added, the Edit Remote Sale screen will look like the one shown in Figure 3.1.1.
- Use the Edit button to edit the product details and the Delete button to delete the product from the remote sale.
2. Creating a Remote Sale from a Handheld Device
The store employee accesses the Remote Sale section on the handheld device, creates an order, and scans the product as required. Figure 2.1 shows the Remote Sale section on the handheld device.
Figure 2.1
- Once the product is scanned, the Remote Sale section on the handheld device will show the sale details. Figure 2.2 shows the order details. The store employee can scan multiple products in an order if required.
Figure 2.2
- The Remote Sale section's listing screen will show the list of all scanned orders. Figure 2.3 shows the listing screen.
Figure 2.3
3. Editing a Remote Sale Record from Control Center
You can edit the product details or delete the products from the remote sale.
Please follow the steps below to edit a remote sale record:
- Click the Edit icon under Actions shown in Figure 0.2.
- The Edit Remote Sale screen will appear, as shown in Figure 1.1.2.
- If you want to edit the product details, click the respective Edit icon.
- The Add/Update Product screen will appear, as Figure 3.1 shows.
Figure 3.1
- You can change the product or product quantity.
- Make the required changes and click "Save."
- If you want to delete the product, click the respective Delete icon.
- The Alert message will appear, as Figure 3.2 shows. Click the "Yes" button to delete the product.
Figure 3.2
4. Completing a Remote Sale at the POS
Remote sales created in Control Center or on a handheld device are completed and finalized at the POS. All taxes, discounts, and other price-affecting factors are applied only at the POS.
- The customer gives information about their requirements through any medium, such as phone calls, emails, or messages.
- When the customer arrives, the store employee retrieves the remote sale from the POS.
Figure 4.1 - The Remote Sale screen appears as Figure 4.1. The cashier selects the order from the list, continues the payment process, and completes it in a few clicks.
Figure 4.2
- The store hands over the products to the customer at the payment point.
- Payment is processed as a regular POS transaction, and once the remote sale is finalized and cannot be reused.
When data synchronization is enabled, any changes made in Control Center or on a handheld device are automatically reflected on the POS. This helps reduce checkout time and improves efficiency for both store employees and customers.

5. Deleting a Remote Sale Record in the Control Center
You can delete the remote sale record from the Remote Sale home screen and the Edit Remote Sale screen.
Please follow the steps below to delete a remote sale record from the Remote Sale home screen:
- Click the Delete button, as shown in Figure 0.2.
- A warning dialog will appear with two related options, as shown in Figure 5.1.
Figure 5.1
- Click "Yes, Delete" to continue deleting the remote sale.
- Click “Cancel” to close the pop-up and skip the deletion process.
- You can also delete remote sale records from Edit Remote Sale.
To delete this record from the Edit Remote Sale screen, follow the steps mentioned below:
- Click the Edit icon highlighted in Figure 0.2.
- The Edit Remote Sale will appear as shown in Figure 1.2.
- Click the "Delete" button. The warning dialog will appear, as shown in Figure 5.1.
- Click "Yes, Delete" to continue deleting the remote sale.
- Click “Cancel” to close the pop-up and skip the deletion process.
Related Articles
Remote Sale - Store Employee
Remote Sale Overview "Remote Sale" displays a list of all remote sales created using the handheld device at your store locations. This feature is useful in situations where customers place advance orders and come later to pick them up — often ...Sale Restrictions
Sale Restrictions Overview Sale restrictions are rules that block sales for a certain time period. These allow certain items in your price book to be restricted so that they cannot be sold during certain days or certain hours. Sale restrictions come ...Item Sale Limits
Item Sale Limits Overview An item sale limit is a simple rule that can be placed on a product(s) to limit their sale in a single transaction or per day. This feature comes in handy for specific products that may have transactional limits set by the ...Remote Settings – Classic
Remote Settings Overview Remote access is an essential component of an effective POS system. By connecting all POS devices (such as printers and monitors) to a centralized system, a business can manage it remotely. "Remote Settings" is a feature that ...Processing Sales and Payments on POS – Classic
Processing Sales and Payments on POS Overview A POS transaction manages how customers purchase goods and services in a retail establishment. It can occur in person or online, and receipts can be generated electronically or in print. This article ...