Reorder Alias Report
Reorder Alias Report Overview
Generally, the reorder alias is created for items that are branded differently in situations where the manufacturer or vendor has changed for the same product. The "Reorder Alias Report" shows a list of all the products that contain the reorder alias attached for reference.
1. Reaching the "Reorder Alias Report"
To reach the "Reorder Alias Report," follow the below steps:
Step 1: Log into Control Center
Step 2: Choose Point of Sale
Step 3: Choose Reports
Step 4: Choose List Reports
Step 5: Choose Reorder Alias Report
See Figure A. You will see many types of list reports that will be useful to your retail business. By clicking the drop-down selection, you will see the different types of list reports.
Figure A
You will see the "Report Data is Empty" message initially. You need to select the date range to check the "Reorder Alias Report." See Figure B.
Figure B
2. Generating the Reorder Alias Report
For generating the "Reorder Alias Report," click on the "Generate Report" button, and the system will display the list upon selection of filters.
Figure C(1)
Figure C(2)
Fields:
- Reorder Alias UPC: This column is the UPC for the reorder alias that has been created.
- Reorder Alias Description: This is the description for the order alias, giving some context to it.
- UPC: This column displays the UPC that was originally defined for the item in the system.
- Description: Here, the description of the original item whose reorder alias has been created is mentioned.
- UPC Purchase Unit UPC: This is the UPC of the parent item for the original item.
- UPC Purchase Unit Description: The description of the parent item for the purchase unit
- UPC Subunit UPC: Here, the UPC of the linked child item is mentioned in this column.
- UPC Subunit Description: The description for the child item is mentioned in this column.
- UPC Link Qty: This is the fixed quantity value that describes the relationship between the parent and child items. For example, 1 cigarette carton contains 10 cigarette packs. So, 1 carton would be the parent item, and 1 pack would be the child item.
- Reorder Alias Purchase Unit UPC: The new UPC for the parent item for the reorder alias is mentioned here in this column.
- Reorder Alias Purchase Unit Description: The description for the reorder alias purchase unit is mentioned here.
- Reorder Alias Subunit UPC: The UPC child item for the newly created reorder alias is mentioned here.
- Reorder Alias Subunit Description: The description for the reorder subunit is mentioned here.
- Reorder Alias Link Qty: The renewed/changed link quantity value (if so) is mentioned here in this column.
3. Manage Filter
See Figure D. Now, let's see how to check the Reorder Alias Report with different filters. The data in the Reorder Alias Report can be filtered into different categories as well. The filter options are:
- UPC: It stands for Universal Product Code (UPC), which helps in tracking items at the store. This UPC column displays the UPCs of the items that are listed.
- Department: If you select "Department," you will see a report of items that are transferred department-wise.
- Manufacturer: If you select "Manufacturer," you will see the manufacturer-specific inventory data in the report of the items that are transferred.
- Category: If you select "Category," you will see the product's category-wise data in the list report. You need to select the level from the "Category" drop-down selection.
- Tag: If you select "Tag," you will get the tag-wise data for the group that is entered in the product details. When you select "Tag," the specific tag group will be enabled.
- Vendor: If you select "Vendor," you will get vendor-specific data for the group that is entered in the product details.
- Department Tag: If you select "Department Tag," you will get the department-tag-wise data for the group that is entered in the product details.
1. Selected List: You will have one flag to decide whether you want to "Include" or "Exclude" the selected records when Figure D is generated.
- Include: If the flag is selected as "Include," it means the "Reorder Alias Report" will be generated by applying the selected records. See Figure D above.
- Exclude: If the flag is selected to "Exclude," it means the "Reorder Alias Report" will be generated without including the selected records. See Figure D above.
2. Clear Selection: You can remove any record from the list by clicking the Remove (x) icon. If you want to remove the whole selection, click the "Clear Selection" button.
4. Resultant Report
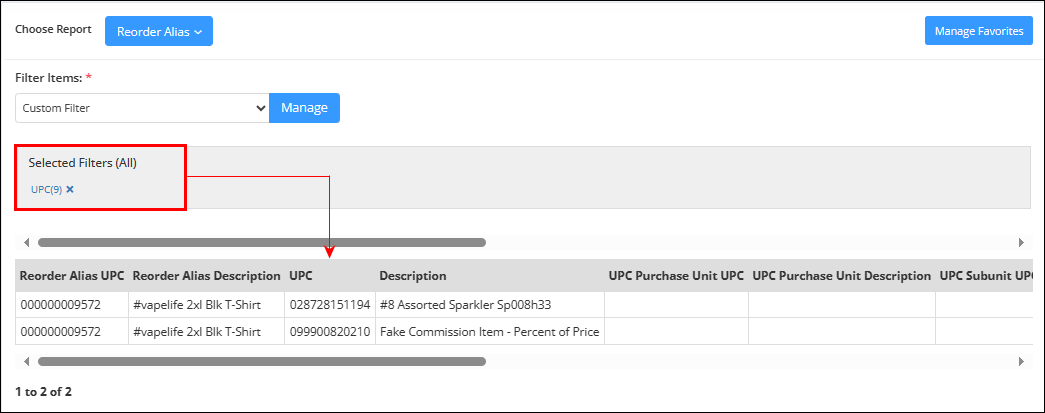 Figure E
Related Articles
Reorder - Purchase Orders – Classic
Reorder - Purchase Orders Overview A purchase order, commonly referred to as a PO, is a formal offer from a buyer to a seller to purchase specific products or services at a specified price. Generally, purchase orders are created in Control Center ...Overrides Report
Overview The "Overrides Report" allows users to review configuration values that have been overridden from system defaults across Control Center. It provides audit-level visibility for overrides applied to Departments, POS Flags, Products, and POS ...Out Of Stock Report
Out Of Stock Report Overview The "Out Of Stock Report" type will display the list of those products that are currently not in stock, as per the database records of the inventory management system. The system will display the records of Out of Stock ...Barcode/Shelf Label Report
Barcode/Shelf Label Report Overview The "Barcode/Shelf Label Report" feature enables you to generate and print barcode labels for shelves or individual products. It supports various label types, including Avery, Dymo, and Zebra formats. Labels can be ...Out Of Stock Report - Store Employee
Out Of Stock Report Overview The Out Of Stock Report type will display the list of those products that are currently not in stock, as per the database records of the inventory management system. The system will display the records of Out of Stock ...