Sale Restrictions
Sale Restrictions Overview
Sale restrictions are rules that block sales for a certain time period. These allow certain items in your price book to be restricted so that they cannot be sold during certain days or certain hours. Sale restrictions come in handy in situations where a store selling restricted items (such as alcohol) likes to abide by the local county rules.
In this guide, you will learn:
- How to add sale restrictions
- How to edit sale restrictions
- How to delete an applied restriction on an item(s)
1. Reaching the "Sale Restrictions" Module:
To reach the "Sale Restrictions" module:
1. Log into Control Center2. Choose Point of Sale3. Choose Maintenance4. Choose Restrictions5. Choose Sale Restrictions
Figure 1.0
2. Understanding the "Sale Restrictions" Module Layout
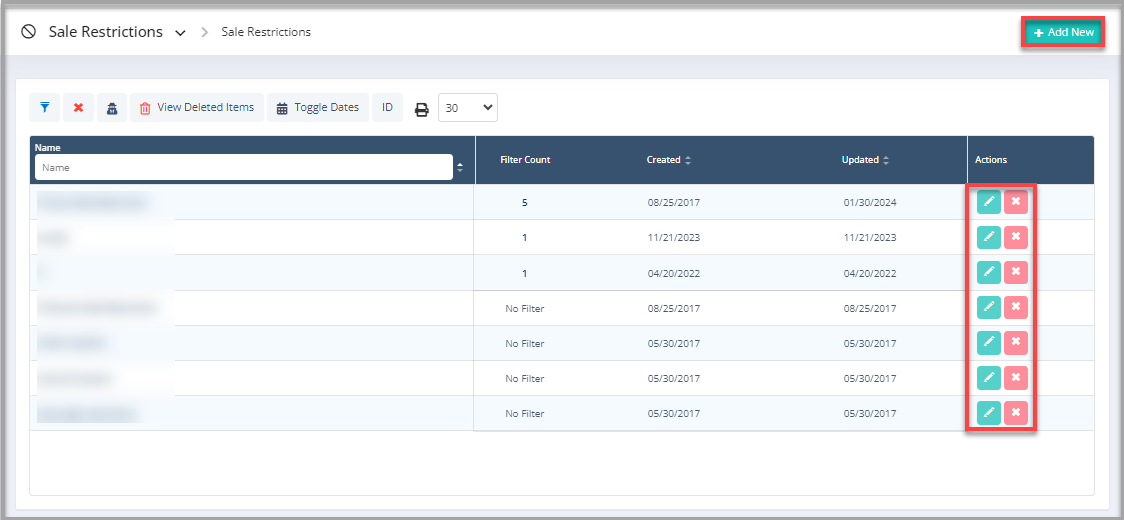
Please see the image below labeled Figure 2.0 for descriptions of the buttons and fields that appear on the screen:  Figure 2.0
From here, you can add, edit, and delete the sale restrictions as per your requirements.
3. Adding New Sale Restrictions
Follow the steps below to add a new sale restriction:
- Click the “Add New” button highlighted in Figure 2.0 above to create a sale restriction.
- The form highlighted in Figure 3.0 will appear on your screen.
Figure 3.0
3.1. Fields:
- Name: The name of the sale restriction is defined here.
- Restriction Schedules: This part of the Sale Restrictions form is where you will set the restriction schedule for the items selected. You can select a particular day(s) and time as per the store's working hours to schedule the sale restriction. For the day(s) the sale restriction is active, it will be highlighted in green. Non-active sale restriction day(s) will be highlighted in red.
3.2. Manage Assignment
- Select Locations:
This option lets you override the item sale limit to a specific location, location group, or all.
1) All: If this option is selected, it will apply the sale limit to all locations.2) By Locations: If this option is selected, it will apply the sale limit to selected locations.3) By Location Groups: If this option is selected, it will apply the sale limit to all the location groups.
Figure 3.2.0
3.3. Sale Restrictions Filters
To add item type to the sale restrictions:
- Click the “Add Item Type” button highlighted in Figure 3.0 above.
- The form highlighted in Figure 3.3.0 will appear on your screen.
Figure 3.3.0
- Choose the right filter type you wish to use to find the items you wish to add to the sale restriction.
- After you select the item filter you want to use, the "Manage" button in Figure 3.3.1 will appear on your screen.
Figure 3.3.1
- By clicking the "Manage" button, a Manage Filters window will pop up. You will see the following details: (See Figure 3.3.2.)
Figure 3.3.2
- You will see different records to select the item's categories.
- You will find the following checkbox along with all the records:
. You need to select the items from the list and move to the "Selected List" area on the right side.
- Once selected, click on "Apply."
- Now, the sale restrictions will be applied to the selected items only.
4. Buttons:
- Save and Close: This button saves the changes and exits the Sale Restrictions form.
- Save and New: This button also saves the changes made but opens a new Sale Restrictions form.
- Save: This button saves the current changes made and opens the same page.
- Cancel: This button cancels all the changes made.
4. Editing Sale Restrictions
Follow the steps below to edit sale restrictions:
- Click the Edit Sale Restriction button highlighted in Figure 2.0 above to add an item type.
- The form highlighted in Figure 4.0 will appear on your screen.
Figure 4.0
As highlighted above in Figure 4.0, the day on which the sale restriction is active is highlighted in green (Tuesday). Days with no restrictions will be listed in red.

Edit the data in the fields, which are explained above under Add New Item Sales Limit, to update the existing sale restrictions.
5. Deleting Sale Restrictions
Follow the steps mentioned below to delete items with sale restrictions:
- Click the Delete button highlighted in Figure 2.0 above to delete sale restrictions.
- The dialog box highlighted in Figure 5.0 will appear on your screen.
Figure 5.0
- Click “Yes, Delete” to
continue the deletion process of the Sale Restriction record.
- Click “Cancel” to close
the pop-up and skip the deletion process.
Related Articles
Item Sale Limits
Item Sale Limits Overview An item sale limit is a simple rule that can be placed on a product(s) to limit their sale in a single transaction or per day. This feature comes in handy for specific products that may have transactional limits set by the ...Remote Sale
Remote Sale Overview "Remote Sale" shows you the list of all remote sales created using the handheld device at your locations. The Remote Sale feature allows store employees to create sales in advance before the customer reaches the checkout counter. ...Remote Sale - Store Employee
Remote Sale Overview "Remote Sale" displays a list of all remote sales created using the handheld device at your store locations. This feature is useful in situations where customers place advance orders and come later to pick them up — often ...POS Flag Report
POS Flag List Report Overview POS flags allow you to add restrictions on certain sale items based on age. This report lists all POS flags, tax groups, and settings/age restrictions that are associated with them. 1. Reaching the "POS Flag List Report" ...Departments - Store Employee
Departments Overview Departments are used to group products that share similar characteristics — such as tax settings, reorder details, and other values. This structure helps you easily view and understand how similar items are organized. As an ...