Scheduling a Report
Overview
Scheduling reports can enhance the efficiency and profitability of retail businesses by offering insights into key metrics such as sales volume, customer satisfaction, and delivery times. These insights are instrumental in pinpointing areas requiring enhancement and fine-tuning operational strategies.
FTx Cloud POS supports report automation. You can configure specific reports that can be printed or emailed at set times and recurrences. The system will send the scheduled report to the indicated email IDs at the defined frequencies (daily, weekly, bi-weekly, monthly, quarterly, etc.). You can create as many schedules as required, each with unique settings.
 You can schedule, replace, and manage any report included in List Reports, Sales Reports, Smart Till Reports, Inventory Reports, and Lottery Reports following the steps mentioned in this article. You can also replace or edit the existing scheduled report.
1. Scheduling a New Report
Prerequisite: Please ensure you have configured a report. This means you have made the required selections for date ranges and filters. (You don't have to click "Generate Report" to schedule a report.)
Please follow the steps below to schedule a new scheduled report:
- Navigate to the report you wish to schedule. For example, a Buydown Sales Report, Invoice Summary Report, or Time Clock List Report.
- Configure a report as per your requirements using the filter options.
- Click the "Schedule Report" button highlighted in Figure 1.1.
Figure 1.1
- The pop-up screen will appear as shown in Figure 1.2. Click on "Create New Scheduled Report."
Figure 1.2
- The "Schedule Options" screen will appear, as Figure 1.3 shows.
Figure 1.3Fill in the appropriate information in the fields:
- Name: Enter the name for your report.
- Section: For the Cloud POS, the section will be POS by default.
- Run Frequency: Select the run frequency (Daily, Weekly, Bi-weekly, Monthly, Quarterly, etc.) as per your requirements from the Run Frequency drop-down. The system will display additional options depending on the frequency you choose. 1.1 Run Frequency explains further details.
- Run Time: Select the time when you want the system to send the report by email.
- Export Type: Select the report format, i.e., PDF, CSV, and Excel, from this Export Type drop-down.
- Users: Select the users to whom you need to send the report.
- Email Addresses: Enter the selected users' email addresses. Please ensure that you write only one email address per line.
- White Background: Enable this toggle button if you want the report to have a white background.
- Include Header: This toggle button will be enabled by default. Please set it to NO to exclude the report's header from the report.
- Print Title on Every Page: This toggle button will be enabled by default. Set it to NO if you do not want the title printed on each page.
- Click "Schedule Report."
- A success message will appear, and the system will send the scheduled report to the indicated email IDs.
1.1 Run Frequency
Use the Run Frequency drop-down to set the report frequency you are scheduling.
Daily: Choose the Daily option to schedule the report to run every single day. The system will send the configured report to specified email addresses or user IDs daily.Figure 1.1.1
- The Start Time and End Time fields specify the time interval for the reports. The system defaults Start Time to 12:00 AM and End Time to 11:59 PM. You can modify it if necessary.
- The Run Time field specifies the time for the report to run. The system defaults to 11:59 PM. You can modify this setting if necessary.
Weekdays: Choose the Weekdays option to schedule the report to run on weekdays. The system will send the configured report to specified email addresses and/or user IDs on weekdays.Figure 1.1.2
- The Start Time and End Time fields specify the time interval for the reports. The system defaults Start Time to 12.00 AM and End Time to 11.59 PM. You can modify if necessary.
- The Run Time field specifies the time for the report to run. The system defaults to 11:59 PM. You can modify this setting if necessary.
Weekly: Choose the Weekly option to schedule the report to run weekly. The system will send the configured report to specified email addresses and/or user IDs every week.Figure 1.1.3
- The Run On field specifies the day for the report to run. The system defaults to Run On on Monday. You can change it to any other weekday if necessary.
- The Run Time field specifies the time for the report to run. The system defaults to 11:59 PM. You can modify this setting if necessary.
Monthly: Choose the Monthly option to schedule the report to run monthly. The system will send the configured report to specified email addresses and/or user IDs every month.Figure 1.1.4
- The Run On field specifies the day for the report to run. The system defaults to Run On on First Day. You can change it to Last Day if necessary.
- The Run Time field specifies the time for the report to run. The system defaults to 11:59 PM. You can modify this setting if necessary.
Daily - Today: Select the Daily - Today option to schedule the report to run daily AND include the current day.Figure 1.1.5
- The Run Time field specifies the time for the report to run. The system defaults to 11:59 PM. You can modify this setting if necessary.
Bi Weekly: Choose the Bi Weekly option to schedule the report to run bi-weekly. The system will send the configured report to specified email addresses and/or user IDs bi-weekly.Figure 1.1.6
- The Run On field specifies the day for the report to run. The system defaults to Run On on Monday. You can change it to any other weekday if necessary.
- The Run Time field specifies the time for the report to run. The system defaults to 11:59 PM. You can modify this setting if necessary.
Quarterly: Choose the Quarterly option to schedule the report to run quarterly. The system will send the configured report to specified email addresses and/or user IDs quarterly.Figure 1.1.7
- The Run On field specifies the day for the report to run. The system defaults to Run On on First Day. You can change it to Last Day if necessary.
- The Run Time field specifies the time for the report to run. The system defaults to 11:59 PM. You can modify this setting if necessary.
Yearly: Choose the Yearly option to schedule the report to run once a year.. The system will send the configured report to specified email addresses and/or user IDs yearly.Figure 1.1.8
- The Run On field specifies the day for the report to run. The system defaults to Run On on First Day. You can change it to Last Day if necessary.
- The Run Time field specifies the time for the report to run. The system defaults to 11:59 PM. You can modify this setting if necessary.
2. Replacing an Existing Scheduled Report
Please follow the steps below to replace a scheduled report:
- Navigate to the report you need to schedule and configure a report as per your requirements using the filter options.
- Click the "Schedule Report" button highlighted in Figure 1.1.
- The pop-up screen will appear, as Figure 1.2 shows.
- Click "Replace Existing Report." The Select Scheduled Report screen will open, as shown in Figure 2.1.
Figure 2.11: Enter the report name or its part in this Search bar and click the "Search" button.2: The system will display the existing reports relevant to your search. Click on the report you need to replace.3: Click "Apply."
- The selected report will open in the Edit mode. Make the required changes and click "Replace."
- A success message will appear, and the system will send the replaced report to the indicated email IDs.
3. Managing the Scheduled Report
You can manage all your scheduled reports from any of the report screens. Please follow the steps below to manage the scheduled reports.
- Click on the "Schedule Report" drop-down and click "Manage Reports."
Figure 3.1
- The Manage Scheduled Reports screen will appear, displaying the list of all scheduled reports, as Figure 3.2 shows.
Figure 3.21: Use this Search box to search for a specific scheduled report.2: Use this drop-down to view the scheduled reports based on specific sections, such as All, POS, Loyalty, Admin, Cube, Signage, and Unknown.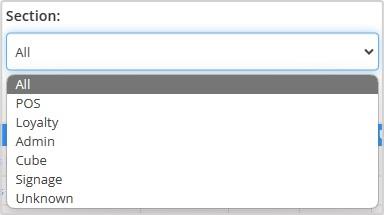 Figure 3.3You will be able to see the section options based on your FTx Cloud POS subscription plan.3: Use this drop-down to view the scheduled reports based on the report frequency, such as All, Daily, Weekdays, Weekly, Monthly, Daily - Today, and Bi-Weekly.Figure 3.44: Edit or delete the report:
- Click the respective Edit button to edit the scheduled report. The Scheduled Report will open in the Edit mode. Make the required changes and click "Save."
- Click the respective Delete button to delete the scheduled report. The system will show a confirmation message. Click "Yes, Delete."
Related Articles
Flash Report
Flash Report Reports -> Sales Reports -> "Flash Report" The "Flash Report" will allow you to check the following configurations: - Buydowns - Commissions - System Discounts - Loyalty Campaigns You can check the configuration records that are already ...Deposits Report
Deposits Report Overview "Deposits Report" lets you view the deposit records. The store experiences significant traffic on weekends, holidays, and during festivals. Many customers tend to pay in cash during these times, which can lead to the cash ...Cycle Count Coverage Report
Cycle Count Coverage Report Overview Reports -> Inventory Reports -> "Cycle Count Coverage" The store admin/executive manages the inventory of the store using a POS system handheld device to count the inventory periodically. At the time of counting ...Manufacturers List Report
Manufacturers List Report Overview The "Manufacturers List Report" provides a simple, scrollable list of all manufacturers entered into the system. Each row displays the manufacturer name as recorded in the database. This report is primarily used for ...Report Favorites - Store Employee
Report Favorites Overview Report Favorites provide quick access to reports you’ve saved for easy viewing and management. These can include list reports, sales reports, and inventory reports. Each report screen includes a "Manage Favorites" button, ...