Time Clock - Store Employee
Time Clock Overview
This module is designed for employees who do not access the point-of-sale (POS) system. It provides a simplified interface for managing tasks, accessing information, and performing routine operations without requiring POS credentials.
Key features include:
Access Control: Simplified access without POS login.
User-Friendly Design: Quick navigation for non-POS workflows.
Ideal for roles like back-office staff, warehouse personnel, or support teams not involved in direct customer transactions.

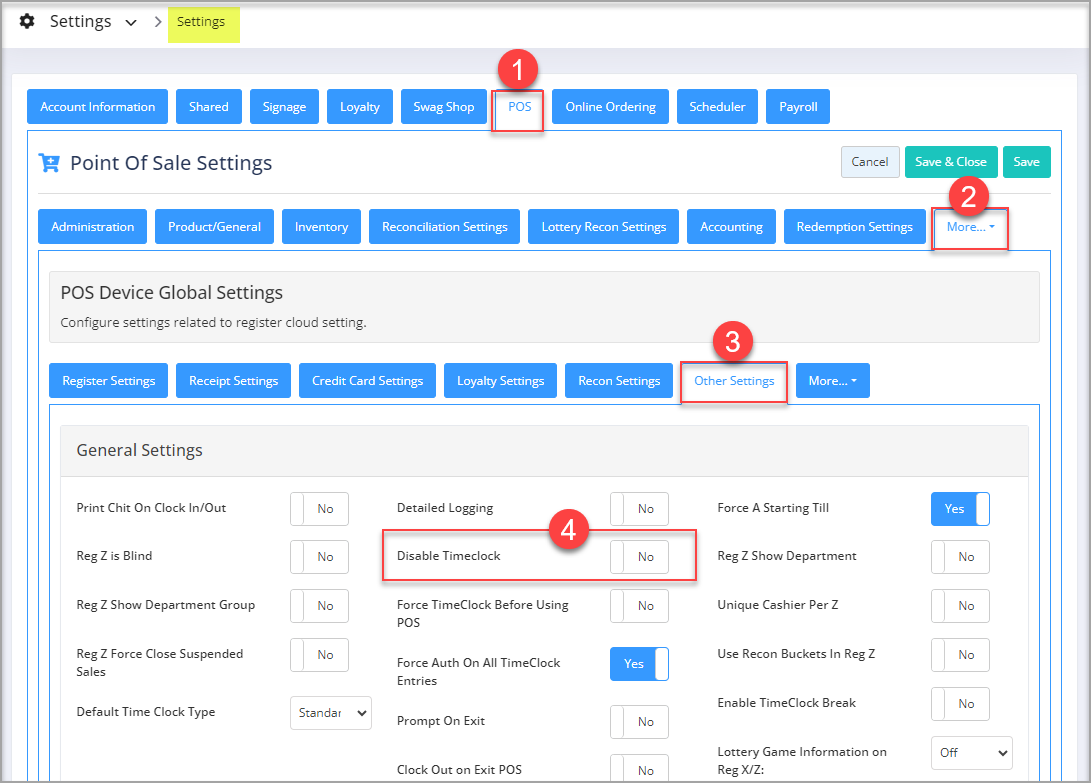
Prerequisite: For employees to access this module, the following settings are required to be set to NO by the corporate user.
Navigation: Control Center>>POS>>POS Settings>>More>>Other Settings>>Disable Timeclock. Figure 0.0
- After logging in, make sure that you have selected the current location.
Reaching the "Time Clock" Module:
To reach the "Time Clock" module, follow the steps below:
- Step 1: Log into Control Center
- Step 2: Choose Time Clock
Figure 0.1
Understanding the "Time Clock" Module Layout in Control Center
Please see the image below labeled Figure 0.2 for a description of the buttons and fields that appear on the screen.
Figure 0.2
When you click on the "View Details" button, the form highlighted in Figure 0.3 appears.
Figure 0.3
1. Clock In: Employees can use this button to clock in their shift.
2. Print: This button is used to print the employee time clock (shift) report.
1. Clocking In for Your Shift
Employees who do not have access to log in through the POS system can use the Control Center to log in.
Follow the steps below to clock in:
Follow the steps below to clock in:
- Click the “View Details” button highlighted in Figure 0.1 above to clock in.
- The form highlighted in Figure 1.0 will appear on your screen.
- Click on the "Clock In" button as shown in Figure 1.0.
Figure 1.1
- Select the Entry Type from the drop-down list.
Figure 1.2
- Standard: This option is by default set by the system and is often chosen for a general shift.
- Sick/Vacation/Holiday/Bereavement/Unpaid Time Off: These are different options that can be selected in case employees are to be paid/unpaid for time off.
- Other: Choose this option if the time entry doesn’t fall into the above-mentioned categories.
- Once selected, click on "OK."
- You will be notified with a Success message.
- Click on "OK" to proceed.
Figure 1.3
- After acknowledging the Success message dialog box, your clock-in record will be created, and it will appear as displayed in Figure 1.4 below.
Figure 1.4
1.1. Clocking Out from Your Shift
Follow the steps mentioned below to clock out from your shift:
- After completing your shift, click the “Clock Out” button (as shown in Figure 1.1.0) to end your work session.
Figure 1.1.0
- The Success alert highlighted in Figure 1.1.1 will appear on your screen.
Figure 1.1.1
- Click on "OK" to acknowledge the clock-out message.
2. Printing the Time Clock
With the Print function, the system will create the shift's file based on the selections made and open it in a new tab. You can download the soft copy or print the paper copy as per your requirements.
- Export the shift as a PDF, CSV, or Excel file.
- Open the PDF in a new tab with a single click.
Follow the steps mentioned below to print the time clock:
- Click the "Print" button highlighted in Figure 0.3 above.
- Make the selections you wish to have on the printout.
- Click the "Start Print" button to create the file.
Figure 2.0
Make appropriate selections:
- Sort By: Select any option: None, In-Time, Out Time, or Time Worked.Figure 2.1
- Export Type: Select the export type as any of the following: PDF, CSV, or Excel (xlsx).
Figure 2.2
- Include Header: The system enables this button by default. Please turn it off to exclude the time clock's file header from the report.
- Repeat Header On Every Page: This button is enabled by default. Set it to No/Yes if you want to add/remove the title from showing on each time clock page.
- Send As Email: Enable this button to send the time-clock file via email. The Email Address field will appear. Enter the email address and click "Send Email."
Once printing settings are configured, click "Print" to print the time-clock report in the desired format.
The report will appear as highlighted in Figure 2.3.
Figure 2.3
Related Articles
Time Clock Edited Entries Report - Store Employee
Time Clock Edited Entries Report Overview The "Time Clock Edited Entries Report" provides a detailed view of all time clock entries that have been manually edited by users or administrators. This includes changes such as clock-in or clock-out times ...Time Clock Entry Report
Time Clock Entry Report Overview The "Time Clock Entry Report" shows all employee time clock entries within the designated time frame. 1. Reaching the "Time Clock Entry Report" To reach the "Time Clock Entry Report," follow the steps below: Step 1: ...Time Clock Edited Entries Report
Time Clock Edited Entries Report Overview The "Time Clock Edited Entries Report" shows the edited time clock entries with notes and user details within the designated time frame. Various types of filters can be applied to get the desired data in the ...Time Clock Manual Entry – Control Center (Users)
Time Clock Manual Entry Overview The "Time Clock" feature is used to record and track the working hours of store employees. It ensures accurate timekeeping by logging when employees clock in and out of their shifts. To learn more about how employees ...Executive Comparison Crosstab Report - Store Employee
Executive Comparison Crosstab Report Overview The "Executive Comparison Crosstab Report" in the FTx Cloud POS consolidates data from sales, cycle counts, and time clocks to provide a weekly overview of a specific location. This article includes ...