Label Printing - Store Employee
Label Printing Overview
The FTx Label Printing System supports digital label printing with a focus on flexibility, customization, and integration. It enables users to create and manage label templates tailored to various business needs, improving both inventory control and checkout efficiency.
Key features include:
- Custom Label Templates: Design and print barcode label templates for products.
- Inventory Integration: Seamlessly syncs with inventory systems for accurate product tracking and stock visibility.
- Printer Compatibility: Supports label printing using Avery, Dymo, and Zebra printers.
This module simplifies the labeling process by allowing businesses to manage label formats centrally and print in bulk, reducing manual effort and potential errors.
This article covers how to:
- Create and add new barcode label templates
- Edit existing label layouts
- Print barcode labels using the saved templates
Reaching "Label Printing"
To reach "Label Printing," follow the steps below:
- Step 1: Log into Control Center
- Step 2: Choose Pricebook
- Step 3: Choose Label Printing
Figure 0.1 below will help you understand the navigation better.
Figure 0.1
Understanding the "Label Printing" Layout
Please see the image below, labeled Figure 0.2, for a description of the buttons and fields that appear on the screen.
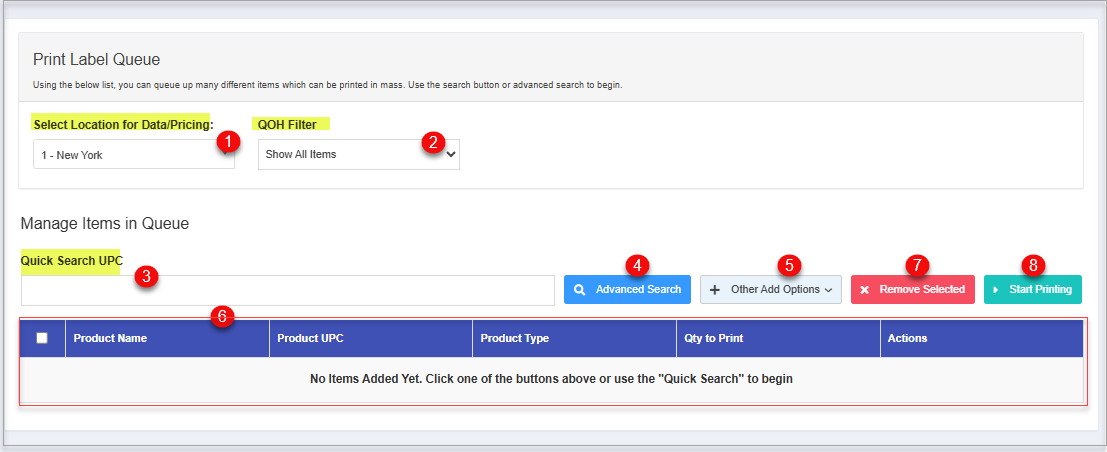
Figure 0.2
Key Information:
- Select Location for Data/Pricing: A dropdown menu to choose a store location (e.g., "1 - New York") — used to pull correct pricing and product data.
- QOH Filter: Filters products based on Quantity on Hand (QOH). The default option shown is “Show All Items.”
- Quick Search UPC: A search bar where users can enter UPC codes to find products quickly.
- Advanced Search: Opens more detailed search/filter options.
- Other Add Options: A dropdown for alternative methods to add products to the queue.
- Added Product Table: The details of the product that you are adding for printing labels.
- Remove Selected: Removes selected items from the queue.
- Start Printing: Begins the label printing process for the items in the queue.
1. Selecting Location for Data/Pricing
The location dropdown is used specifically for label printing.
Figure 1.1
- Select the location to specify the source location from which product information and pricing will be pulled for generating labels.
2. QOH Filter:
This field displays the different filters for quantity on hand. Select any one of the options from the drop-down list as per the requirements.
Figure 2.1
- Only Items > 0: This option will display only items with a QOH greater than 0.
- Only Items < 0: This option will display only items with a QOH lesser than 0.
- Only Items >= 0: This option will display only items with a QOH greater than or equal to 0.
- Only Items <= 0: This option will display only items with a QOH less than or equal to 0.
- Only Items = 0: This option will display only items with a QOH greater than 0.
- Only Items <> 0: This option will display only items with a QOH not equal to 0.
3. Quick Search UPC:
If you wish to print a label for a particular product, enter the UPC for the product in Quick UPC Search that you wish to add to the queue for printing.
Figure 3.1
- Type in the UPC and press Enter. See Figure 3.1 for reference.
- The product will be added to the product table and will be ready for printing its label.
4. Advanced Search:
The Advanced Search lets you filter products by name, type, department, vendor, and status (Active/Inactive). Use it when the UPC is unknown or when managing multiple products. Select and add the desired product to the queue from the results.
Figure 4.1
Sections on the Advanced Search page:
- Type Product Name: Use this field to type and search a product.
- All Products: Use this field to choose the product type - Parent, Child, Standalone, or All Products.
Figure 4.2
3. Only Active: Use this field to filter records by status — Active, Inactive, or All Records. Selecting "All Records" includes both active and inactive records for a broader search.
Figure 4.3
4. All Departments: Use this field to choose a particular department or all departments for searching for a product to add.
Figure 4.3
5. All Vendors: Use this field to choose a particular department or all vendors for searching for a product to add.Figure 4.4
6. Search: Use this button to fetch the products as per your requirements.
7. Add Items to the Queue: This button adds selected products from the search results to the print queue. This allows you to print labels for multiple items at once. Ensure items are selected before clicking the button.
- Click on "Cancel" to cancel the selection and exit the select product screen.
Let's see one example:
- Once the customization for selecting a product is made, then follow the steps below:
Figure 4.5
See Figure 4.5 above:
1. Click on "Search"  once the product selection customizations are done.
2. Make the selection of products by checking the checkboxes  against the product name.
3. Click on "Add Items to Queue"  in order to add the selected items to the print label queue.
The added products will be as highlighted in Figure 4.6.
Figure 4.6
5. Other Add Options
This field allows you to select additional product options for label printing. You can add products to the queue that have undergone price or cost changes, appear on the adjustment worksheet, or have been recently invoiced and added to inventory.
Figure 5.1
5.1. Add by Price Changes
Select items from the list of products that you wish to add whose price/cost is changed to the queue for label printing.
Figure 5.1.1
- You can search for a product by entering its name or UPC on the basis of cost or price change.
- Check the product to select the product and click on "Add Items to Queue" to add them to the queue.
5.2. Add by Worksheet
Select the worksheet from the list of worksheets that are displayed after searching. Click "Add Worksheet Items to Queue," and it will add the respective items to the queue for label printing.
Figure 5.2.1
5.3. Add by Invoice
Select the invoice from the list of invoices that are displayed after searching.
- Click on "Add Invoice Items to Queue," and it will add the respective items to the queue for label printing. Whenever new items arrive at the store with an invoice, it becomes easier to print their labels in time.
Figure 5.3.1
- Once you click on "Add Invoice Items to Queue," you will be prompted with the ALERT message seen in Figure 5.3.2.
Figure 5.3.2

- All Items on Invoice & Children – Adds every item from the invoice, including any associated child items
- Only Items on Invoice (No Children) – Adds only the main items from the invoice, excluding child items.
- Only Child Items (No Parent Items) – Adds only the child items, without their parent items.
- Child Items and Standalone – Adds child items along with standalone items (not linked to any parent).

For example: If you select Invoice # 0011223344 as displayed in Figure 5.3.2, and "All Items on Invoice & Children" from Figure 5.3.2, then the list of products will be added as highlighted in Figure 5.3.3.
Figure 5.3.3
6. Products Table Displaying Items Added to the Print Queue
This table displays all the products that have been added to the print queue, including details like product name, UPC, and quantity, allowing you to review and manage items before printing labels.
Column Description:
Column Description:
- Once the products have been added to the printing label queue, they can be printed as per the business requirements.
- You can use this screen to manage items added to the printing queue.
- Different sections of the Label Printing System screen are explained below for better understanding.
Figure 6.1
Selected Products List Records that are added to the queue for printing:
- Product Name: Here is the name of the product for which the label is to be printed.
- Product UPC: The UPC for the product is mentioned in this column.
- Product Type: The product type is mentioned in this column as parent, child, or standalone.
- Qty to Print
: The quantity number is the quantity number that describes how many labels should be printed for the selected products.
- For example, if the value of the print quantity is 5, the system will print 5 labels for each item. With (+) and (-) signs, you can add or subtract the quantity number.
- Actions: To remove the individual added product, the "Remove Item" button can be used.
- Remove Selected: This button lets you delete all the checked records of the products that are added to the queue.
- Start Printing Button: This button will print the labels as per the selected options. explained below in the latter part of the document.
7. Remove Selected
The "Remove Selected" button deletes all items that have been checked in the queue list. Use this option to bulk-remove multiple products from the print queue in one action.
Figure 7.1
- Check the checkboxes for the items that you wish to remove and click on "Remove Selected."
Figure 7.2 - The selected items will be deleted from the product list table.
8. Start Printing Button
This button will help you choose the printer and allow you to print the labels as per the created print templates.
- Click on the button to get directed to the Print Options page.
- All the options found on Print Options are explained below:
Figure 8.1
- Choose Printer Type: This field lets you choose the printer type from the drop-down list that consists of 4 options for selecting a printer type for your labels. See Figure 8.2. Select the printer type that suits your needs.
Figure 8.2
- Avery Format: In case you have selected the Avery option, the customization option as per the Avery format pops up, as displayed in Figure 8.3 below.
- Choose Avery Format: Three options for Avery labels are explained below:
Figure 8.3
- Avery 5160: The Avery 5160 label template allows the generation of labels with the product's UPC number, price, and barcode. The label will be generated as shown in Figure 8.4.
Figure 8.4- Avery 5167: The Avery 5167 label template allows the generation of labels with the product's UPC number and the product's barcode. One major difference between Avery 5160 and Avery 5167 is that it displays only the item name, barcode, and UPC in a smaller font. See Figure 8.5.
Figure 8.5
- Avery 94220: The Avery 94220 label template allows the generation of labels with the product's name, the product's price in bold fonts, and the product's barcode with the UPC number. See Figure 8.6.
Figure 8.6
- Show Price: If this toggle is set to YES, it will display the price of the product on the label.
- Show UPC: If this toggle is set to YES, it will display the UPC of the product on the label.
- Include Buydowns: Enable this toggle to include buydowns to show the discounted price on the label.
- Include Discounts: Enable this toggle to include discounts to show the discounted price on the label.
- Use Aliases: If this toggle is enabled and no aliases exist for the item, the system will automatically use and display the standard UPC without asking for user confirmation.
If aliases are found, the system will perform the following checks:
- If primary aliases are set for an item, the system will display or print that primary alias.
- If no primary alias is set but the item has only one alias mapped, the system will consider this alias as primary and print it.
- If multiple aliases are mapped and no alias is set as primary, the system will consider the alias that was added first as the primary and print it.
2. Shelf Templates
The 2x1.25 shelf tag label template allows the generation of labels with the product's UPC number and the product's barcode. These labels are used on the shelf where the products are stored. See Figure 8.7.
Figure 8.7
- Show Price: If this toggle is set to YES, it will display the price of the product on the label.
- Show UPC: If this toggle is set to YES, it will display the UPC of the product on the label.
- Include Buydowns: Enable this toggle to include buydowns to show the discounted price on the label.
- Include Discounts: Enable this toggle to include discounts to show the discounted price on the label.
- Use Aliases: If the toggle is enabled and no aliases are found for the item, the system will automatically display or print the standard UPC without prompting the user.
If these toggles are set to NO, they will not display the price and UPC of the product on the label.
The resultant printed label:
Figure 8.8
3. Zebra Formats
The Zebra Formats template allows the generation of labels with the product's UPC number, price, and barcode. The label will be generated as shown in Figure 8.9.
Figure 8.9
- Choose Zebra Format: There are many predefined zebra formats. Choose the one from the drop-down.
- Use Full PLU: If this toggle is set to YES, this will display the full Price Lookup Unit code for the item on the label.
- Choose Printer: Choose the printer from the drop-down list.
Download JS Print Utility: In case the JS Printer is not installed on your system, click on the link button as highlighted in Figure 8.9 to do so. This utility helps in previewing the template for your label.
Figure 8.10
4. Dymo Formats
- The Dymo Format template allows the generation of labels with the product's UPC number, price, and barcode.
- To print labels using Dymo formats, you'll need to use the Dymo label software.
Figure 8.11
- Choose Dymo Format: There are many predefined formats. Choose the one from the drop-down.
- Choose Printer: Choose the printer from the drop-down list.
- Include Buydowns: Enable this toggle to include buydowns to show the discounted price on the label.
- Include Discounts: Enable this toggle to include discounts to show the discounted price on the label.
- Use Aliases: If the toggle is enabled and no aliases are found for the item, the system will automatically display or print the standard UPC without prompting the user.
A sample Dymo label:
Figure 8.12
- You need to install the Dymo Web Service App to print the Dymo labels.
Related Articles
Barcode/Shelf Label Report - Store Employee
Barcode/Shelf Label Report Overview The "Barcode/Shelf Label Report" feature enables you to generate and print barcode labels for shelves or individual products. It supports various label types, including Avery, Dymo, and Zebra formats. Labels can be ...Employee Sales Report - Store Employee
Employee Sales Report Overview The "Employee Sales Report" in the FTx Cloud POS system is a detailed summary that tracks and displays individual employees' sales performance over a selected period. This article includes information about: How to ...Negative Cashier Report - Store Employee
Negative Cashier Report Overview The "Negative Cashier Report" in the FTx Cloud POS lists negative actions taken in a specified store and date range. Negative actions include voids, cancellations, returns, and no sales. It shows all transaction ...Location Sales Report - Store Employee
Location Sales Report Overview The "Location Sales Report" in FTx Cloud POS summarizes the sales performance of the selected store location. This article includes information about: How to generate the Location Sales Report for the selected date ...Manufacturer Sales Report - Store Employee
Manufacturer Sales Report Overview The "Manufacturer Sales Report" shows sales information for all or selected categories, manufacturers, and vendors. Various filters can be configured to make the report more specific. This article includes ...