Discounts - Store Employee
Discounts Overview
In FTx Cloud POS, system discounts are automated pricing adjustments applied to products or transactions based on predefined business rules. These rules enable businesses to strategically manage pricing across various locations, times, and quantities.
As an employee, you can access and review the structure and triggers of these discounts.
For example, discounts might apply only on certain days or hours, at specific store locations, or when a minimum quantity is purchased.
For example, discounts might apply only on certain days or hours, at specific store locations, or when a minimum quantity is purchased.
While you cannot create, edit, or delete discounts, you can view all active discounts and their configurations to stay informed. The system also generates comprehensive reports showing discount usage, total savings, and their financial impact — helping you stay aligned with store operations and pricing strategies.
This article is intended to give an overview of the discount setup for informational purposes. Only users with appropriate permissions can make changes.
Reaching "Discounts"
To reach the "Discounts" module:
- Step 1: Log into Control Center
- Step 2: Choose Pricebook
- Step 3: Choose Discounts/Buydowns
- Step 4: Choose Discounts
Figure 0.1 below will help you understand the navigation better.
Figure 0.1
Understanding the "Discounts" Module Layout
Please see the image below, labeled Figure 0.2, for a description of the buttons and fields that appear on the screen.
Figure 0.2
- View Discounts: Click the View icon to view detailed information about the selected discount.
- View Discounts Note History: It displays any comments or notes that have been added over time, providing context or reasoning behind the discount setup or changes (if applicable).
1. Viewing Discounts
This screen represents the View Discount interface in FTx Cloud POS and is used to view detailed configuration and item association for a specific discount. It is intended for users with view-only access or those verifying existing discount setups.
Below is a breakdown of each section:
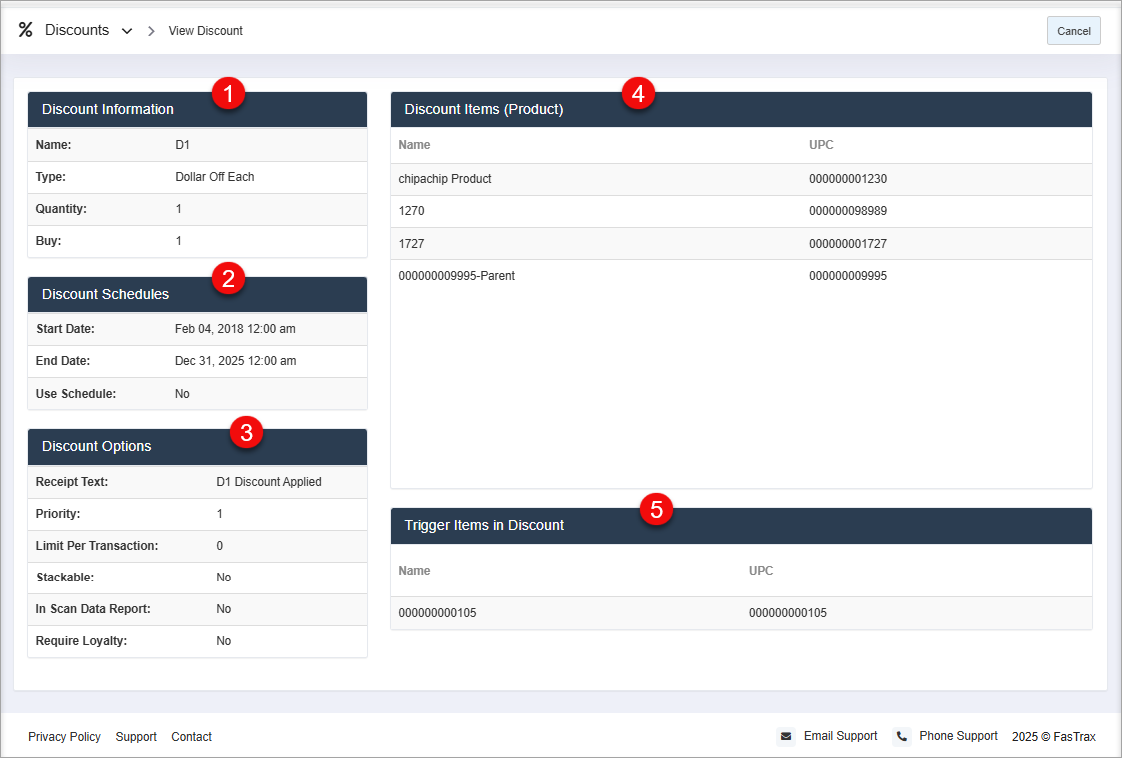
Below is a breakdown of each section:
Figure 1.1
1. Discount Information
Displays the basic details of the discount rule:
- Name: The internal name or label of the discount.
- Type: The discount method used (e.g., Dollar Off Each).
- Quantity: The quantity eligible for discount.
- Buy: Indicates how many items must be purchased to trigger the discount.
2. Discount Schedules
Shows when the discount is active:
- Start Date / End Date: The date range during which the discount is valid.
- Use Schedule: Indicates whether the schedule feature is activated (Yes/No).
3. Discount Options
Provides specific configuration details:
- Receipt Text: Text printed on the customer receipt when the discount is applied.
- Priority: The order in which this discount is applied relative to others.
- Limit Per Transaction: Restricts how many times this discount can apply in a single transaction (0 = no limit).
- Stackable: Whether this discount can be combined with others.
- In Scan Data Report: Indicates if this discount appears in reporting for scan data submissions.
- Require Loyalty: Specifies if customer loyalty enrollment is needed to apply the discount.
4. Discount Items (Product)
Lists the items that receive the discount:
- Name and UPC: Identifies all products that are eligible for the discount under the current configuration.
5. Trigger Items in Discount
Displays items that trigger the discount (can differ from discounted items). The listed item(s) must be present in the transaction to activate the discount logic.
- Name: Indicates the item's name
- UPC: Unique product code for each trigger item.
2. Viewing the Discounts Notes History
This option lets you view the created notes history about any change in the previously created discount with a timestamp, note, and user who made the change.
- Click on the View Notes button highlighted in Figure 0.1 above as well as in Figure 2.1 below for reference to view discount notes.
Figure 2.1
- The screen highlighted in Figure 2.2 will appear on your screen.
Figure 2.2
Related Articles
System Discounts Report - Store Employee
System Discounts Report Overview The "System Discounts Report" in the FTx Cloud POS system provides a detailed overview of all discounts automatically applied by the system based on predefined rules or promotions. This report is a collection of ...Buydowns - Store Employee
Buydowns Overview In FTx Cloud POS, a Buydown refers to a temporary reduction in the retail price of a product, funded by the supplier, vendor, or manufacturer. These promotional price reductions are set based on specific criteria such as time ...Uplift Sales Report - Store Employee
Uplift Sales Report Overview The "Uplift Sales Report" in FTx Cloud POS provides insights into employee performance related to spiff commissions. Spiff campaigns are configured through "Commissions," where selected items are tied to commission ...E-Journal Report - Store Employee
E-Journal Report Overview The E-Journal Report (Electronic Journal Report) is a digital record of all transactions processed on the POS terminal. It functions like a digital copy of the cash register receipt tape, capturing every action done on the ...Daily Sales Report - Store Employee
Daily Sales Report Overview Various types of sales reports provide the most critical statistics for running a business efficiently. A daily sales report summarizes all sales made during the day at a company. FTx Cloud POS includes the "Daily Sales ...