Loyal-n-Save: Loyalty Settings
Loyal-n-Save: Loyalty Settings Overview
In Control Center, the path is Point of Sale > Maintenance > Settings & Panels > Loyalty
All loyalty global settings will be set here; some of these settings can also be overridden at the campaign level.
1. General Information
Figure 1.0
- Chain Display Name: Enter your chain display name. This is the name that will be prominently displayed across all aspects of your Loyal-n-Save loyalty program. It should be the official name of your business or a recognizable brand name that your customers are familiar with. This name will appear on the loyalty program website, in the app, and in any communications with your customers.
- Description: This section should provide a detailed overview of your business. Include information such as the type of products or services you offer, your business's mission and values, and what sets you apart from competitors. This description will help customers understand who you are and why they should join your loyalty program.
- Chain Background: Select a background color that complements your brand's color scheme. This will be displayed behind your logo when customers search for your store.
- Chain Logo:Your logo should be a high-quality image that effectively represents your brand. It will appear across the Loyal-n-Save platform, including the app, website, and customer communications.
 Please contact FasTrax if you would like to have your logo updated.
2. Options
Figure 1.1
- Default Balance Type: The balance type is a separation of the token bucket in which the tokens will be placed upon earning from the campaign.
- Interest Bonus Reward Tokens: The "Interest Bonus Reward Tokens" refer to additional reward tokens that a customer can earn upon completing a Customer Interests Survey. These tokens are additional credits added to the customer's account.
 Not related to the EAIV Survey. Customer Interests presents a list of product categories that customers may be interested in. This feature is displayed when a customer first joins your store on the app and is integrated with the "Marketing" tab, enabling you to target campaigns and email promotions based on their specific interests. It functions as an Additional Customer Marketing Survey, which must be configured by the Client for the survey to appear on the app.
- Complete Profile Bonus Reward Tokens: The Complete Profile Bonus Reward Tokens setting allows retailers to reward customers with bonus loyalty tokens when they complete their profile with the required contact information.
- Bonus Token Value: Numeric field used to specify the number of tokens awarded when a customer meets the profile completion requirement.
- Retailers must select one requirement that determines when the bonus tokens are earned:
- Required Phone and Email: Customers must add both a valid phone number and email address to their profile to earn the bonus tokens.
- Required Either Phone or Email: Customers can earn the bonus tokens by adding either a phone number or an email address.
- Required Only Email: Customers must add a valid email address to qualify for the bonus tokens.
- Required Only Phone: Customers must add a valid phone number to qualify for the bonus tokens.
How the Bonus Is Awarded: Once the selected profile completion requirement is met, the system automatically credits the configured bonus tokens to the customer’s loyalty wallet.
The bonus is awarded only once per customer, even if profile details are updated again later. Token crediting follows standard loyalty wallet and expiry rules.
Example: A retailer sets Complete Profile Bonus Reward Tokens = 150 and selects Required Either Phone or Email. When a customer adds a phone number or an email address to their profile for the first time, 150 reward tokens are automatically credited to their account.
- Swag Item Review Reward Tokens: The Swag Item Review Reward Tokens setting allows retailers to reward customers with bonus loyalty tokens when they submit a review for a swag item. This feature encourages customer engagement and helps retailers collect valuable feedback on merchandise.
- Reward Token Value: Retailers specify the number of tokens to be awarded when a customer submits a valid review for a swag item.
How the Bonus Is Awarded: When a customer submits a review for a swag item, the system automatically credits the configured reward tokens to the customer’s loyalty wallet. The reward is issued once per swag item per customer, even if the review is edited later. Token crediting follows standard loyalty wallet and expiry rules.
- Cash Multiplier*: To encourage customers to use non-cash payment methods, you
can set a default non-cash multiplier when creating campaigns.
- If you set this to 3, the customer will earn 3 times the
extra reward tokens based on their total non-cash spending. This multiplier can be adjusted to reduce token earnings,
helping to alleviate credit card fees for the retailer.
- It is mandatory to set the Non-Cash Multiplier to set a
campaign.
- Non–Cash Multiplier*: To encourage customers to use non-cash payment methods, such as credit cards, debit cards, or checks, you can set a default non-cash multiplier when creating campaigns.
- If you set this to 3, the customer will earn 3 times the extra reward tokens based on their total non-cash spending.
- This multiplier can be adjusted to reduce token earnings, helping to alleviate credit card fees for the retailer.
- It is mandatory to set the Non-Cash Multiplier to set a campaign.
- Min Redeem Amount: You can specify the minimum amount a customer needs to redeem reward tokens against their purchase. If set to 0.00, then there is no minimum amount.
Example: If you set this field to a minimum of $1.00, then the customer will be able to redeem 1,000 tokens against their purchase at a minimum. - Require Register: When "Require Registration" is enabled, customers must log into the Loyal-n-Save portal or app to activate the campaign in their account. By registering for the campaign, customers can earn additional rewards.
- Allow Cash Tender: Allows customers to earn rewards when paying with cash.
- Yes: When toggled to "Yes," this setting allows customers who pay with cash to earn reward tokens on their purchases.
- No: When toggled to No, customers who pay with cash will not earn reward tokens on their purchases.
- Allow Non–Cash Tender: Enabling non-cash tender ensures that customers who prefer to pay with credit cards, debit cards, checks, or other non-cash methods can accumulate rewards.
- Yes: When toggled to "Yes," this setting allows customers who pay with non-cash methods (such as credit cards, debit cards, and checks) to earn reward tokens on their purchases.
- No: When toggled to "No," customers who use non-cash payment methods will not earn reward tokens on their purchases.
- Participate In Offers: Enabling this option allows customers to engage in special promotions and campaigns driven by manufacturers that you have agreements with. For example, a manufacturer launches a campaign offering double reward tokens for purchasing their new product. Retailers who have enabled the "Participate In Offers" setting can take advantage of this promotion. When they buy the new product, they receive twice the usual amount of reward tokens. Retailers have full control to decide whether to offer these campaigns to your loyalty members.
- Employee Earn On Purchases: Toggling this on will allow employees to earn reward tokens and team incentives when they make purchases. In addition to individual rewards, this feature might also include team-based incentives.
- Purchase Earn Limit: This limit determines the number of purchases a customer can make per day that will earn reward tokens. Once this limit is reached, any additional purchases will only have their receipts stored, and no further reward tokens will be credited for those transactions.
- Purchase Limit Lock: Enabling this option will activate automatic account locking based on a specified purchase limit. When the setting is enabled, an additional field appears where you can set the Purchase Limit Value. This value represents the maximum number of purchases a customer can make in a day before the account is automatically locked. Once a customer reaches the defined purchase limit within a single day, their account will be automatically locked, preventing any further purchases for that day.
- Temporary Lock Enabled: Enable temporary account locking when purchase limits are reached for the day. This function is used for fraud prevention. When this setting is checked to “Yes,” an additional field will appear for you to configure the Temporary Lock Duration. The duration options are available in hours, days, weeks, or months.
- Split Level 1 Reward Tokens with Clerk: This option involves distributing half of the reward tokens obtained by a level 1 employee to the clerk (cashier) who made the sale, effectively dividing the token earnings between the two employees. The employee who contributed to the sale and the employee who signed up the customer for Loyal-n-Save.
- Allow Employee License Lookup: Enabling this option will enable employees to be identified in the POS system by scanning their license when processing a purchase.
- Validate Referral Code: If a cashier signs up a customer at the register and enters an invalid referral code or one that does not match any existing codes in the system or fails to enter a referral code altogether, the registration process cannot continue. The system will prompt the cashier to either correct the referral code with a valid one or remove the code entirely if they choose not to use one. This ensures the cashier cannot proceed until the referral code issue is resolved, preserving the integrity of the referral process. Customers can also provide a referral friend code to the cashier; if no code is provided, the cashier must enter their Employee ID. This step will associate the customer with the cashier’s team.
- Purchase Needed to Redeem: This setting determines the number of purchases a customer must complete before they can start redeeming their tokens for cash. It sets a requirement that must be met before the user can spend these tokens. For example, if the setting is configured to require 3 purchases, the user will need to complete 3 transactions before they can redeem their tokens for cash. If the value is set to 0, the feature is disabled, meaning there is no requirement for a minimum number of purchases, and users can redeem their tokens immediately.
- Redemption Limit: This setting controls the frequency at which customers can redeem their reward tokens for cash.
- Per-Receipt Basis: This restricts the number of redeemable tokens that can be used for cash redemption in a single receipt or transaction. For example, if the limit is set to $100, a customer can only redeem up to $100 worth of tokens in one transaction.
- Daily Basis: This sets a daily maximum limit on how much redeemable cash can be used. For instance, if the daily limit is $50, a customer can only redeem up to $50 worth of tokens in cash per day, regardless of the number of transactions.
- Weekly Basis: This defines a maximum limit on redeemable cash for a week. For example, with a weekly limit of $100, a customer can redeem up to $100 worth of tokens for cash over the course of a week.
- Redemption Interval: Determines the duration for which cash redemption limits apply to reward tokens.
- Per Transaction: Sets the maximum number of tokens that can be redeemed in a single transaction
- Daily: The limit applies on a daily basis; the customer can redeem tokens for cash up to a specified amount each day.
- Weekly: The limit applies on a weekly basis, allowing the customer to redeem tokens for cash up to a certain amount each week.
3. Team Settings
Loyal-n-Save is a loyalty program platform designed to help retailers engage and reward both their customers and employees. The platform allows businesses to create and manage loyalty programs that incentivize repeat purchases and customer referrals through a user-friendly app.
For employees, Loyal-n-Save offers various incentive programs to boost motivation and performance. These programs include earning rewards for referring new customers and participating in team-based activities where employees can work together to achieve goals and earn collective rewards. This approach not only enhances employee engagement but also fosters a sense of teamwork and shared success within the retail environment.
Retailers participating in Loyal-n-Save can customize their loyalty offerings to fit their brand and customer base. The platform provides tools for creating personalized experiences, running targeted promotions, and offering exclusive deals and rewards. Employees can also earn rewards and incentives as part of these loyalty programs, contributing to a more dynamic and rewarding workplace.
3.1 Reaching Team Settings
To access the Team Settings:
- Log into Control Center
- Choose Settings
Figure 1.2
- Choose Loyalty > Team
All global settings will be set here; some of these settings can also be overridden at the campaign level.
Figure 1.3
Teams are the friends and family that you refer to each individual store. The people you refer directly will be put in your first tier. When your first tier recruits friends of their own, those recruited members will become your second tier. When your second tier refers to their friends, those recruits will become your third tier, and so on. All the way down to five tiers, you’ll earn a percentage (*percentages are determined by each individual store) of everyone’s reward tokens made at that particular store. Team levels can be either set globally or customized on a per-campaign level.
Figure 1.4
3.2 Basic Team Settings
Under the Basic Team Settings, you determine the value of tokens customers will receive for customer and employee referrals. Here you can also have the option to set a time frame that will trigger the account to go inactive if there is no customer activity for a set period of time. In the example below, if a team member has not been to your store in two months and you want to stop them from accruing team rewards, you can set an inactivity period; this does not delete their tokens or their account, and once they make a purchase at your store again, their account will be reactivated.
- Customer Referral Bonus (tokens): This can be used to reward your customer with bonus referral tokens for referring Loyal-n-Save to friends and family.
- Employee Referral Bonus (tokens): This can be used to reward your employees with bonus referral tokens for referring Loyal-n-Save to your store customers.
- Inactivity Months: If a team member has not been to your store in a while and you want to stop them from accruing team rewards, you can set an inactivity period. This does not delete their tokens or their account, and once they make a purchase at your store again, their account will be reactivated. The settings are as follows: Disable, 1 month through 11 months, 1 year.
3.3 Create Organization Structure
Employees in your Organization Structure levels are your store staff members. You can determine how many levels of employees receive incentives and enter the employee’s title in the fields.
Figure 1.5
You can add a new level or remove an existing level. Perform the following to add/remove a level:
- To create a new level, click on the "Add New Level" button
- To delete a level, click on the X under Actions.
If a level is attached to an employee, the following error message will appear: “Level cannot be deleted as employees are still attached to this level.”When a customer makes a purchase, here is the team breakdown:
- Cashier would get Level 1 tokens
- Assistant Manager would get Level 2 tokens
- Store Manager would get Level 3 tokens
- District Manager would get Level 4 tokens
If we use the default setting shown below, you can still customize it to work the way you want.
Sample Settings:
Figure 1.6
In the example below, the customer earned 150 tokens.
Levels | Team Breakdown Percent | Team Rewards |
Level 1 (Cashier) | 50 | 75 |
Level 2 (Assistant Manager) | 25 | 37.5 |
Level 3 (Store Manager) | 15 | 22.5 |
Level 4 (District Manager) | 10 | 15 |
Based on the information above:
The cashier will receive 75 tokens for this sale.
Calculation: 150 (the number of tokens the customer received)
X 50% (the team breakdown percentage)
= 75 tokens earned
The assistant manager will receive 37.5 tokens for this sale.
Calculation: 150 (the number of tokens the customer received)
X 25% (the team breakdown percentage)
= 37.5 tokens earned
The store manager will receive 22.5 tokens for this sale.
Calculation: 150 (the number of tokens the customer received)
X 15% (the team breakdown percentage)
= 22.5 tokens earned
The district manager will receive 15 tokens for this sale.
Calculation: 150 (the number of tokens the customer received)
X 10% (team breakdown percentage)
= 15 tokens earned
Deletion of Levels from Organization Structure
- To delete a level(s) from the organization structure, click on the Delete (X) button. Once you click on the X icon, the selected level gets deleted successfully.
Team Breakdown: Here you can manage the token trickle, where each level is awarded a certain percentage after the customer accumulates reward tokens. There are a total of five tiers for tokens that can be customized, with a percentage range of 0 to 100. A total of up to six people can be rewarded at the time of sale, but you can set any level to a percentage of zero or turn them off.
In the example above, a Level 1 employee will earn 50% of the customer’s sales in the form of tokens. Specifically, Level 2 employees receive 25%, Level 3 employees receive 15%, Level 4 employees receive 10%, and Level 5 employees receive 5%.
Underneath the Team Breakdown section, you will set how tokens are handled when a team member is involved in a return. If someone on the team makes a return, there are three options for how to handle the tokens:
Figure 1.7
- No Team Return Reward Tokens: No action taken on tokens
- Return Only Level 1 Reward Tokens: Tokens are returned only from the first-level employee (cashier)
- Return All Level Reward Tokens: Tokens are returned from all employee levels
3.4 Advanced Team Incentive Options
Show Advanced Team Options (Toggle: Yes/No) - Enable this option to access advanced team features designed for users with a deeper understanding of team-based incentives.
Figure 1.8
When set to "Yes," additional configuration options will become available, including:
- Sliding Incentive Rules
Tiered Periods
- Probation Period Settings
These advanced tools allow for more flexible and strategic management of team incentives.
3.5 Sliding Incentive Rules
Here, the employer establishes rules to boost incentives and sets the frequency of these increases. There are two options for setting incentive rules: Flat Increment or Tiered Multiplier. You also determine the amount, frequency, and maximum incentive.
With the "Employee Incentive Program" module, business owners can increase employee incentives based on their length of employment by setting specific incentive rules. By using the Tiered Multiplier in the Employee Incentive Program, employers can reward employees for their loyalty and efforts to upsell customers, earning a higher percentage in rewards (tokens). The longer an employee stays, the higher the percentage of rewards they will receive, up to the maximum amount set by the company. Once these settings are configured, the system will automatically calculate and track token balances, both redeemed and earned. With the sliding incentive, employers set the amount and frequency of incentive increases during the probation period and their subsequent length of employment.
3.6 Flat Increment Incentives
When setting the incentive rule to Flat Increment, you enter the percentage increase amount, how often the increase is applied, and how long an employee is entitled to receive increases. The incentive percentage options are set by the retailer.
Figure 1.9
For example, a customer made a purchase and earned 100 tokens. By default (before modification), the Level 1 employee (store cashier) would earn 50% of the 100 tokens, which is 50 tokens. The retailer wants their employees to receive a one percent increase every year until they reach the maximum level of 5.00%. The breakdown below shows that the employees will get a 1% increase after each year of employment until they reach 5.00%.
- Year 0: 50%
- Year 1: 51%
- Year 2: 52%
- Year 3: 53%
- Year 4: 54%
- Year 5: 55%
To accomplish this, you will see in the screenshot above that the Incentive Rule is set to Flat Increment, with a 1% increase after each year until they reach the maximum of a 5% increase. Note that the percentage amounts are customizable by the retailer, and the frequency can be set to increase in days, weeks, months, or years.
3.7 Tiered Multiplier Incentives
The Tiered Multiplier feature in the Employee Incentive Program helps employers reward their employees for staying with the company and for successfully upselling to customers.
To illustrate the multiplier, we will use the same scenario as above but include the enhancement module of EIP, demonstrating how the incentive increase is calculated after the employee reaches milestones set by the employer. In our example, the retailer sets a probation period of 90 days. During probation, the employee earns tokens at the team breakdown percentage rate (redeemable after completing probation). Once the employee reaches their milestone (in this example, the start of month four), the incentive rate multipliers are calculated. Note that the tiered multiplier can be applied in increments of days, weeks, months, or years. Our example uses months.
Figure 2.0
Calculation: Any purchase made in the past 9 months will earn a constant additional 1.25% of tokens since MAX is used.
This is the maximum the employee will receive since the retailer entered "Max" in the To field. You can add more tiers by clicking on "Add New Tier."Continuing with our Tiered Multiplier incentive example, let’s examine how tokens will be distributed to employees after they complete their probation. The chart below uses the same example as previously described but includes the added incentive breakdown:
Using the settings mentioned above, the calculations would be as follows:
Levels | Team Breakdown Percentage | Team Rewards | Hired Date | Length of Employment | Multiplier | Increase | EIP Reward |
| Level 1 (Cashier) | 50 | 75 | 4/1/2024 | 1 | 0.00 | 0.00 | 0.00 |
| Level 2 (Assistant Manager) | 25 | 37.5 | 12/1/2023 | 5 | 1.05 | 39.38 | 1.88 |
| Level 3 (Store Manager) | 15 | 22.5 | 6/1/2023 | 11 | 1.25 | 28.13 | 5.63 |
| Level 4 (District Manager) | 10 | 15 | 11/1/2023 | 6 | 1.10 | 16.50 | 1.50 |
In the table provided, for the first three months, the employee earns the Team Breakdown percentage without a multiplier. After 90 days, the employee continues to earn tokens, but at a higher percentage, and they can begin redeeming their rewards through the store or online Swag Shop. Starting in the fourth month of employment, the employee receives an additional multiplier, increasing their token earnings from no multiplier to 1.05. For months 7 to 9, the incentive multiplier is 1.10, and from month 10 onwards, the multiplier is 1.25. After 10 months, the employee's multiplier is capped and remains at 1.25.
Below are two examples showing the incentive multiplier with and without a probation period.
In the example below, you will see that the employee is to receive 1.05% of tokens from month zero to the end of month one. In months two through the end of month six, the employees will receive an increase of .05 for a total multiplier of 1.10%. When the employee reaches month seven, they will receive a 1.25% multiplier increase.
The incentive breakdown is as follows (Month Tiered Multiplier):
| Probation 90 Days | 0 Multiplier |
| Month 4 - 6 | 1.05 x Multiplier |
| Month 7 - 9 | 1.10 x Multiplier |
| Month 10+ | 1.25 x Multiplier |
| Month 1 - 3 | 1.05 x Multiplier |
| Month 4 - 6 | 1.10 x Multiplier |
| Month 7+ | 1.25 x Multiplier |
3.8 Probation Period
A probation period is the duration an employee must work before they can start redeeming the tokens they have earned. This field is customizable, allowing the retailer to set the probation period if desired. The number of days for probation is entered into the Probation Days field. While new hires can begin earning tokens immediately for signing up customers and making sales, they will not be able to redeem these tokens until they have completed the probation period.
In our example, the employee begins earning tokens and sales on their first day of employment. After completing their 90th day of employment (starting on day 91), they can redeem their tokens. These tokens can be used as tender in the store or redeemed for qualifying items in the Swag Shop.
Figure 2.1
Employees' profiles will show two separate balances: a Spendable Balance and a Pending Probationary Balance. After the probation period concludes, the Pending Probationary Balance will be combined with the Spendable Balance, making all tokens available for the employee to use.
To view the Spendable Balance and a Pending Probationary Balance, perform the following:
- Step 1: Log into Control Center
- Step 2: Choose Loyalty
- Step 3: Choose Customer
- Step 4: Choose Customers
Figure 2.2
- Step 5: Choose the Edit icon under Actions.
Figure 2.3
- Step 6: Choose the "Balances" tab.
- Step 7: Click on "View" in the Employee Incentives section.
Figure 2.4
- Step 8: Once you click on the "View" button, the following details will be displayed:
- Total Balance: This is the total amount of tokens the customer currently has.
- Spendable Balance: This is the number of tokens the customer can currently spend.
- Pending Probationary Balance: Tokens shown here will be added to the spendable balance after the employee has completed their probationary period.
4. Terms
This section allows you to enter and customize the terms and conditions specific to your company. These terms and conditions outline the rules, guidelines, and policies that govern the use of services, products, and any associated rewards or promotions.
Figure 2.5
5. Notifications
In this section, you have the ability to set up notifications for admin emails. The fields below provide you with the option to receive emails using either user accounts or a customized email list.
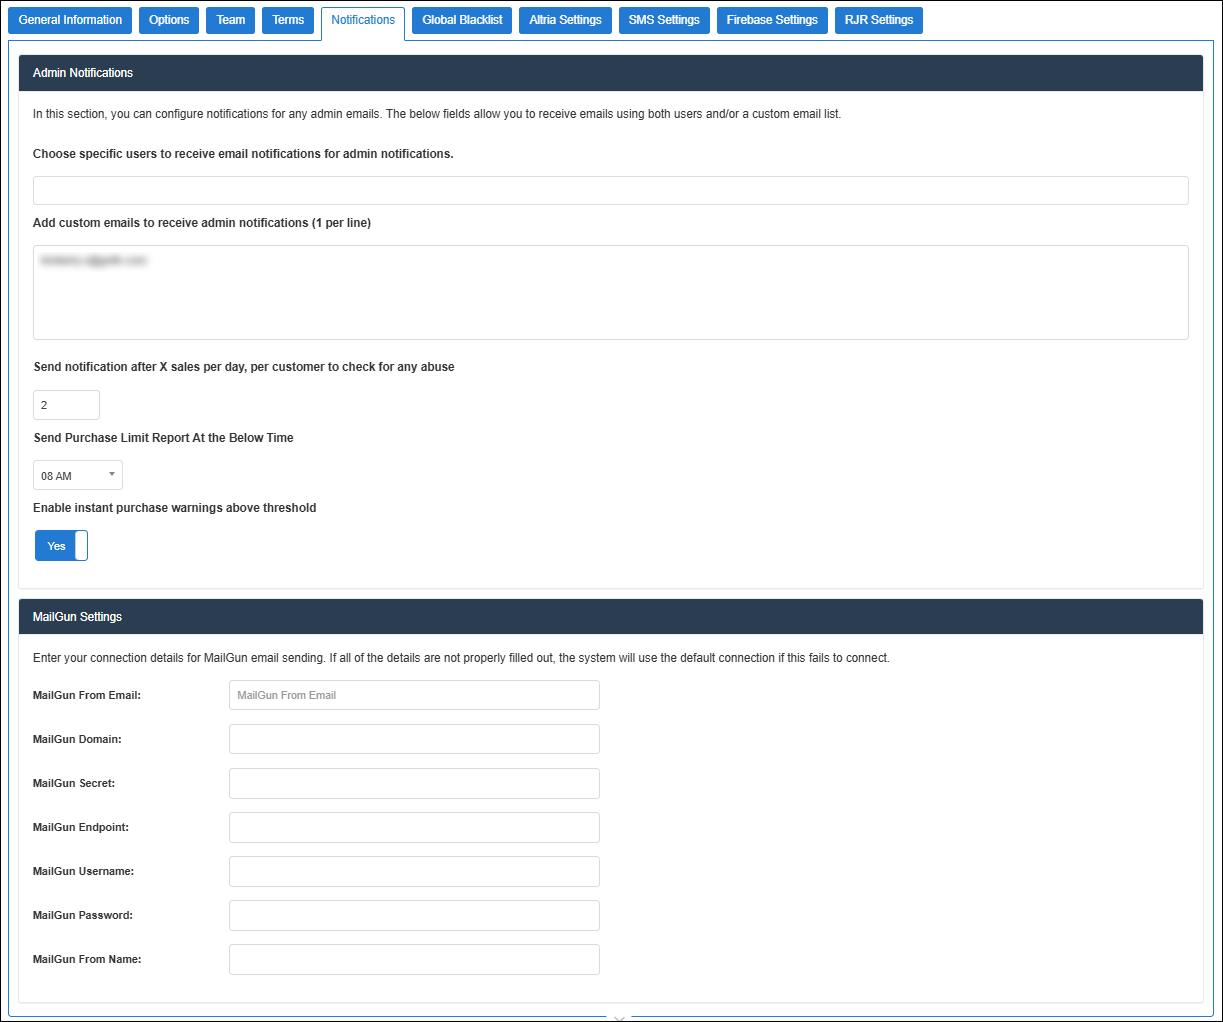
Figure 2.6
- Choose specific users to receive email notifications for admin notifications: You can choose the email addresses from the drop-down list of whom you wish to be notified for admin notifications.
- Add custom emails to receive admin notifications (1 per line): In case the emails are not there in the drop-down list, then you can add the custom email ID of the recipient to receive the notifications. Only one email is added to a line.
- Send notification after X sales per day, per customer to check for any abuse: This setting allows you to configure a threshold for the number of sales a single customer can make within a day. If a customer reaches this predefined limit (denoted as X), the system will automatically send a notification. The purpose of this notification is to alert you or your team to review the customer’s activity for potential abuse or suspicious behavior. This helps in monitoring and preventing any misuse of promotions or rewards.
- Send purchase limit report at the below time: This setting allows you to specify a scheduled time for generating and sending a report related to purchase limits. The report will detail how the purchase limits are being applied, including which customers are reaching or exceeding these limits. You can set the time for the report to be generated and sent on a daily, weekly, or custom schedule, depending on your preference. This helps in keeping track of purchase patterns and managing compliance with set limits.
- Enable instant purchase warnings above threshold: This feature allows you to trigger an instant warning whenever a purchase surpasses the specified limit. This helps in monitoring large or unusual transactions, allowing for immediate review and action if necessary to prevent potential issues or fraud.
6. Global Blacklist
The global Blacklist utility serves to exclude items that do not qualify for earning tokens. It can include prohibited or restricted items, such as alcohol.
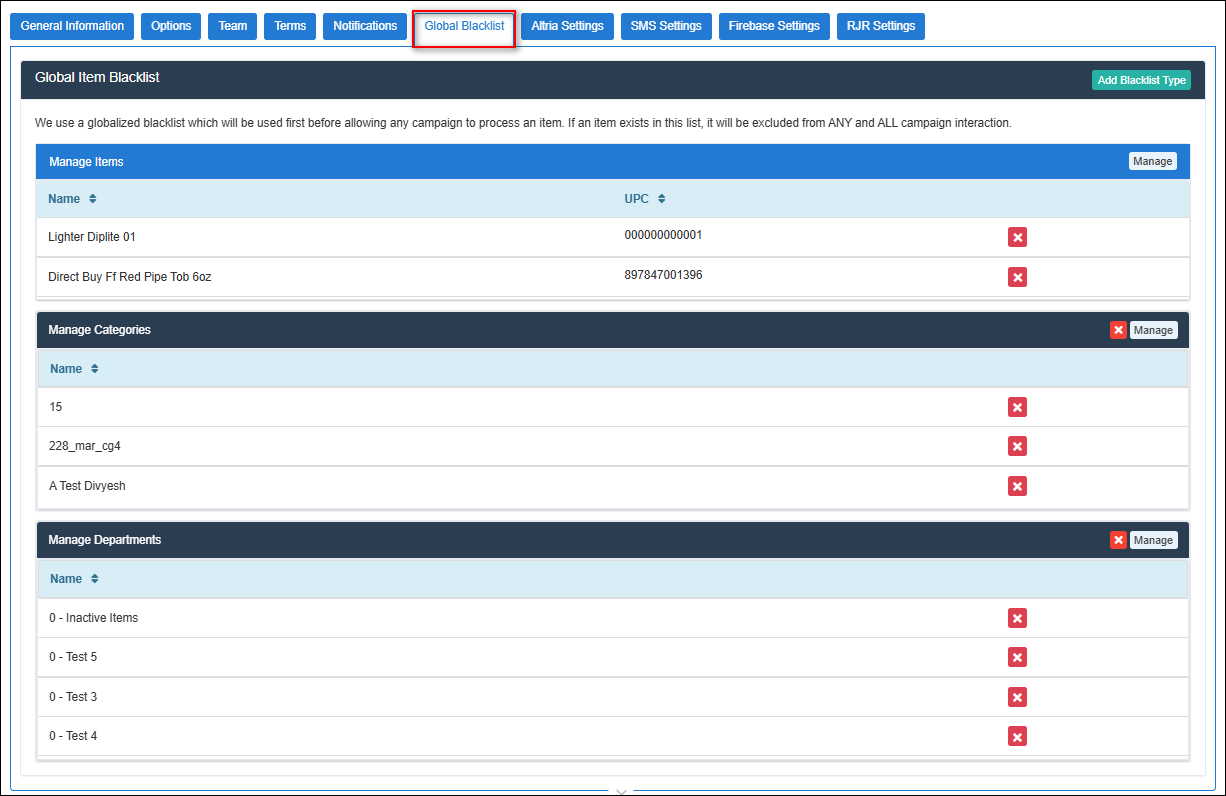
Figure 2.7
- To add a blacklist type, click on the "Add Blacklist Type" button.
Figure 2.8
- Select the blacklist type from the dropdown list and click on the "Add Type" button.
Figure 2.9
- Once you select the blacklist type, click on "Manage." The Manage Filters pop-up will be displayed as shown below:
Figure 3.0
- Select the item(s) that you wish to be excluded from all the campaign interaction.
- Once you select the item(s), click on the green Right Arrow button to move the selected items to the Selected List section.
- Click on "Apply." Managing Altria Settings for Tier 2 and 3 in the Loyal-n-Save program involves configuring specific options that pertain to customers within these loyalty tiers. This management section allows businesses to fine-tune the experience and benefits provided to Tier 2 and Tier 3 loyalty members.
7. Altria Settings
Managing Altria Settings for Tier 2 and 3 in the Loyal-n-Save program involves configuring specific options that pertain to customers within these loyalty tiers. This management section allows businesses to fine-tune the experience and benefits provided to Tier 2 and Tier 3 loyalty members.
Figure 3.1
- Altria Tier: This information provides users with clear visibility of their current tier within the Altria segment of the Loyal-n-Save loyalty program. The tier level indicates the status and benefits the user is entitled to base on their engagement and spending related to Altria products. (Retailers will not be able to adjust the Tier level)
- Show Altria AGDC Promos: This toggle controls whether AGDC (Altria Group Distribution Company) promotions are displayed and made available for eligible customers within the system. When enabled, the system will validate the customer’s age, and, if the customer is 21 years or older, it will fetch and display applicable Altria-funded AGDC promotions at both the POS and loyalty interfaces. These promotions may include manufacturer-sponsored discounts, limited-time offers, or product-specific deals that are restricted to age-qualified customers. The age verification is mandatory, and if a customer does not meet the age requirement or age data is unavailable, the promotions will not be shown or applied. When disabled, AGDC promotions will be completely suppressed regardless of the customer’s age, meaning no Altria-sponsored AGDC offers will be displayed, applied, or considered during the transaction flow, ensuring that only standard loyalty or non-Altria promotions are available.
Figure 3.2
- Enable Personalization Plus: When enabled, the system activates Altria Personalization+, which delivers targeted, customer-specific offers. Offers are dynamically assigned based on Customer purchase behavior, Product preferences, and Engagement history. Customers may receive Personalized discounts on eligible Altria products, and Exclusive, behavior-driven promotions not available to all customers. These offers are typically automatically synced from Altria, redeemable at POS without manual intervention.
Note: This option is restricted to Administrator-level users only. It will be visible and configurable exclusively for users with administrative access rights.
- Altria Company ID: The Altria Company ID is a unique identifier assigned to your account by Altria, a prominent producer and marketer of tobacco products. This ID serves several important functions within the Loyal-n-Save program, ensuring that your account is accurately linked to Altria's system for tracking and rewards purposes.
- Primary Contact Email: The Primary Contact Email field is crucial for ensuring smooth and effective communication between your company and Altria regarding digital data submissions. This email should be the address of the main individual within your organization who is responsible for handling all interactions and transactions involving digital data exchanged with Altria.
- Altria AGDC FTP Connection: The Altria AGDC FTP Connection refers to a secure method of transferring files between your company and Altria. FTP (File Transfer Protocol) or SFTP (Secure File Transfer Protocol) connections are used to manage the exchange of digital files, ensuring that data related to promotions and metrics is efficiently and securely transferred. Include an optional subfolder if needed.
Figure 3.3
- Altria Product Mappings: This option allows you to choose how Altria products are categorized for promotional statistics. While there are pre-defined survey options available, you have the flexibility to customize which departments within your store are associated with each type of Altria product, such as cigarettes, cigars, etc.
Figure 3.4
- Send Altria AGDC Notifications: Notifications regarding the success or failure of benchmark and activity log submissions will be dispatched to the email addresses provided below.
- AGDC Notify List: Please input the email addresses below, each on a separate line, to subscribe to AGDC updates for receiving AGDC updates.
7.1 Altria Credentials
This section contains the authentication information needed to securely connect the loyalty platform with Altria’s systems or services. These credentials are typically provided by Altria or its API management system and are essential for enabling access to Altria-specific promotions, customer mapping, or compliance-controlled content.
Figure 3.5
Client ID:
- A public identifier issued by Altria.
- Used to identify who is making the API request.
Client Secret:
- A private key paired with the Client ID to prove the authenticity of your application.
- It's used during the authentication process to securely obtain access tokens.
Subscription Key:
- Often used in API Gateway services.
- This key allows your platform to access specific APIs or services provided by Altria.
- It acts like an API key to monitor usage and ensure only authorized systems are making calls.
These credentials should be stored securely and never exposed in front-end systems. Only admin users or backend developers should handle them.
Note: The Altria Credentials section is only available to retailers classified under Altria Tier 2 and Tier 3. If you do not fall within these tiers, this configuration option will not be visible in your Loyalty Settings. 8. White Label Settings
A white-label website/application is a website/application created by one company that another company can rebrand as their own. In the retail industry, including loyalty programs like Loyal-n-Save, white-label websites/applications offer businesses the ability to customize and brand a pre-built website with their own logos, colors, and content without needing to develop the site from scratch.
A white-label website could allow a retail business to offer a fully branded loyalty program portal without needing to build one from scratch. The retailer could use a white-label solution to:
- Offer customers a branded online portal to manage their loyalty points and rewards.
- Integrate with existing e-commerce systems.
- Provide a seamless, branded experience across all digital touchpoints.
Our White Labeling Approach:
We utilize a multi-tenant model to deliver both the front-end and back-end of the website/application to our clients. This allows each client to customize their brand identity elements and select features from a range of pre-built functionalities. The client's white label settings for the website/app can be configured and managed through the Control Center.
Figure 3.6
8.1 Manage White Label App/Web Settings
Within this section, you'll be able to manage and configure the White Label Settings for both Website & Application.
Figure 3.7
- Web or App Name: Clients have the option to personalize the name of their website or app.
- Primary Color: This setting allows clients to choose the primary color for the call-to-action buttons on their website or app.
- Secondary Color: Clients can select a secondary color for their website or app from the available settings.
- Logo: Clients can upload their brand’s logo, which includes words, images, and colors that represent the brand or product.
Figure 3.8
- Icon: This setting allows clients to choose an icon that symbolizes their brand, used for identity in spaces where the full logo isn’t practical. This also sets the favicon for the website.
Note: A favicon is a small graphic or icon linked to a website. It appears in the browser's address bar or on tabs, serving as a visual cue or reminder of the website's identity. Essentially, it's a tiny version of the site's logo or symbol that helps users quickly recognize and distinguish the website when they have multiple tabs open or when they save the site as a bookmark. - Clients will also have the ability to choose the web banner (the very first screen the user sees when they open the website).
Figure 4.0
- Non-AVT user login message*: Users who have not completed in-store age verification after account creation will be restricted from viewing content on the web or app. The message entered here will be displayed to inform users that the product they are attempting to view is age-restricted. An example of a message is as follows: "This app/website contains age-restricted products. Therefore, you must verify your age and ID in-store before using this website/app." Retailers can customize this message through the backend by entering their own text in the provided textbox to inform users of this protection measure.
Figure 4.1
- Company Contact Email: The email address from the retailer that will appear in messages sent to users from Control Center.
- Social Facebook Link: The URL to the retailer’s official Facebook profile.
- Social Instagram Link: The URL to the retailer’s official Instagram profile.
- Android Application Link: The URL directing users to the retailer’s app on the Google Play Store.
- iOS Application Link: The URL directing users to the retailer’s app on the Apple App Store.
- Points/Tokens Select: Select one of the options from the dropdown menu.
Domain Setting For White Label: This setting is used for synchronizing the domain and tenancy resolution. If tenancy gets resolved, only then will the white label platform and its features be in effect.
Figure 4.2
- For Developers Only – To be completed by the onboarding team in collaboration with the Loyal-n-Save Development team.
8.1.1 Dashboard Selection Settings
To reflect the campaign groups on the PWA landing page, you need to configure the Dashboard Selection Settings available under Loyalty Settings > White Label Settings. This setting enables you to switch between two dashboards (Dashboard 1 & Dashboard 2).
- Dashboard 1: Displays the default dashboard layout.
- Dashboard 2: Displays an alternate dashboard layout with additional configuration options.
The selection made here will dynamically impact the visibility of the dashboard displayed on the application landing page (dashboard).
Figure 4.3
Information Icon
An Info icon will be displayed beside both Dashboard 1 and Dashboard 2.
- Clicking the Info icon, a preview of the front-end dashboard corresponding to the selected option will be displayed.
- When you select Dashboard 2, be sure to enable the following toggles available under the Application Tab Customization section:
- Share
- Join Team
- 21+ offers
Figure 4.4
- Once Dashboard 2 is selected and the above-mentioned toggles have been enabled, the dashboard on the application landing page will be displayed as shown below:
Figure 4.5
- Click on any Group to view the deals available in that category.
Figure 4.6
Category Group Dashboard Sorting
The dropdown options available for Campaign Group Dashboard Sorting allow you to sort the campaign groups Alphabetically or by Campaign Group Count. Depending on the selection made, it will display the campaign groups accordingly.
Figure 4.7
This option is available only when Dashboard 2 is selected.
Purpose:
Defines the display order of campaign groups on the dashboard.
Available Options:
- Sort Alphabetically
- Ascending
- Descending
- Sort by Campaign
- Ascending
- Descending
Campaign groups in the application will be arranged based on the selected sorting option.
8.1.2 EAIV Settings
Figure 4.8
- Disable EAIV Process: This toggle determines whether the EAIV (Electronic Age and Identity Verification) process is active at the store level. When the toggle is set to "Yes" (Enabled), the EAIV process is disabled, meaning the system will not prompt or allow customers to complete age and identity verification through EAIV during transactions. In this state, any workflows or promotions that depend on EAIV verification may be restricted or require alternative validation methods. When the toggle is set to "No" (Disabled), the EAIV process is enabled, allowing customers to complete their age and identity verification electronically as part of the transaction flow.
8.1.3 Module Display Options
This setting allows retailers to control the visibility of specific modules on the customer-facing front-end portal. Each toggle corresponds to a particular module. When a toggle is set to "Yes," that specific module will be displayed and accessible to users on the front end. If the toggle is set to "No," the corresponding module will be hidden from the customer view.
Figure 4.9
- Choose which modules from the list above you would like to include or exclude in the white-labeled version.
8.1.4 Application Tab Customization:
Figure 5.0
- Select three options from the provided list to be displayed in the bottom menu of the mobile version. You can drag and drop your preferred items to change the position; the top three selections will be shown.
Note: You cannot select more than three modules. On selecting more than 3 modules, you will see a validation message. - External Links: The External Links section in the "White Label Settings" tab allows you to add custom navigation links to the Customer Portal.
Figure 5.1
- To add an external link, click on the "Add Links" button.
Figure 5.2
- Title: The text that will appear in the left navigation menu.
- Link: The destination web address the user will be redirected to when they click the label.
- Once saved, the link will automatically appear in the left-hand navigation menu of the Customer Portal. Clicking it will redirect users to the specified URL.
Note: This is useful for directing customers to external resources such as brand websites, support pages, or promotional content.8.1.5 Contact Us Details
Enter the Contact Us information for your company in the space provided below.
Figure 5.3
8.1.6 PWA Banner Details
Figure 5.4
The Progressive Web App (PWA) settings allow retailers to customize their branded PWA for a seamless user experience across web and mobile platforms. A Progressive Web App combines the functionality of a website and a mobile app, delivering fast, reliable, and engaging experiences to users.
- To configure this setting, make sure the toggle "PWA Banner" under the "Module Display Options" is set to "Yes."
- Once this toggle is set to "Yes," you can upload a logo or a banner that will represent your app on users’ home screens.
- Click on the Browse icon and select a banner.

Make sure the dimensions of the image you upload are as follows: "width is 960px" and "height is 300px."
- Optionally, you can enter the PWA banner link; this is a custom domain or subdomain for your PWA (e.g., pwa.yourbrand.com).
- Once you set a link to a banner, when the user clicks on the banner on the front-end portal of the retailer, the user will be redirected to the same page.
9. SMS Settings
One of the key subsections under Loyalty Settings is SMS Settings, which allows a retailer to configure how text message communications (like campaign notifications, OTPs, or promotions) are sent to customers.
Figure 5.5
Here’s a breakdown of the fields under SMS Settings and what each one means:
- Enable Text Message: When set to “Yes,” the system is allowed to send text messages to customers (e.g., receipts, team points, swag shop orders, etc.). If set to “No,” all SMS communications are blocked. You would enable this once all the below SMS credentials are correctly configured.
- Secret ID: A unique identifier or key that authenticates your connection with the SMS service provider. It’s used in conjunction with the API Token to ensure secure communication between the Loyal-n-Save system and the SMS gateway.
- API Token: A secure token generated by the SMS provider that allows the Loyal-n-Save system to interact with their API. Serves as a password-like credential that verifies and authorizes requests made to the SMS gateway on your behalf.
- From Phone: The phone number that will appear as the sender of the SMS messages. This is the number your customers will see as the sender, which can be either a standard long code, a short code, or a branded sender ID (depending on provider capabilities and regulations).
10. Firebase Settings
Firebase settings are used to configure push notifications in Loyal-n-Save. These notifications are sent to customers’ mobile devices (via the app or PWA) to alert them about loyalty points, promotions, campaign updates, etc.
Figure 5.6
The Messaging Sender ID in Firebase is key; it identifies which Firebase account is responsible for sending the message, ensuring it is correctly routed and delivered.
Firebase Configuration
Fields below are used to set up the Firebase project connection for sending push notifications.
- API Key: Used to authenticate requests from your app to Firebase services.
- Project ID: The unique identifier of your Firebase project.
- Messaging Sender ID: A numeric ID that identifies your Firebase project and is used to send push notifications.
- APP ID: Identifies your app within Firebase and links it to analytics, notifications, and other services.
11. RJR Settings
The RJR Settings under Loyalty Settings is specifically used to integrate with R.J. Reynolds (RJR), a tobacco company that offers retailer incentive programs and promotional rewards for selling RJR products.
Figure 5.7
This setting allows retailers to connect Loyal-n-Save with RJR’s incentive and loyalty systems. Once integrated, this enables automated reporting of sales, redemption of RJR incentives, and syncing customer participation in RJR-funded promotions.
- RJR Company ID: The RJR Company ID is a unique identifier assigned by R.J. Reynolds to your retail business. It links your store(s) with RJR’s internal systems for tracking sales performance and loyalty participation.
You can obtain your RJR Company ID from your RJR sales representative or account manager.
Note: You must be an authorized retailer of RJR products to receive a Company ID and activate the integration in Loyal-n-Save.
12. Swag Shop Settings
The Swag Shop Settings in the Loyal-n-Save program are designed to customize and manage their loyalty rewards. Additionally, you can configure notifications to streamline the fulfillment process and enhance marketing management for your Swag Shop, ensuring that customers are kept informed about their orders and promotions are effectively communicated.
Figure 5.8
12.1 General Tab
- Max Redemptions Allowed Per Day: * Defines the maximum number of times a specific coupon can be used per day.
- Max Allowed Per Purchase: * Defines the maximum number of times a specific coupon can be used per purchase.
12.2 Notifications Tab
12.2.1 Fulfillment Settings
In this section, you can customize your notification settings to receive notifications on fulfillment-related activities. The following fields give you the ability to receive emails using either users, a custom email list, or both.
Figure 5.9
- Choose specific users to receive email notifications for swag shop purchase updates: You can choose the email addresses from the drop-down list of those whom you wish to be notified for the Swag Shop purchase updates.
- Add customer emails to receive swag shop status updates (1 per line): In case the emails are not there in the drop-down list, then you can add the custom email ID of the recipient to receive the notifications. Only one email is added to a line.
Marketing Settings
In this section, you can customize your notification settings to receive notifications on marketing-related activities. The following fields give you the ability to receive emails using either users, a custom email list, or both.
Figure 6.0
- Choose specific users to receive email notifications for swag shop purchase updates: You can choose the email addresses from the drop-down list of those whom you wish to be notified for the Swag Shop purchase updates.
- Add customer emails to receive swag shop status updates (1 per line): In case the emails are not there in the drop-down list, then you can add the custom email ID of the recipient to receive the notifications. Only one email is added to a line.
Related Articles
Loyal-n-Save (LNS) Employees
LNS Employees Overview LNS employees, or Loyal-n-Save employees, are essentially the store staff members themselves; they function as a regular employee who earns commission-based rewards. The employee can also use the mobile app or website just like ...Swag Shop Settings
Swag Shop Settings Overview The Swag Shop Settings in the Loyal-n-Save program are designed to customize and manage their loyalty rewards. Additionally, you can configure notifications to streamline the fulfillment process and enhance marketing ...Loyal-n-Save Staff Training Manual (Cloud POS)
Scan the customers ID to see if they have a Loyal-n-Save account: If the customer’s name populates, it signifies that they have already acquired an account through our stores. If the customer’s name does not populate, please inform the customer bout ...Loyal-n-Save Staff Training Manual (On Premise POS)
1. Introduction: What is Loyal-n-Save? Loyal-n-Save is a fun, interactive loyalty program that rewards our valuable customers for shopping at our stores. It also encourages them to refer friends and family members to the store. Loyal-n-Save allows ...Loyalty Dashboard
Overview The Loyalty Dashboard offers a great way to gain insights about the performance of the loyalty programs. It allows merchants to track, analyze, and understand their loyalty based on real-time data. Reaching "Loyalty Dashboard" Log into ...