POS Panels - Layout & Buttons – Classic
POS Panels - Layout & Buttons Overview
- The hardware component includes the POS device (monitor, CFD, scanner, receipt printer, etc.) located at the checkout counter, while the POS Panel software ensures seamless hardware operation.
- Add or remove multiple panels.
- Edit existing panels by adding or removing buttons and changing button names.
This article includes information about:
- POS Panel Layout
- POS Panel Buttons

1. Reaching the POS Panels
- Step 1: Log into POS
- Step 2: Choose Open POS
Figure 1.1
2. Understanding the POS Panel Layout
- 1: Sales-Related Information & Receipt
- 2: Right Panel
- 3: POS Panels
2.1. Sales-Related Information & Receipt
Figure 2.1.1Date and Time: Current Date and Time on the left side.
- If there is an issue with the internet connection, the system will operate offline and display the OFFLINE text near the date and time. When the system is in offline mode:
- You can continue with processing sales and payments. The system will sync the data when the internet connection is available.
- You cannot perform the operations available in the "Actions" section.
Cashier: Here, you see the cashier's name.Items: Here, you see the number of items scanned so far.Balance Due: Here, you can view the customer's outstanding balance.Receipt Details: The white section shows the receipt details to be printed. The size of this section may vary based on the preference set by your corporate employee. Its header includes the store address, store number, register number, date, cashier name, receipt number, and current time.If you click the Arrow icon, the "Full Receipt" screen will appear, as shown in Figure 2.1.2. It displays the added items for sale and the receipt details to be printed on the left.
- Use the respective "Edit" link to edit the item's quantity, if required.
Figure 2.1.2
2.1.1 Cash or Non-Cash
Note: We have provided the necessary information at this point. If you notice the Cash and Non-Cash icons on your POS register, we recommend discussing their operation with your manager and understanding your store's dual pricing policies.Figure 2.1.1.1
- For which department do they want to apply dual pricing? They can apply dual pricing to all departments or select specific departments.
- Many FTx Cloud POS users generally apply dual pricing for tobacco-related products. However, it is their choice. FTx Cloud POS offers the feature to configure dual pricing according to your specific requirements.
- How much more does the customer pay using a credit card, for example, 2%, 5%, etc.?
- Define which tenders will be considered equivalent to cash. The corporate employee can consider other payment methods, such as gift cards and coupons, equivalent to the cash payment method.
- Set the default payment method.
- If the corporate employee enables the dual pricing function and doesn't set any default payment method, the system will prompt you to choose a payment method, as Figure 2.1.1.2 shows.
- If the corporate employee enables the dual pricing function and sets any default payment method, the system will only allow you to proceed with the specified payment method.
- The system will not prompt any such message if the corporate employee doesn't enable the dual pricing function. You can proceed with your sale without making any selections.
- If the corporate employee has applied the dual pricing setting and not opted for any default payment method, the POS | CHOOSE METHOD OF PAYMENT screen will appear when you open the POS Panel. Please select the payment method.
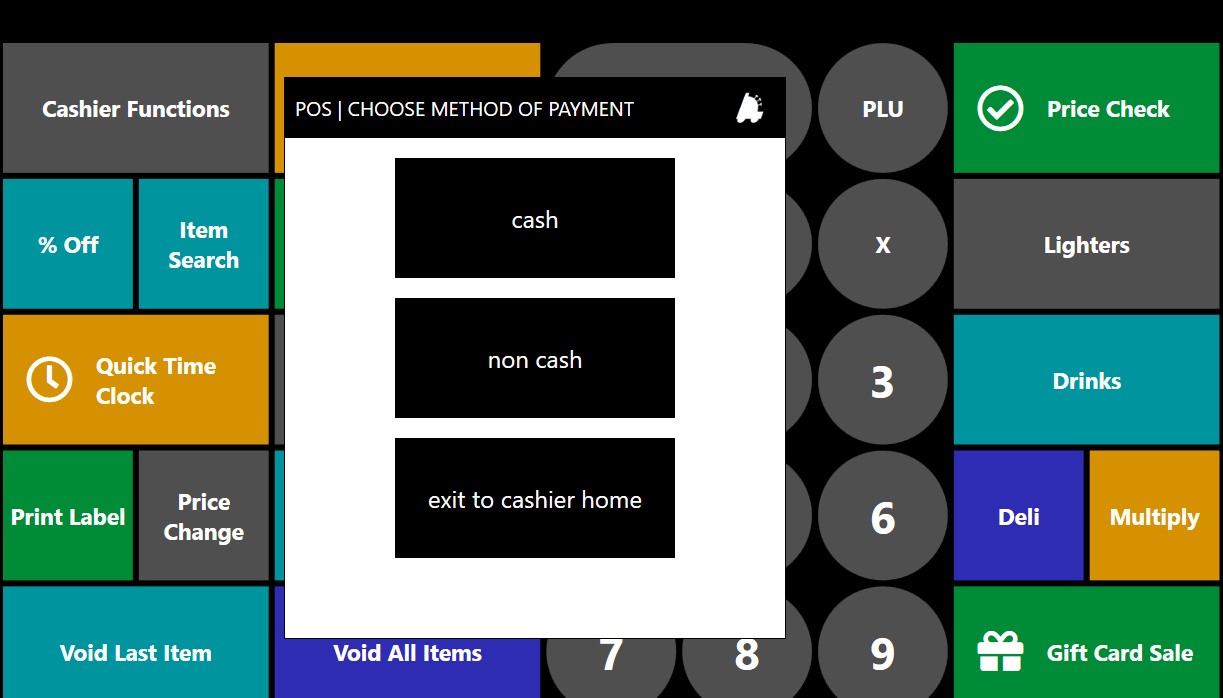 Figure 2.1.1.2
- The system will highlight the selected payment method. For example, in Figure 2.1.1.1, "Non-Cash" is highlighted. To change the payment method, please click on the other payment method.
- The system will show a Confirmation message, as shown in Figure 2.1.1.3. Click "Yes" to change the payment method. The system will change the payment method.
Figure 2.1.1.3
2.2. Right Panel
Figure 2.3
- Messages: Click the "Message" button to view the messages from the corporate office. The POS | Messages screen will appear.
- The system highlights the unread messages in blue.
- Select any message by clicking on it, then click the "View" button to view the message and the "Delete" button to delete it.
- Use the "Create" button to create a new message. Creating a new message from this section is identical to creating a message from the dashboard. Please read point 2.3 Messages in the Dashboard Layout article.
Figure 2.4
- To Do: Click "To Do" to open the POS | To Do List screen.
Generally, the corporate employee creates a To Do List instructing the stores to perform some actions. You can view the messages specific to you or your store. You can access the To Do List in POS from both the POS Dashboard and this location.
Figure 2.5
- Show Finished: Click this button to view the list of only completed To Dos.
- View: Click on a To Do from the list and click the "View" button to open the message details.
- Close Complete: You can select a To Do from the list by clicking on it and click the "Close Complete" button to mark it as completed. This feature is useful when you have already read the message and completed the To Do.
- Close: Click this button to close the POS | To Do List screen.
- Select a message by clicking on it, and click the "View" button to open the POS | Manual screen and view the To Do's details.
Figure 2.6
- Print: Click this button to print the To Do.
- Close: Click the POS | Manual screen.
- Close Complete: Click this button to mark the To Do as completed.
- Item Limit: Click the "Item Limit" button to view the restrictions applied by the corporate office.
The corporate office can apply an item sale limit to the selected item(s) to limit their sale in a single transaction or per day. When you click this button, the system will display information about any applicable limits, if any.
- Customer: Click "Customer" to search for a customer.
Figure 2.7
- Search: Enter the customer's phone number in the indicated field and click this button to search for a specific customer.
- New: Click this button to add a new customer. The Management | Customer Details screen will appear. Fill in the appropriate details and click the "Save" button.
- Lookup: Enter the customer's phone number in the designated field and click this button to retrieve their information.
The difference between "Search" and "Lookup" is that the search function searches for a customer, whereas the lookup function adds the customer to the sale.
- Exit POS: Click "Exit POS" to exit the POS Panel.
2.3. POS Panels
3. POS Panels & General Buttons
- Main Panel
- Sub-Total Panel
- Cashier Function Panel
- Lottery Panel (If the store sells lottery)
3.1 Main Panel
Figure 3.1
- Cashier Functions: Click this button to navigate the Cashier Functions panel.
- Print Receipt: This button lets you reprint a previously recorded sale receipt. The receipts for the past three days are available.
When you click this button, the system will prompt you to select an option to print a gift receipt or reprint the receipt. You can also print a gift receipt with the dollar values obscured.
- Price Check: This button lets you view detailed information about an item, including the price, image, buydown, and promotions. You can also view QOH and cost information based on the register settings.
- Open Depts: This button allows you to log sales for open departments.
- % Off: This button allows you to apply a percentage discount to a particular product. The corporate employee predefines the percentage discount for the specific department.
- The corporate employee must select which departments are available for discounting from the Control Center.
- If the corporate employee has specified any discount percentage, the system will deduct the stated discount from the bill for the products belonging to the selected departments.
- If the corporate employee has not specified a discount percentage, the system will prompt you to enter one. The system will calculate and deduct the discount from the bill for the products belonging to the selected departments.
- Resume Sale: This button lets you resume a previously suspended sale.
- Lighters: This button allows you to log the sale of the lighter.
- Newspaper: This button lets you log the newspaper's sales.
- Quick Time Clock: This button allows you to launch the Time Clock utility and clock in quickly.
- Suspend Sale: This button lets you suspend a sale. You can resume a suspended sale using the "Resume Sale" button.
- Drinks: This button allows you to log a drink sale.
- House Look Up: This button lets you search for a specific house account.
- E-Liquid: This button shows e-liquid formula calculations and logs a sale of the specified item.
Figure 3.1.1.2
- Price Change: This button lets the manager temporarily alter an item's current price.
- Item Return: This button allows you to process the return of items the customer has purchased. When you click this button on the POS device, the POS | Return screen will appear, as Figure 3.1.1.3 shows. You can scan the item or receipt, manually enter the receipt number, or proceed with a manual item return based on the requirements.
Figure 3.1.1.3Many of our clients authorize only managers to handle the return process. Processing a return also includes creating a return worksheet. Please refer to point 4.48. Return Item for more details.
- Deli: This button allows you to log the sale for deli items.
- Toppings: This button enables you to record the sale of a topping item.
- Tax Exempt: This button allows you to remove all taxes from the sale. The Tax Exempt Information screen will appear when you click this button, as Figure 3.1.1.4 shows. You can enter the appropriate information in it and click "Ok."
Figure 3.1.1.4
- Void Last Item: During the sale process, the customer may instruct you to remove a specific item from the sale immediately after scanning it. You can click the "Void Last Item" button. The system will delete the item from the sale.
- Void All Items: During the sale process, the customer may instruct you to remove all scanned items or multiple items and restart the scanning process with different items. Click the "Void All Items" button. The Select Items To Void screen will appear. Select the items you must void and click the "Void" button. The system will delete the selected items from the sale.
- Gift Card Sale: This button allows you to log a sale to the specified gift card department for the entered dollar amount.
- Gift Card Balance: This button allows you to check the available balance on the gift card.
Figure 3.1.1.5
- No Sale: This button lets you open the cash drawer without a sale.
- Cancel Sale: This button allows you to cancel the sale.
- Sub Total: This button navigates you to the Sub-Total Panel.
3.2 Sub-Total Panel
Figure 3.2
- Buttons with Specified Amounts: These buttons enable you to select specific amounts without typing them.
- Cash Next: This button allows you to choose the Cash Next option for the transaction.
- Check: This button allows you to choose the Check option for the transaction.
- Credit Card: This button enables you to select the Credit Card option for the transaction.
- Debit Card: This button allows you to choose the Debit Card option.
- Gift Card: This button enables you to select the Gift Card option for the transaction.
- Manufacturer Coupon: This button lets you select the Manufacturer Coupon option for the transaction.
- Store Coupon: This button enables you to select the Store Coupon option for the transaction.
- Redeem Choice Bucks: This button allows you to choose the Redeem Choice Bucks option for the transaction.
- Redeem Loyalty: This button allows you to choose the Redeem Loyalty option for the transaction.
3.3 Cashier Functions
Figure 3.3.1
- Time Clock: This button lets you launch the time clock utility.
- Starting Till: This button lets you specify the starting till amount. When you click this button, the POS | Starting Till screen will appear.
- Start Till Amount: Count the cash available and enter the amount in the Start Till Amount field.
- Description: Select the appropriate option from the drop-down. (Some companies let their employees enter the description manually.)
Figure 3.3.2Depending on your company’s setting, the POS | Starting Till screen may appear automatically when you start the till.
- Item Report: This is an example button. FTx Cloud POS enables your corporate employees to configure a button that launches three reports: New Item Report, Price Change Report, and Commission Report. Corporate employees can create a button for each report. When you click any of these buttons, the system will prompt you to specify the number of days for which you want to view the report. Enter the number of days and click "Download" to download the report.
Figure 3.3.3
- Print House Invoice: This button lets you print the house account invoice.
- Safe Drop: This button allows you to log the safe drop amount. When you click this button, the Safe Drop screen will appear, as Figure 3.3.4 shows. You can enter the safe drop amount and description and click the "POP Cash Drawer" button to proceed.
Figure 3.3.4
- Pay In: This button allows you to add the specified amount of cash to the drawer. When you click this button, the Pay In screen will appear, as Figure 3.3.5 shows. Enter the amount and description, and click "Ok." The cash drawer will open for you to deposit the money.
Many of our clients authorize only managers to operate the Pay In function. You may require your manager’s intervention to complete this process if you don't have the required rights.
Figure 3.3.5
- Pay Out: This button lets you take out the specified amount of cash from the drawer. When you click this button, the Pay Out screen will appear, as Figure 3.3.6 shows. Enter the amount and description, and click "Ok." The cash drawer will open, allowing you to withdraw the money.
Figure 3.3.6
- All Kits: This button allows you to select any ordering kit category from the list. When you click the "All Kits" button, the Create Order screen appears, allowing you to select the kits and add them to the sale. The image below is an example of the Create Order screen.
Figure 3.3.7
- Remote Sale Look Up: This button allows you to search for a remote sale by receipt number and location. When you click this button, the Remote Sales screen appears, as Figure 3.3.8 shows. Search for the remote sale using the Search By and for fields, select the remote sale, and proceed with the payment.
Figure 3.3.8
- Damaged Product: This button allows you to add the damaged product to your inventory.
Many of our clients authorize only managers to operate this function. You may require your manager’s intervention to complete this process if you don't have the required rights.
- Multiply Qty: This button enables you to multiply the quantity of the selected item by the specified number. If the customer buys ten pieces of a product, you need to scan the product only once, and then they can multiply the quantity by 10 using this button.
- Open Department: This button lets you log the open department sale.
- Enter the item's price amount and click the "Open Department" button on your POS.
- If the corporate employee has allocated only one department as the open department, the Open Department Description screen will appear. If predefined descriptions are in place, select an appropriate description from the Description drop-down and click "OK."
- If the authorized corporate employee has allocated multiple departments as open departments, the Department Price Prompt screen will display the department names and the amount you entered, as Figure 3.3.9 shows. You can change the amount if required.
Figure 3.3.9
- Pour My Beer: This button allows you to view the balance of the Pour My Beer card for a specific gift card and provides an option to print the balance as well.
- Choose Salesman: This button allows another cashier to log in when a cashier is already logged in.
- Register X: This button allows you to perform Register X.
- Register Z: This button allows you to perform Register Z.
- Waste & Spoilage: This button allows you to remove food waste from inventory.
- Tender: This button lets you specify how the customer will pay for the sale.
- PMB Balance: This button allows you to log a sale to the specified Pour My Beer Card department for the entered dollar amount.
- Single Kit: This button opens the Configuration screen for a specified kit and allows you to add it to the sale.
- Blacklist IDs: This button allows you to add the blacklist IDs to the system.
- Sale Formula: This button lets you open e-liquid formula calculations and log a sale of the specified item.
- Return to Main: This button allows you to navigate the Main Panel.
3.4 Lottery Panel
4. All Possible Buttons
4.1 Add Blacklist ID
Figure 4.1.1
- When you enter the license number and click "Save," the license will be added as a blacklisted ID in the system.
4.2 All Kits
- When you click the "All Kits" button, the Create Order screen appears. This screen allows you to select the kits and add them to the sale. The image below is an example of the Create Order screen.
Figure 4.2.1
4.3 Automatic Tip
- When you click this button, the system calculates and shows the tip amount based on the predefined percentage for the current sale. The system records the tip as an open department sale. However, we recommend discussing this function in detail with your manager.
4.4 Breakdown
- The Breakdown function lets you remove a parent from the inventory and add the appropriate number of children. When you click the Breakdown button, the POS | Breakdown screen appears, as shown in Figure 4.4.1. Scan the item you need to break down. The system will show its QOH details on the screen. Click the "Breakup" button to remove a parent from the inventory and add the appropriate number of children.
Figure 4.4.1
4.5 Cancel Sale
- Many of our clients authorize only managers to operate this function. You may require your manager’s intervention to complete this process if you don't have the required rights.
4.6 Choose Salesman
- When you select the Choose Salesman button type in the Choose Button Type drop-down, the Option List drop-down will appear, as Figure 4.6.1 shows.
- Select an appropriate option: Switch Login, Choose Cashier / Salesperson (Dropdown, Sorted Alphabetically), Choose Cashier / Salesperson (Login Pad).
Figure 4.6.1
- Suppose you have selected "Choose Cashier/Salesperson (Dropdown, Sorted Alphabetically):" Clicking the button will open a dropdown list of all active employees in alphabetical order.
- You can select a name, and the POS assigns that employee as the cashier/salesperson for the transaction. You can also search dynamically search/filter and display matching employees, as Figure 4.6.2 shows.
Figure 4.6.2 - In case you have clicked, Choose Cashier/Salesperson (Login Pad): Clicking this button opens a numeric login pad where the cashier enters an Employee ID using the on-screen keypad. Once a valid ID is entered, that employee is assigned as the cashier/salesperson for the transaction, as Figure 4.6.3 shows.
Figure 4.6.3
4.7 Clear Digits
4.8 Clear Tenders
4.9 Damaged Product Inventory
- When you click this button, the POS | Discount Items to Sale screen appears. It displays a list of damaged items available for sale at reduced prices. You can select the required item and proceed with the sale.
4.10 Digital Coupons
4.11 Discount Coupons
4.12 Dollar Discount
- If the corporate employee has specified any amount when configuring this button, the system will use that amount as a discount whenever this button is clicked. Otherwise, you are required to enter the discount amount.
4.13 Gift Card Balance
- When you click the "Gift Card Balance" button, the POs | Gift Card Entry screen appears.
Figure 4.13
4.14 Gift Card Sale
The "Gift Card Sale" button allows you to sell a gift card.
Watch the video tutorial on selling and processing a Gift Card. 4.15 House Account Lookup
- When you click the "House Account Lookup" button, the POS | Phone Number Entry screen appears.
Figure 4.15
4.16 House Account Payment
4.17 Item Search
- The Find Item screen will appear, as Figure 4.17.1 shows. Search for the products you want to add to the order.
Figure 4.17.1
- Search By: The Search By drop-down lets you select the information type you want to insert in the search bar. You can choose from Description, UPC, UPC Expanded, Vendor Part, or Everywhere.
Figure 4.17.2
Figure 4.17.3
- Search bar: The Search bar lets you enter the keywords based on which you want to search for the product.
- Select the appropriate option from the "Search By" and "All Products" dropdowns, enter your keywords in the search bar, and click the "Find" button. Based on your input, the item list will appear, as shown in Figure 4.17.4.
Figure 4.17.4
4.18 Kit Category
4.19 Launch Module (Custom)
- FTx Cloud POS enables your corporate employees to configure a button that launches three reports: New Item Report, Price Change Report, and Commission Report.
- Corporate employees can create a button for each report. When you click any of these buttons, the system will prompt you to specify the number of days for which you want to view the report. Enter the number of days and click "Download" to download the report.
Figure 4.19.1
4.20 Multiply Quantity
- If the customer buys ten pieces of a product, you need to scan the product just once, and then they can multiply it by 10 using this button.
4.21 Multiply Sales
Figure 4.2.21.2
4.22 No Sale
4.23 Open Department
- Enter the product's price amount and click the "Open Department" button on your POS to log an open department sale.
- If the corporate employee has allocated only one department as the open department, the Open Department Description screen will appear. If predefined descriptions are in place, select an appropriate description from the Description drop-down and click "Ok." Otherwise, type in a proper description. The system will log the sale as the open department sale. You can continue scanning the other products or processing the payment.
Figure 4.23.1
- If the authorized corporate employee has allocated multiple departments as open departments, the Department Price Prompt screen will display the department names and the amount you entered, as Figure 4.23.2 shows. You can change the amount if required.
- Click the applicable department name. The Open Department Description screen shown in Figure 4.23.2 will appear. If predefined descriptions are in place, select an appropriate description from the Description drop-down and click "Ok." Otherwise, type in a proper description. The system will log the sale as the open department sale. You can continue scanning the other products or processing the payment.
Figure 4.23.2
4.24 Open Local Program (Custom)
- This button opens another application specified by the corporate employee directly from within the POS interface. It will be a custom button named after the application that will be opened, such as Control Center.
4.25 Open Website URL (Custom)
4.26 PLU Entry
4.27 Pour My Beer Balance
4.28 Panel Navigation (Custom)
4.29 Pay In
- Many clients authorize only managers to operate the Pay In function. You may require your manager’s intervention to complete this process if you don't have the required rights.
Figure 4.29.1
4.30 Pay Out
- When you click this button on the POS device, the Pay Out screen will appear, as Figure 4.30.1 shows. Enter the amount and description to deduct the money.
Figure 4.30.1
4.31 Percent Discount
- If the corporate employee has specified any discount percentage, the system will deduct the stated discount from the bill for the products belonging to the selected departments.
- If the corporate employee has not specified a discount percentage, the system will prompt you to enter one. The system will calculate and deduct the discount from the bill for the products belonging to the selected departments.
4.32 Pour My Beer Card Sale
4.33 Price Changes
- Scan the items and click the "Price Change" button on the POS.
- The POS | Select Item to Change Price screen displays all items scanned during the sale. Select the required item and click the "Change" button.
Figure 4.33.1
- The Temp Price Change screen will appear. Make the appropriate selections, enter the new price and description, and click "Ok."
Figure 4.33.2
4.34 Price Check
4.35 Print Label Item
4.36 Print Labels
4.37 Print Receipt
4.38 Print Sale
4.39 Heartland Reboot
4.40 Heartland Propay Reboot
4.41 Redeem Loyalty
- You can select the customer on the POS device, click this button, and proceed to the redemption process.
4.42 Redemption - Manual
4.43 Register X/Z
Need a visual walkthrough? Watch the video tutorial here.
4.44 Remote Sale Lookup
- When you click this button on the POS device, the Remote Sales screen appears, as Figure 4.44.1 shows. Select the remote sale and proceed with the payment.
Figure 4.44.1
4.45 Heartland - Reset
4.46 Heartland Propay - Reset
4.47 Reset Smart Till
- The smarttill cash drawer is an intelligent till option from FTx Cloud POS that you can integrate with your FTx POS system at your stores. It can record all cash activity in real-time and reconcile it to sales made in-store. The designated individuals can receive notifications when discrepancies occur in the store's cash drawers.
4.48 Resume Sale
4.49 Return Item
- When you click this button on the POS device, the Return screen will appear, as Figure 4.49.1 shows.
Figure 4.49.1
- You can scan/manually enter the barcode or scan the receipt, which displays a list of all items on the receipt and allows you to choose what to return. However, to use this button, you must have permission to handle the Item Return operation.
The POS | Add Return To Worksheet screen will appear. You can choose from three options: Return to Inventory, Return to Vendor, and Return to Warehouse.
Figure 4.49.2
- This item is new and can be added back to Inventory: If you see the item in perfect condition, choose this option. You can send it back to inventory by clicking "Ok." In this case, the system will not add the item to the Damaged Product Inventory.
- This Item is damaged: Choose this option if you see the item is not in perfect condition. Choose the applicable options in the Item Condition drop-down, write notes, and click "Ok."
Figure 4.49.3
- Item Condition: Choose the suitable option from this drop-down.
- Condition Notes: Enter the appropriate notes.
- In this case, the system will add the item to the Damaged Product Inventory. You can resell the item at a discounted price, which will be determined by the corporate employee's settings in the Configure Department-Level Discounts section of Control Center.
4.50 Round For Charity
4.51 Safe Drop
- When you click this button on the POS device, the Safe Drop screen will appear, as Figure 4.50.1 shows. Enter the safe drop amount and description, and click the "POP Cash Drawer" button to proceed.
Figure 4.51.1
4.52 Sell Item
- When you click this button on the POS device, the Choose Item screen will appear, displaying the added products in alphabetical order, as Figure 4.52.1 shows. Select the item and proceed with the payment.
Figure 4.52.1
4.53 Single Kit
4.54 Starting Till
- When you click this button on the POS device, the Starting Till screen will appear, as Figure 4.54.1 shows. Enter the start time, amount, and description; click the "Ok" button, and start the shift.
Figure 4.54.1
4.55 Suspend Sale
4.56 Tax Exempt
- When you click this button on the POS device, the Tax Exempt Information screen will appear, as Figure 4.56.1 shows. If the information is available, enter it. However, filling in the information is optional.
Figure 4.56.1
4.57 Temp Price Change
4.58 Tender
Beyond standard tenders like cash or credit, this button type also allows you to create additional payment methods such as Gift Cards, EBT Food Stamps, Manufacturer Coupons, and any other custom tenders your store accepts.
4.59 Quick Time Clock
Figure 4.59.1
4.60 Void All Items
4.61 Void Last Item
4.62 Waste/Spoilage
- Navigate to the "Cashier Functions" button by clicking the "Cashier Functions" button on the Main Panel.
- Click the "Waste & Spoilage" button and scan the item you wish to log as waste.
- The Waste Confirmation screen will appear, as Figure 4.62.2 shows.
- You can search for the required items to add them to the waste list.
Figure 4.62.3
- 1: Search Items: Search for the specific items using the search section.
- 2: Select Items: Click the respective checkbox to select the required item.
- 3: Specify quantity and add it to the waste list: Specify the required quantity in the Waste Qty field and click the "Add To Waste List" button to add the selected items to the waste list.
Related Articles
POS Dashboard Layout – Classic
POS Dashboard Layout Overview The POS Dashboard layout serves as the main landing page upon logging into the POS system. It provides immediate access to essential features, such as the Time Clock for clocking in and out, the Current To-Do List for ...Web Preferences - POS – Classic
Web Preferences - POS Overview "Web Preferences" shows the Register Settings properties set for your store (location). The corporate employee sets the Register Settings properties from Control Center. For information related to those settings, go to ...POS Panels - Layout & Buttons – Modern
Overview A POS panel is the primary interface of a point-of-sale system, enabling cashiers or business operators to process transactions efficiently. It is a combination of hardware and software that provides essential tools for managing sales, ...FTx Cloud POS Step-by-Step Guide – Classic
FTx Cloud POS Step-by-Step Guide FTx Cloud POS is a cloud-based point-of-sale (POS) solution that provides comprehensive business management capabilities through a single tool, featuring extensive integration capabilities for property management ...POS Panels
POS Panels Overview "POS Panels" enables you to create POS panels that you assign to POS devices installed in your stores. The POS device installed at the payment point is hardware. It includes the POS panel software part, which makes it functional. ...