POS Dashboard Layout – Classic
POS Dashboard Layout Overview
The POS Dashboard layout serves as the main landing page upon logging into the POS system. It provides immediate access to essential features, such as the Time Clock for clocking in and out, the Current To-Do List for tracking pending tasks, and Dashboard Messages for important system updates or internal communications.
From this central screen, users can navigate to various functional menus, including "Open POS" to initiate and manage sales transactions, the "Action" menu for accessing utility options necessary for POS and Control Center synchronization, and "Log Off" to securely exit the system.
This article will give you an understanding of each topic available on the POS Dashboard.
Understanding the POS Dashboard Layout & Functions
Please refer to Figure 0.1 and the descriptions of the buttons and fields below to understand the layout of the POS Dashboard.
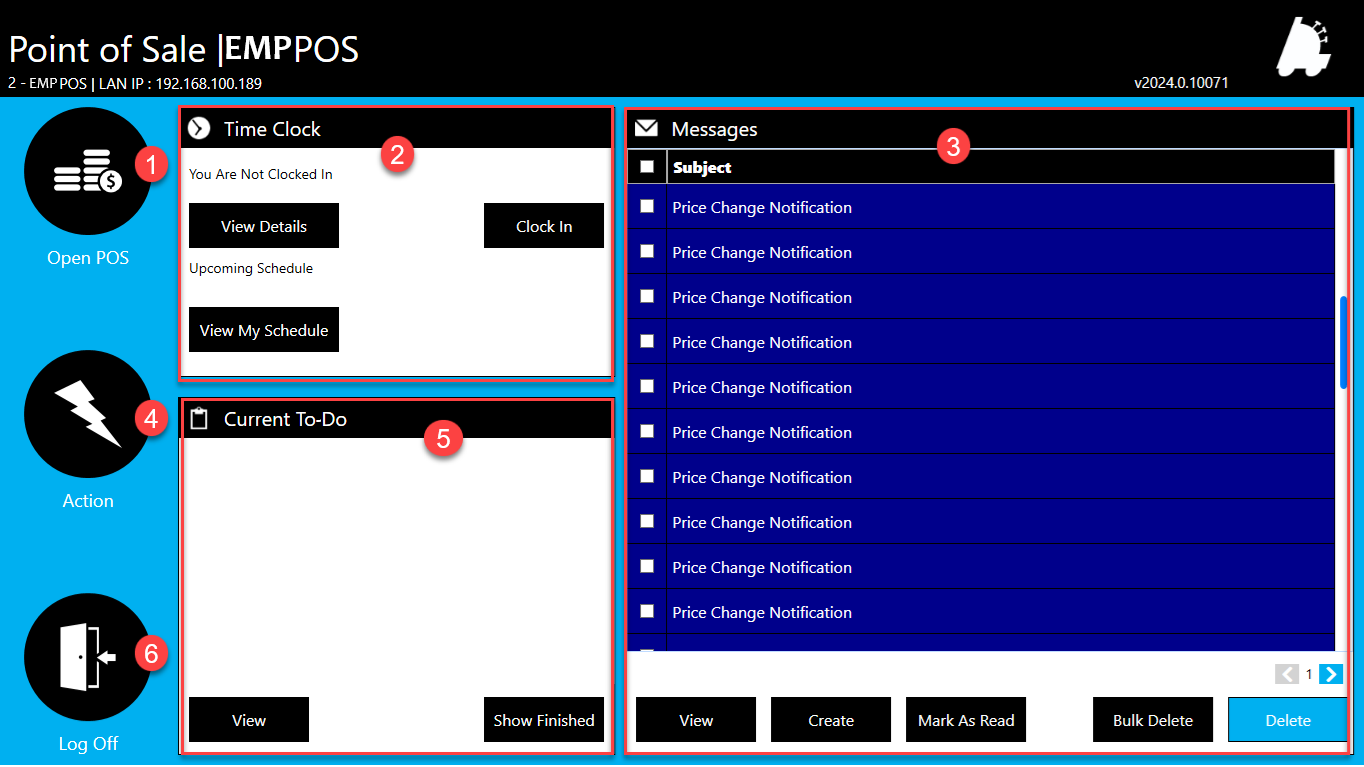
Figure 0.1
As soon as you log into the POS, the dashboard is the first screen that you see. Different action menus and other sections for displaying various information and actions are explained below:
- Open POS: Use "Open POS" to get started with sales-related POS functions. See 1. Open POS heading.
- Time Clock: Use "Time Clock" to clock in/out of your shift and to view your schedule. This part is explained under 2. Time Clock heading.
- Messages: Use "Messages" to view the dashboard messages that are sent to the employees and are visible here. This part is explained under the 3. Messages heading.
- Action: Use "Action" to open the POS Action screen to utilize various POS utilities such as settings, reconciliation, cycle counts, etc. See section 4. Action.
- To-Do List: Use "To-Do List" to check your To-Do List, i.e., the work you are assigned to-do. This part is explained under the 5. Current To-Do heading.
- Log Off: Click "Log Off" to safely leave the POS system. See section 6. Log off below for a better understanding.
1. Open POS
See Figure 1.1.
When you click "Open POS," the screen highlighted in Figure 1.1 is displayed. A POS panel is the central interface of a point-of-sale system, seamlessly integrating hardware and software to enable efficient transaction processing, sales management, and customer interaction.
Figure 1.1
For a detailed overview of each POS button, please visit this link: POS Panels - Layout & Buttons.
For a detailed overview of each POS button, please visit this link: POS Panels - Layout & Buttons.
2. Time Clock
Use the Time Clock feature to clock in/out for your shift. You can also view your two-week schedule from here.
See Figure 2.1.
 For employees who do not use the POS system, you can clock in and out through Control Center.
To learn how, click this link: Time Clock - Control Center.
Figure 2.1
See Figure 2.1 to compare the difference between when the user is clocked in with a timestamp.
See Figure 2.1 to compare the difference between when the user is clocked in with a timestamp.
1. View Details: This button lets you view the details of your shift with the date, in/out time, and shift duration.
- You can select the number of entries from Show Entries For The Last X Days to be displayed in the Time Clock Details screen.
- You can also print these time clock details for general use or check the Acct Format to print/use them in accounting format for accounting purposes.
- Click on "Close" to exit the Time Clock details.
Figure 2.2
2. View My Schedule: This button allows you to view your schedule for two weeks in advance.
The employee scheduler is created by the corporate user from Control Center under Employee Scheduler.3. Clock In/Out: See Figure 2.2. This button will help you clock in/out to log your shift timings into the system.
3. Dashboard Messages
Dashboard Messages provide a fast and efficient way to communicate with store locations directly through the POS and Control Center. Designed to streamline internal communication, these messages appear in a centralized dashboard that all employees can access.
FTx Cloud POS provides a two-way messaging facility across the account. If you are authorized, you can view the sent and received messages on your Dashboard in the Messages section, as Figure 3.1 shows.
Figure 3.1

The visibility of dashboard messages (sent/received) is based on settings defined during their creation by a corporate user. Messages can be targeted to you individually, to all employees at a specific location, or to an entire location group.
The Messages section lists all messages that have been sent and received. The system will highlight the unread messages in blue, and the read messages are highlighted in white. See Figure 3.2.
Figure 3.2
All the actions related to these messages are explained below. See Figure 3.1.
- View: Use this button to view the details of the selected message.
- Create: Use this button to create and send a message.
- Mark As Read: Select the checkboxes next to the message(s) and click the "Mark As Read" button to mark them all as read at once.
- Bulk Delete: Select the checkboxes next to the message(s) and click the "Bulk Delete" button to delete them at once.
- Delete: Use this button to delete a selected message.
3.1. Viewing Message:
Please select a message by clicking on it and clicking the "View" button. The View Message screen will appear. See Figure 3.1.1.
Figure 3.1.1
- Message Thread: This section displays the entire message thread.
- Send Reply: Enter the message's reply and click the "Send Reply" button to reply to the message.
- Add Attachments: Use this section to attach your reply.
3.2. Creating a Message:
Please follow the steps below to send a message.
- Click the "Create" button highlighted in Figure 3.2.2.
Figure 3.2.2
The POS | Create Message screen will appear, as Figure 3.2.2 shows.
- Subject: Enter the message's subject line.
- Message: Enter the message you wish to convey.
- Visibility: Select the appropriate visibility setting.
- Attachments: Add attachments if required.
- User Selection:
- All Users: Select this option to send messages to all users of your company's account.
- Specific User: Select this option to send the message to a specific user. The To drop-down field will appear. Please select the required users from it.
Figure 3.2.3
3.3. Mark as Read
- This button lets you mark the selected multiple messages as read at once.
- Check the checkboxes next to the message(s), one or more.
Figure 3.3.1
- Click the "Mark As Read" as highlighted in Figure 3.3.1.
- The warning message as displayed in Figure 3.3.2 appears.
Figure 3.3.2
- Click on "Yes" to continue.
- The selected multiple message(s) will be marked as read.
3.4. Bulk Delete
- This button lets you delete the selected multiple messages at once.
- Check the checkboxes next to the message(s), one or more.
Figure 3.4.1
- Click "Bulk Delete," as highlighted in Figure 3.4.1.
- The warning message as displayed in Figure 3.4.2 appears.
Figure 3.4.2
- Click on "Yes" to continue.
- The selected multiple message(s) will be deleted.
3.5. Delete
- This button allows you to delete a single message. See Figure 3.1.
- Check the checkbox against the message.
- Once done, click on "Delete"; the warning message as highlighted in Figure 3.5.1 appears.
Figure 3.5.1
4. Actions
See Figure 0.1
Click on "Action" to open the Point of Sale | Actions screen, where you can access various POS utilities. These include functions such as Settings, Reconciliation, Cycle Counts, and more. The actions are explained below.
Figure 4.1
- Return Home: Use this button to take you back to the POS dashboard.
- Reconciliation: This feature lets you handle shift reconciliation, add daily reconciliation/edit daily reconciliation, and manage safe.
Figure 4.2
Click the associated links to learn more: - Data Synchronization: This feature is used to synchronize the various CC modules associated with the logged-in employee.
Figure 4.3Select any option from the Sync Options list, and the system will automatically sync the CC data with POS for the selected parameter.
- Cycle Counts: FTx POS allows you to physically count the products that are present in your store with an inventory management method called Cycle Counts.
- Inventory: The Inventory feature allows you to handle various inventory functions such as Adjustments, Worksheets, or Transfers.
- Receiving: The Receiving feature helps you manage receiving invoices in POS for updating store inventory levels. It also establishes a traceable inventory movement trail against vendors, as well as ensuring quantities and costs are properly reflected.
- Reorder: Generally, orders are created for your store from Control Center or handheld devices; you can view them in POS as well. Additionally, you can use the Reorder feature to create orders from the POS using the Reorder Using Blank Form method.
- Manage Lottery Games: The Manage Lottery Games feature lets you activate/deactivate the lottery games for your store location. You can also make changes in its bin assignment at the location level from the POS.
- Re-register Fingerprint: This feature lets you register/re-register your fingerprints through the Re-register Fingerprint feature.
- Settings: The Settings feature lets you customize the POS layout, configure fingerprints, and manage lottery games and web preferences.
- POS Training Mode: The POS Training Mode opens up training mode to allow staff to practice using the point-of-sale system without affecting real sales data or inventory.
- Scan Store: The Scan Store feature is designed to streamline inventory management by allowing employees to update item details within the POS system quickly.
To learn how to get immediate access to essential features on the POS Dashboard>>Actions, please refer to the video linked.5. Current To-Do
Current To-Do displays tasks assigned by the corporate user. While it may appear like a regular message, it contains specific instructions for completing tasks rather than general communication.
See Figure 5.1.
Figure 5.1
- From the list of To-Dos, select the To-Do task and click the "View" button.
- The screen highlighted in Figure 5.2 appears.
- It describes the To-Do task in detail.
Figure 5.2
- Complete the task as suggested.
- When done, click "Close Complete" to mark the task as completed.
- If you wish to print, click on the "Print" button.
Show Finished: All the completed To-Do will appear under this button.
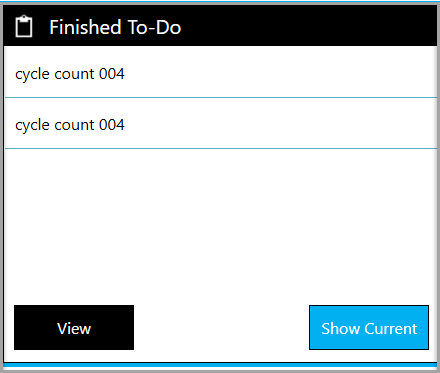
Figure 5.3
Figure 5.3
6. Log Off
The "Log Off" button ends the current session, ensures security, and makes the POS system ready for another session.
Figure 6.1
- If you are on the POS Dashboard, click the "Log Off" button to end the current session.
- If you are using any POS function under Open POS, first click "Exit POS" to return to the dashboard, then click "Log Off."
- If you are in the Actions menu, click "Return Home" to navigate back to the dashboard, then click "Log Off."
To learn how to get immediate access to essential features on POS Dashboard, please refer to the video linked.Related Articles
POS Panels - Layout & Buttons – Classic
POS Panels - Layout & Buttons Overview A POS panel is the primary interface of a point-of-sale system, enabling cashiers or business operators to process transactions efficiently. It is a combination of hardware and software that provides essential ...FTx Cloud POS Step-by-Step Guide – Classic
FTx Cloud POS Step-by-Step Guide FTx Cloud POS is a cloud-based point-of-sale (POS) solution that provides comprehensive business management capabilities through a single tool, featuring extensive integration capabilities for property management ...POS Dashboard Layout – Modern
POS Dashboard Layout Overview The POS Dashboard layout serves as the main landing page upon logging into the POS system. It provides immediate access to essential features, such as the Time Clock for clocking in and out, the Current To-Do List for ...POS Panels - Layout & Buttons – Modern
Overview A POS panel is the primary interface of a point-of-sale system, enabling cashiers or business operators to process transactions efficiently. It is a combination of hardware and software that provides essential tools for managing sales, ...Dashboard & Navigations - Store Employee
Dashboard & Navigations Overview The Dashboard serves as the central hub for all essential activities and insights. It provides employees with quick access to key metrics, operational updates, and important notifications. This article includes ...