E-Journal Report
E-Journal Report Overview
E-Journals are electronically captured records of all transactions, providing a detailed log of transactional data. E-Journal Reports enable users to quickly locate and review specific transactions along with their associated details.
The E-Journal Report displays transactions based on the selected date range and location.
Key features include:
- Customizable Filters: Various filters can be applied to refine search results and display only relevant transaction records.
- Detailed Transaction Data: Each report is structured across multiple fields, presenting key details along with automatically calculated information.
- Efficient Data Retrieval: Quickly access and analyze transactions for auditing, troubleshooting, or record-keeping purposes.
The report ensures that only transactions matching the selected filter options are displayed, providing users with precise and relevant insights.
1. Reaching the "E-Journal Report"
To reach the "E-Journal Report," follow the below steps:
- Step 1: Log into Control Center
- Step 2: Choose Point of Sale
- Step 3: Choose Reports
- Step 4: Choose Sales Reports
- Step 5: Choose E-Journal
You’ll find a variety of inventory reports designed to support different aspects of your retail operations. To view them, click on the Choose Report drop-down menu. This will display a list of available inventory report types, each offering insights for effective inventory management. See Figure 1.1.
Figure 1.1
2. Understanding E-Journal Report Layout
You will see the Report Data is Empty message initially. You need to select the date range to check the summarized e-journal data in the report. See Figure 2.1.
Figure 2.1
3. Generating a E-Journal Report
When you navigate to the E-Journal Report page, you will get the options pre-selected by default. You can generate the report in the selected date range.
Figure 3.1
1. E-Journal General Details:
- Cashier Name: This will show the cashier who rang up the transaction.
- Register Number: It displays the register number that was involved in the transaction.
- Receipt #: It displays the receipt number for the transaction.
- Date/Time: The date and time of the transaction are displayed here.
- Store: This mentions the location where the store is located.
- Type: It explains the type of sale, whether clear, suspended/cancelled.
- Customer: This mentions the name of the customer for whom the transaction was carried out, if available.
- DOB: This field gives the date of birth of the customer that is entered at the POS to validate the age if needed.
- Age: This field will denote whether or not the customer was age verified.
2. Item Details:
- UPC: This displays the unique product code for the code.
- Name of the Product: This displays the product name.
- Qty: This field represents the purchased product quantities.
- Price: This field gives the total price of the transaction.
- Buydown: This field gives the buydown details, if applicable.
- Discount: If any discount is applied during the transaction, this field displays the details about it.
- Other Taxes: If any taxes are applied, this column will give the details about them.
- Total: The total price of the items bought will be displayed here.
- Sub Total: This is the sub total for all the items bought in that transaction.
- After Discounts: This is the total amount for the transaction after applying the discount (if applicable).
- Tax: This displays the tax amount (if tax is applied on any of the items). For the items in the transaction that are non-taxable, the report will display the tax label as "Exempted."
Figure 3.2
- Total: This is the total amount that the customer paid in the end.
- Change: This is the amount returned back to the customer where he paid more for the items bought than they cost.

Any other related details such as delivery charges or credit card fees will only be displayed when some amount is applied. See Figure 3.3 for reference.
3. Option Buttons:
- Print as Receipt: This option button will print the receipt for that transaction. See Figure 3.3.
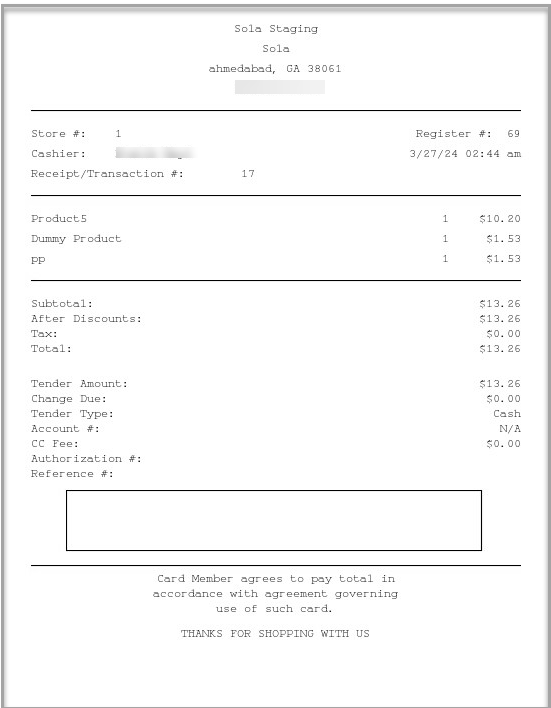
Figure 3.3
- Print as PDF: This option displays the associated transaction as a PDF.
Figure 3.4
- Print as Customer Receipt: This option will download and display the customer's side receipt for that transaction.
Figure 3.5
- Show Variance: This feature is used to display the variance in transaction if occurred during the selected time period and location.Figure 3.6
- Preview Scan Data: Three types of scan data reports are available. As per your account configuration, select the scan data report type, and the system will display the preview for that.
Figure 3.7
- For RJ Reynolds Retail Scan Data, the resultant report will be displayed as highlighted in Figure 1.7.
Figure 3.8
4. Coupon Details:
This section will only be visible if the store or manufacturer coupon is used in the transactions.
- Account No: This field shows the customer's account number, if any.
- Coupon UPC: This field shows the customer's account number, if any.
- Cash: This section shows the payment method. If multiple methods are used, all of them will be shown along with the amount details.
- Store Coupon: This section shows the coupon transaction. It shows the coupon type (Store Coupon/ Manufacturer Coupon) along with the amount details.

Note:
- The same details will be printed on the POS receipt and CC receipt (as explained in 3. Option Buttons.)
- If you want to include the store and manufacturer coupon details in the receipt, please enable the Tax Store Coupons and Tax Manufacturer Coupons buttons in "Register Settings" under "POS Device Global Settings."

Scroll the bar as highlighted in Figure 3.8 to view more details.
3.1 Filter By Cashier
- Show All: This option displays the different transactions for all the store locations.
- Filter by Cashier: This button lets you apply some filters and generate filter-specific reports by cashier.
By clicking the "Manage" button, a Manage Filters window will pop up. You will see the following details as highlighted in Figure 3.1.1.
3.1.1.Manage Filter:
Use this field to manage report filters from here:
Figure 3.1.1.1
Select the list of cashiers from the list and move ahead with the selection.
Figure 3.1.1.2
-Manage Filter Screen Information:
-Manage Filter Screen Information:
1. Search: Use this search bar for a specific result.
2. Results: Here, you see the relevant list of cashiers to generate custom-cashier-based data results. You can search for a specific cashier in the Search bar.
3. Checkboxes: Select the required products by checking the appropriate checkboxes.
4. Arrow: Click the green Arrow button to move the selected records to the Selected List area.
5. Clear Selection: Click the "Clear Selection" button to remove the whole selection. To remove any record from the list, click the Remove (X) icon.
6. Apply/Close: Apply or save the custom filter:
- Apply: Click the "Apply" button for the selected parameters. The system will navigate you to the E-Journal Report home screen. Click "Generate Report." The system will generate reports based on your selection.
- Close: Use this button to exit the Manage Filter screen.
3.2. Filter the Report By:
These options let you filter the report as per the sorting options as highlighted in Figure 3.2.1.
Figure 3.2.1
3.2.1. Filter By Date Range:
This option filters all the E-Journals based on the selected Date Range. See Figure 3.2.1.1.
Figure 3.2.1.1
3.2.2. Filter By Register Z:
This option filters all the E-Journals based on the Register number and Register Z number.
Figure 3.2.2.1
3.2.3. Filter By Receipt Range:
This filter option filters the report with different labels, e.g., receipt range, starting receipt number, ending receipt number, and register number.
See Figure 3.2.3.1.
Figure 3.2.3.1
3.2.4. Filter by Sale Amount
Use this filter to display the E-Journal report based on the sales amount entered in the corresponding field.
Figure 3.2.4.1
Various types of "Sale Amount Is" options can be selected to get different custom reports as per your requirement. See Figure 3.2.4.2.
Figure 3.2.4.2

You can similarly generate the E-Journal report based on different Sale Amount Is selections.
3.2.5 Filter by Check Number
This filter will display the report by check number coming from the customer's side at the POS. See Figure 3.2.5.1.
Figure 3.2.5.1
3.2.6 Filter by Last Four Numbers of CC:
This filter displays report data based on the last four digits of the credit card entered. Refer to Figure 3.2.6.1.
Figure 3.2.6.1
3.3. Filter by Sales Transaction
This filter can be applied to display the results separately in the report for only sales transactions/non-sales transactions, or open department sales transactions.
Figure 3.3
3.3.1. Only Sales Transactions
This filter type lets you filter the transactions that have converted to the sales.
Figure 3.3.1
3.3.2 Only Non Sales Transactions
This filter will generate and display the transactions that didn't generate sales.
Figure 3.3.2.1
3.3.3. Only Open Department Sales
This filter will generate and displays the transactions that were conducted as Open Department Sales.
Figure 3.3.1
3.4. Filter the Sales By:
This filter type segregates the sales report to display in-store sales, ecommerce sales, and the combination of both in-store and ecommerce data in the selected date range and for selected store(s).
Figure 3.4.1
All: This option is selected by default and will display the E-Journal Report for every transaction type: in-store and e-commerce sales.3.4.1. E-Commerce Sales
- This filter shows online sales data generated through the e-commerce platform in the E-Journal Report. Refer to Figure 3.4.1.1.
Figure 3.4.1.1
3.4.2 In-Store Sales:
Transactions conducted directly at the store’s point of sale (POS) terminals, as opposed to those processed online through an e-commerce platform.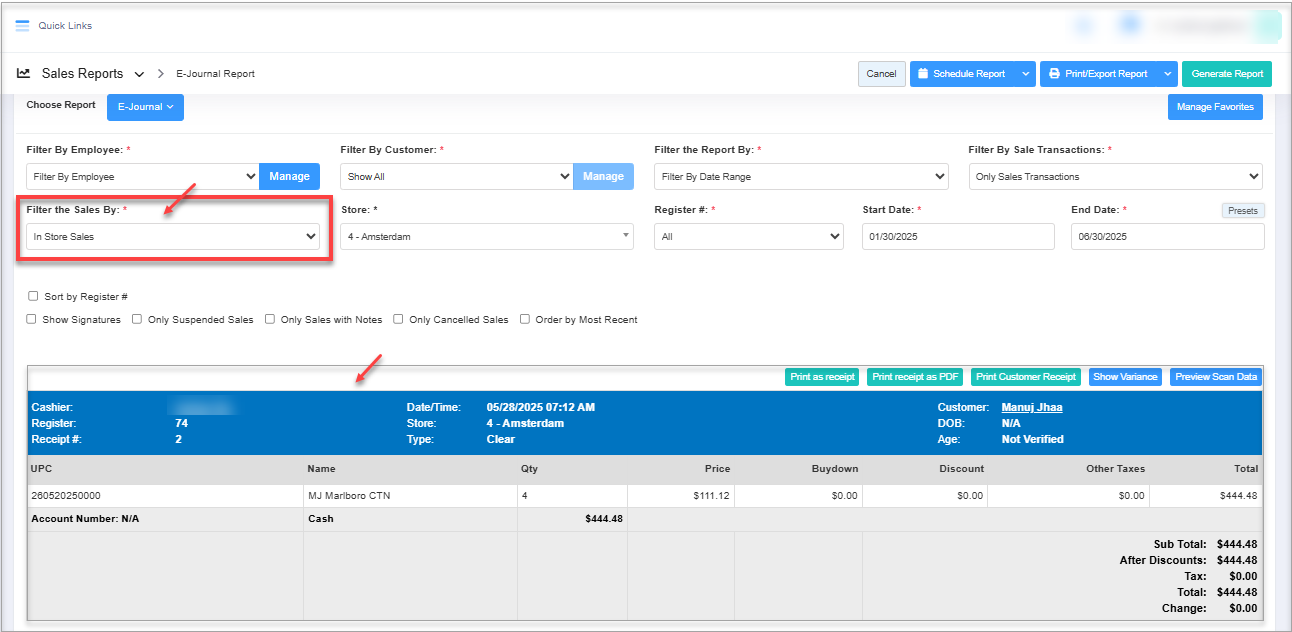
Figure 3.4.2.1
Transactions conducted directly at the store’s point of sale (POS) terminals, as opposed to those processed online through an e-commerce platform.
Figure 3.4.2.1
3.5. Store
This part is for selecting the store location associated with the company account from the Store drop-down list to display the store-specific sales data in the report.
Figure 3.5.1
3.6. Register #
This option allows you to select a specific register number from the Register # drop-down list, corresponding to the chosen location, to generate a register-specific sales report for the specified date range and store.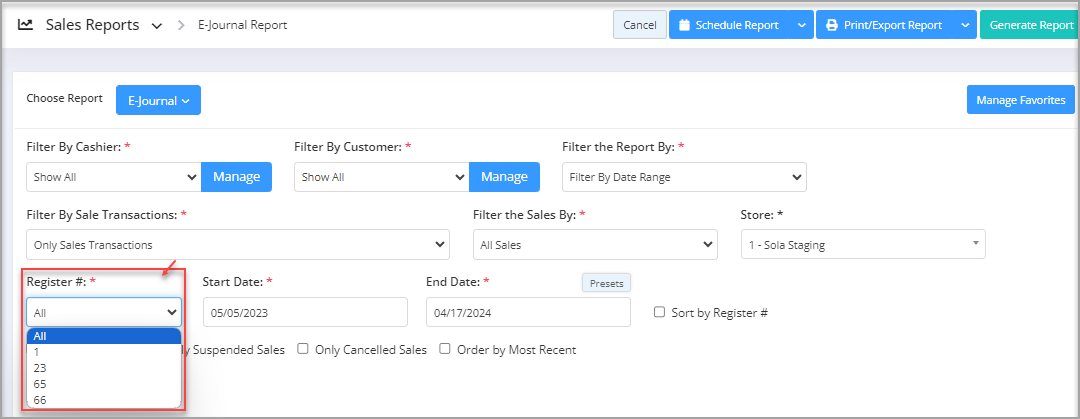
Figure 3.6.1
4. Date Range:
You can filter your sales data in the report by selecting the date range as well as specific times.
By clicking the edit box, you will be taken to a tiny calendar where you can select a specific date range. You can also enter the date manually in mm/dd/yyyy format.
See Figure 4.1, Figure 4.2, and Figure 4.3.
- Start Date: Select the starting date of the date range from the Start Date drop-down calendar as highlighted in the image below.Figure 4.1
- End Date: Select the ending date of the date range from the Start Date drop-down calendar as highlighted in Figure 4.2.
Figure 4.2
- Presets: The Presets label is provided to select the specific duration/interval to generate the report with that.
Figure 4.3
5. Checkbox Filters
This feature lets you filter the report as per below-mentioned filters, highlighted in Figure 5.1 below.
Figure 5.1
- Sort by Register: With this filter, the report will be displayed in terms of ascending register#.
Figure 5.2
- Show Signatures: If checked, this filter will display the records of the sale transactions that used credit cards and captured the signature digitally during the transaction.
Figure 5.3
- Only Suspended Sales: This checkbox, if checked, will display the suspended sales that were either cleared or cancelled later.
Figure 5.4
- Only Cancelled Sales: This checkbox, if checked, will display all the canceled sales at the POS.
Figure 5.5
- Order by Most Recent: This filter will display the sale transactions that happened very recently.
Figure 5.6
6. Scheduling a Report
FTx Cloud POS supports report automation. You can configure a report and schedule it. The system will send the scheduled report to the indicated email IDs at the defined frequencies (daily, weekly, bi-weekly, monthly, quarterly, etc.).
7. Printing/Exporting a Report
You can print or export any report according to your requirements. When you use the Print function, the system creates and opens the report's PDF file in a new tab. You can download the soft copy or print the paper copy according to your requirements.
8. Manage Favorites
FTx Cloud POS allows quick access to the reports you need to view frequently through "Favorite Reports." You can save a report as a favorite and manage all your favorite reports from any of the report screens using the "Manage Favorites" button.
Related Articles
E-Journal Report - Store Employee
E-Journal Report Overview The E-Journal Report (Electronic Journal Report) is a digital record of all transactions processed on the POS terminal. It functions like a digital copy of the cash register receipt tape, capturing every action done on the ...Employee Detailed Variances Report
Employee Detailed Variances Report Overview The "Employee Detailed Variances Report" lists variances determined by the Smart Till for the employee with the individual transactions that they stemmed from. Various types of filters can be applied to ...Coupon Sales Report
Coupon Sales Report Overview The "Coupon Sales Report" displays a list of store and manufacturer coupons used that provide discounts on a specific product or purchase amount. These coupons are funded by the retail store or the product manufacturer, ...Negative Items Report
Negative Items Report Overview The "Negative Items Report" shows records of products that have undergone any negative transaction (void, cancellation, and return) for the selected date range. This article includes information about: How to generate a ...Manual Discount Report
Manual Discount Report Overview The "Manual Discount Report" shows details about manually given discounts. During checkout, you can provide a manual discount to the customer. While a system discount may apply if relevant, a cashier can issue a manual ...