Mass Updates - Store Employee
Mass Updates Overview
The "Mass Updates" feature allows you to apply large-scale data changes quickly, accurately, and efficiently. Whether you're updating discounts, modifying display screen settings, or adjusting prices across multiple locations, Mass Updates helps streamline the process from any device — within seconds.
FTx Cloud POS supports mass update operations in two ways:
- Directly from relevant modules (where applicable).
- Centrally through the "Mass Updates" section
With "Mass Updates," you can:
- Apply bulk changes to any number of selected products, covering a wide range of data fields.
- Schedule those updates to take effect at a specific time, ensuring smooth and timely rollouts.
Reaching "Mass Updates"
- Step 1: Log into Control Center
- Step 2: Choose Pricebook
- Step 4: Choose Products
- Step 5: Choose Mass Updates
Figure 0.1 below will help you in understanding the navigation better.
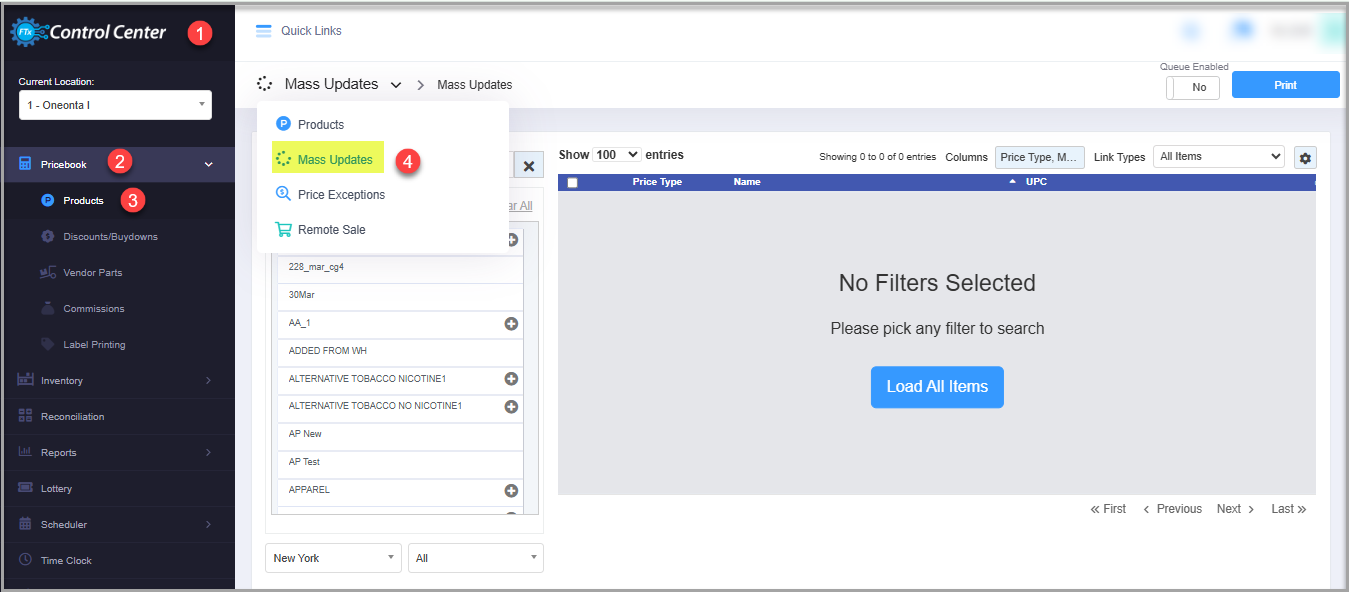
Figure 0.1
Understanding the "Mass Updates" Layout
Please refer to Figure 0.2 and the descriptions of the buttons and fields below to understand the layout of "Mass Updates."
Figure 0.2
- 1.1: Queue Enabled: This toggle button lets you turn on or off the queue formation of the mass update requests.
- If you disable this button, the system will execute the mass update changes without submitting them in Queued Changes.
- If you enable this button, the system will submit the mass update changes in Queued Changes. You can later review and process the changes from there.
However, the system will execute all changes done under the Utilities action except for the Other utility changes without submitting them in Queued Changes, even though this button is enabled.
- 1.2. Print: This button enables you to print the mass update changes report.
- 2.1. Columns: This drop-down lets you choose which information you want to see in the product list columns.
- Click the Columns drop-down to select or deselect the product list columns.
Figure 2.2
- 2.2. Link Types: This drop-down enables you to filter the product list using five parameters: All Items, Standalone Only, Child Only, Parent Only, and Standalone & Parents.
- 2.3. Settings: This button enables you to filter the product list. When you click this button, the Mass Update Settings screen will appear, as Figure 2.3 shows.
Figure 2.3
- Tag Groups Visible: This drop-down will show the list of all tag groups created from Product Tags. Use this drop-down to filter the product list based on tag groups.
- Item Type: Use this drop-down to filter the product list based on two parameters: All Items and Items Not Eligible For Discount.
- Product Aliases: Use this drop-down to filter the product list based on two parameters: All Items and Product with Aliases.
- Product Status: Use this drop-down to filter the product list based on four parameters: Only Active Items, All Items, Only Inactive Items, and Deleted Items.
- 3. Product List: This section shows the product list based on the filters you have applied. You can use the respective checkbox to select the product. Use the Control (Ctrl) button on your keyboard to select multiple products. Use the Shift button to select a group of items all in a row by clicking the top selection and the lowest selection.
- 4. Load All Items: Click this button to load all products without applying any filters.
- 5. Search UPC/Description: This filter enables you to filter the product list based on a specific parameter.
- 7. Categories: This section enables you to filter the product list based on a category or subcategory. It shows all categories and their respective subcategories in a tree view.
- Use the Plus (+) and Minus (-) icons to expand or collapse the category and/or subcategory list.
- 8. Custom Filters: This button lets you view the product listing based on your specific requirements. For more information, please refer to 1 Custom Filters.
- 9. Clear All: Use the "Clear All" button to remove the selection.
- 10.1. Pricebook Zone: This drop-down lets you filter the product list based on a pricebook zone.
- 10.2. Price Type: This drop-down lets you filter the product list based on the Price Type, such as All, Standard, Pik a Pak, Mix Match, Open Price, and Weighted Price.
1. Custom Filters
The "Custom Filters" button lets you create and save specific filters so that you don't have to search for the specific items again and again. Please follow the steps below to create custom filters.
- Click the "Custom Filters" button.
- The Manage Filters section will appear, as Figure 2.1.1 shows.
Figure 2.1.1
- Save: Use this button to save the custom filters.
- Load: Use this button to open the existing filters.
- Add: Use this button to add custom filters.
- If you click the "Add" button, the Add Filter screen will appear, as Figure 2.1.2 shows. Select the required parameter from the Add Filter drop-down.
Figure 2.1.2
- The selected parameter will be added to the Manage Filters section, as Figure 2.1.3 shows. For example, Departments.
Figure 2.1.3
- Click the "Manage" button to select the departments. The Manage Filters screen will appear, as Figure 2.1.4 shows.
Figure 2.1.4
- 1: Use this Search box to search for a specific product.
- 2: Selection Checkboxes: You need to select the required products by ticking the checkbox. You need to follow the same process for any of the five tabs.
- 3: Arrow: Click the green Arrow button to move the selected products to Selected List.
- The Manage Filters screen will look like the one shown in Figure 2.1.5.
Figure 2.1.5
- 1: Clear Selection: If you want to remove the whole selection, click the "Clear Selection" button. You can remove any record from the list by clicking the Remove (x) icon.
- 2: Apply: Click "Apply" to apply the selection.
- The selected products will be visible in the Manage Filters section, as Figure 2.1.6 shows.
Figure 2.1.6
- You can use multiple parameters at the same time and view the list of products. The process of selecting the parameters will be the same as explained above.
2.1.1 Save & Manage Custom Filters
Please follow the steps below to save the configured custom filters for future use and manage the existing custom filters.
- Click the "Save" button shown in Figure 2.1.1.1.
Figure 2.1.1.1
- The Name pop-up will appear, as shown in Figure 2.1.1.2. Enter the name of the custom filter and click "OK." The system will save the filter.
- You can use the saved custom filter whenever you need it and delete it when you don't need it anymore. Click "Load" and use the steps shown in Figure 2.1.1.2 according to your requirements.
Figure 2.1.1.2
1.2. Printing Mass Updates
Please follow the steps below to print mass updates:
- Filter the product list as per your requirements using the available filters explained in 2. Understanding "Mass Updates" Layout.
- Select the products for which you need to print the report and click the "Print" button highlighted in Figure 2.1.
- The Print Report screen will appear as Figure 5.1 shows.
Figure 5.1
- Only Current Page: Check this checkbox to print only the current page.
- Print Type: Use this drop-down to select the required Print Type option. Figure 5.2 shows the available options.
Figure 5.2
- Sort By: Select if you need to sort the report by the Item name or UPC.
- Show Queue Cost/Price: Enable this button to view the cost/price of the products in the mass update queue.
- Report Format: PDF, Excel, or CSV.
- Click "Start Print."
- The report's PDF, CSV, or Excel will open in a new tab. Download it using the Download icon and print it using the Print icon.
Here's a sample PDF report highlighted in Figure 5.3 below for your reference for the Item List with Tree Information Report.
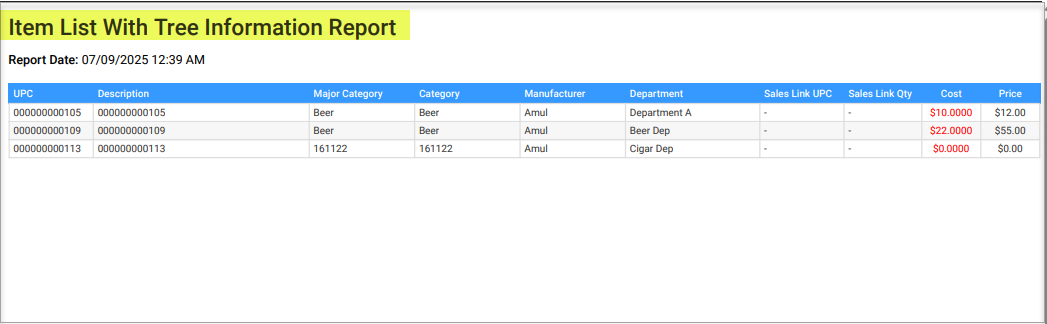
Figure 5.3
Figure 5.3

If you’re a store manager, you may have access to additional functionalities for Mass Updates. If so, click here - Mass Updates - and get a complete overview of how Mass Updates work.
2. FTx Academy Training Course
Check out this FTx Academy video to learn how to navigate and use the "Pricebook" module.
To gain a more comprehensive understanding, sign up for the FTx Academy training program — enroll in the courses and explore the topic lesson by lesson and reinforce your learning with quick quizzes at the end of each module.
Related Articles
Non-Sellers Report - Store Employee
Non-Sellers Report Overview The "Non-Sellers Report" in the FTx Cloud POS system identifies items or products not sold during a specific period. It helps track dead stock and underperforming products, aiding inventory control and sales planning. This ...Slow Sellers Report - Store Employee
Slow Sellers Report Overview The "Slow Sellers Report" within the FTx Cloud POS system identifies products not selling well over a specific period. It assists retailers in recognizing underperforming items so they can implement corrective actions ...Mass Updates
Mass Updates Overview "Mass Updates" allows you to create various data changes quickly and easily. For example, you can update discounts and display screens from any device or make price changes for multiple locations in seconds. The "Mass Updates" ...Dashboard & Navigations - Store Employee
Dashboard & Navigations Overview The Dashboard serves as the central hub for all essential activities and insights. It provides employees with quick access to key metrics, operational updates, and important notifications. This article includes ...Employee Scheduler - Store Employee
Employee Scheduler Overview "Employee Scheduler" in the FTx Cloud POS system is a feature that helps managers plan and assign employee work shifts efficiently. It also helps manage labor costs, improve shift coverage, and ensure legal compliance. ...