Pay-In / Pay-Out Report
Pay-In/Pay-Out Report Overview
The "Pay-In/Pay-Out Report" will display the pay-in and/or pay-out-related data that took place during a specifically entered date range and at a particular store location. Multiple different types of filters can also be configured, depending on your requirements. The system will display the records of pay-in and pay-out-related data only according to the selected filter options. The system will display the amount, description, and timestamp of the pay-in/pay-out. It also displays the name of the cashier, along with the name of the store location where the pay-in/pay-out took place.
1. Reaching the "Pay-In/Pay-Out Report"
To reach the "Pay-In/Pay-Out Report," follow the below steps:
- Step 1: Log into Control Center
- Step 2: Choose Point of Sale
- Step 3: Choose Reports
- Step 4: Choose Sales Reports
- Step 5: Choose Pay-in/Pay-Out
See Figure 1.1. You will see many types of sales reports that will be useful to your retail business. By clicking the "Choose Report" drop-down selection, you will see the different types of sales reports. You want to choose "Pay-in/Pay-Out."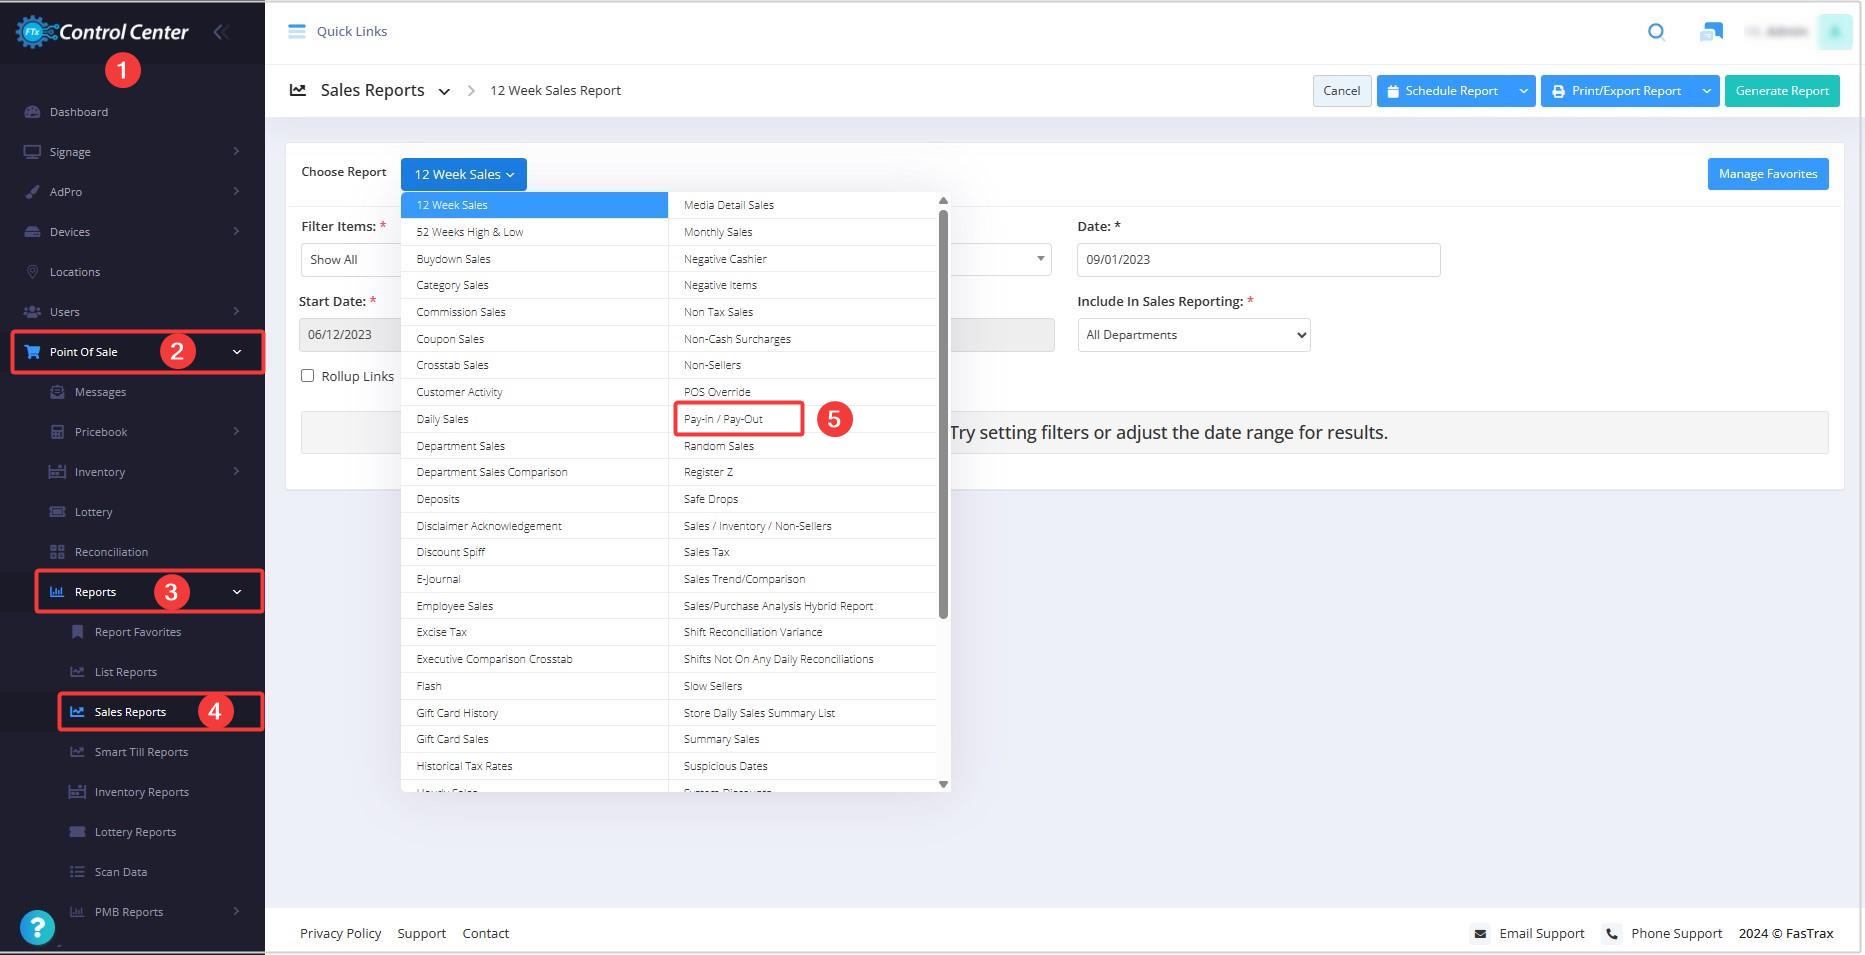
Figure 1.1
You will see the "Report Data is Empty" message initially. You need to select the date range to check the summarized sales data in the report.
Figure 1.2
Report Type:
Figure 1.3
- Both Pay-Ins & Pay-Outs Reports: Choosing this option will display both pay-ins and pay-out records when the report is generated.
- Only Pay-Ins Report: Choosing this option will display only the pay-ins records when the report is generated.
- Only Pay-Outs Report: Choosing this option will display only pay-outs records when the report is generated.
2. Generating the "Pay-In/Pay-Out Report"
When you navigate to the page, you will see the options pre-selected by default. You can generate the report for the selected date range. See Figure 2.1.
Figure 2.1
Fields:
- Location: This column gives the location where the pay-in/pay-out transaction occurred.
- Date: This column gives the date of the pay-in/pay-out action.
- Pay-In/Out: Pay-in and pay-out are the transactions where money is coming in or out of the register that is not associated with a sale or return. A pay-in is where money is coming in, such as cashing in from a vending machine or taking in a lotto sale payment. A pay-out is money going out of the cash drawer and going to those, such as housekeeping, lawn caretakers, and janitors, who expect cash after performing services.
- Amount: This column shows the paid-in or paid-out amount.
- Amount Description: This column describes the pay-in/out amount with its description for which the pay-in/out transaction has been carried out.
- Cashier: This column displays the name of the cashier who carried out the pay-in/pay-out transaction.
3. Date Range:
You can filter your sales data in the report by selecting the date range as well as specific times.
By clicking the Edit box, you will be taken to the attached calendar, where you can select a specific date range. You can also manually enter the date in mm/dd/yyyy format.
See Figure 3.1 and Figure 3.2.
Start Date: This field lets you choose the start date of the date range.
Figure 3.1
End Date: This field lets you choose the end date of the date range.
Figure 3.2
Presets
The Presets label is provided to select the specific duration/interval to generate the report with that. See Figure 3.3.
Figure 3.3
4. Group By Location:
You will see a "Group By Location" drop-down from which you can select "Location" for grouping the pay-in/pay-out data. By default, "None" will be selected, which implies the report data will be displayed without any grouping.
- By Locations: If you select "Location," the data will be displayed in the grouping according to the locations (stores) individually. Once the location-specific report is generated, you can check the pay-in/pay-out data separated as per the locations.
Figure 4.1
- By Location Group: You can also check the data in the report as per the location groups selected. If you select "Location Group," the pay-in/pay-out transaction will be displayed as per the selected location group. When you choose "Location Group," the Include Location Group(s) drop-down will appear, as Figure 4.2 shows. Select the required location groups from it.
Figure 4.2
- When you select the required location groups and click "Generate Report," the system will show the report organized based on the location groups.
Figure 4.3
5. Scheduling a Report
FTx Cloud POS supports report automation. You can configure a report and schedule it. The system will send the scheduled report to the indicated email IDs at the defined frequencies (daily, weekly, bi-weekly, monthly, quarterly, etc.).
6. Printing/Exporting a Report
You can print or export any report according to your requirements. When you use the Print function, the system creates and opens the report's PDF file in a new tab. You can download the soft copy or print the paper copy according to your requirements.
7. Manage Favorites
FTx Cloud POS allows quick access to the reports you need to view frequently through Favorite Reports. You can save a report as a favorite and manage all your favorite reports from any of the report screens using the "Manage Favorites" button.
Related Articles
Pay-In / Pay-Out Report - Store Employee
Pay-In / Pay-Out Report Overview The Pay-In / Pay-Out Report in the FTx Cloud POS tracks the cash movement outside regular sales transactions. What Is Pay-In and Pay-Out? Pay-In and Pay-Out refer to cash transactions unrelated to sales. A Pay-In is ...Deposits Report
Deposits Report Overview "Deposits Report" lets you view the deposit records. The store experiences significant traffic on weekends, holidays, and during festivals. Many customers tend to pay in cash during these times, which can lead to the cash ...Tenders List Report
Tenders List Report Overview Tenders are payment methods created in the Control Center and used in the POS for transactions. They include cash, cards, gift cards, and more. Each tender has a unique ID and specific rules, including refund eligibility ...Register Z Report
Register Z Report When the cashiers/employees complete their shifts, they must generate and submit the sales details report from the POS itself, known as "Register Z." They must generate Register Z before leaving the POS to close their shifts. Thus, ...Shift Reconciliation Variance Report
Shift Reconciliation Variance Report The "Shift Reconciliation Variance Report" will display the list of products showing a variance after the completion of a shift reconciliation. The system will display the products with a variance that took place ...