Product Pricing List Report
Overview
The "Product Pricing List Report" offers a detailed overview of products along with key details and pricing information. Users can filter the report based on various criteria such as category, brand, product type, or availability status.
The report also displays pricing specific to selected pricebook zones, providing accurate and region-relevant price visibility, and is useful for comparing product prices, analyzing market trends, and ensuring pricing consistency across different regions. Depending on the selected pricebook zone, it may include fields such as UPC, Product Name, Cost, Price, and Margin.
This article explains how to access, filter, and use the "Product Pricing List Report" for pricing decisions.
This article explains how to access, filter, and use the "Product Pricing List Report" for pricing decisions.
1. Reaching the "Product Pricing List Report"
To reach the "Product Pricing List Report," follow the below steps:
- Step 1: Log into Control Center
- Step 2: Choose Point of Sale
- Step 3: Choose Reports
- Step 4: Choose List Reports
- Step 5: Choose Product Pricing List
See Figure 1.1. You will see many types of inventory reports that will be useful to your retail business. By clicking the "Choose Report" drop-down selection, you will see the different types of inventory reports.
Figure 1.1
2. Understanding the "Product Pricing List Report"
You will see the "Report Data is Empty" message initially. You need to select the date range to check the "Product Pricing List Report." See Figure 2.1.
Figure 2.1
3. Generating the "Product Pricing List Report"
When you navigate to the page, you will see the options preselected by default. You can generate the "Product Pricing List Report" for the selected fields.
Figure 3.1.
Figure 3.1.
Figure 3.1
Fields Description:
- Product Name: Lists products filtered by selected criteria, including relevant details and pricing from designated pricebook zones.
- UPC: Displays the unique Universal Product Code assigned to each product.
- Price Zone: Identifies the pricebook zone, which defines a specific set of costs and prices for inventory items.
- Cost: Shows the product's purchase cost from the vendor or manufacturer.
- Price: Indicates the retail selling price of the product in the store.
- $ Margin: This represents the dollar profit earned on the item. It is calculated as the difference between the Price and the Cost, showing how much margin is made per unit sold.
- % Margin: This represents the profit margin as a percentage of the item’s selling price. It shows how much of the Price is retained as profit after subtracting the Cost.
4. Filter Items
See Figure 4.1.
This field has an attached drop-down menu consisting of two options:
This field has an attached drop-down menu consisting of two options:
1. Show All: This option will display the data in the reports for all created discounts in the system.2. Custom Filter: This option enables you to generate the report by selecting specific parameters such as UPC, Department, Category, Manufacturer, Tag, Vendor, and Department Tag. Once you choose the "Custom Filter" option, the system will enable the "Manage" button to set up the filters.
Figure 4.1
- Click on the "Manage" button to apply filters to get the customized results. The Manage Filters screen will appear, as Figure 4.2 shows.
Figure 4.2
- Manage Filters Drop-Down: Select the saved custom filters from the Manage Filters drop-down (if any) and click "Apply" to apply the saved custom filter. The system will redirect you to the Product Pricing List Report home screen. Click "Generate Report" to generate the report for the selected filter. Clicking the "Manage Filters" button will also open the list of saved custom filters.
- Parameter Tabs: You will see seven tabs: UPC, Department, Category, Manufacturer, Tag, Vendor, and Department Tag. Select the required tab, i.e., "UPC," to create or apply a custom filter specific to the selected UPCs.
- Search: Use this Search box for a specific result.
- All Items: Use this drop-down to filter the Manage Filters screen data based on four parameters: All Items, Child Only, Parent Only, and Standalone Only.
- Active Only: Use this drop-down to filter the Manage Filters screen data based on three parameters: Active Only, Inactive Only, and All Records.
- Match All Filters Drop-Down: Use the "Match All Filters" filter to decide whether or not the Manage Filters screen data matches all applied filters.
- Results: Here, you see the relevant list of data for the selected tab. For example, if you have chosen the "UPC" tab, it will show the list of all UPCs. You can search for a specific UPC in the Search bar.
- Checkboxes: Select the required products by checking the appropriate checkboxes.
- Arrow: Click the green Arrow button to move the selected records to the Selected List area.Figure 4.3
1. When generating the report, you can decide whether to include or exclude the selected parameters.
- Include: If you select "Include," the system will include all the specified parameters to generate the report.
- Exclude: If you select "Exclude," the system will exclude all the specified parameters to generate the report.
2. Click the "Clear Selection" button to remove the whole selection. To remove any record from the list, click the Remove (x) icon.
3. Apply or save the custom filter:
- Apply: Click the "Apply" button for the selected parameters. The system will navigate you to the Product Pricing List Report home screen. Click "Generate Report." The system will generate reports based on your selection.
- Save Filters: Click the "Save Filters" button to save the custom filter for future use. 4.1.1 Save and Manage Custom Filters explains the details.
- Close: Use this button to exit the Manage Filters screen.
4.1 Save Filters
- You can also save the configured custom filters for future use. By clicking the "Save Filters" button, a pop-up will appear to allow you to enter the name of the custom filter.
Figure 4.1.1
- Enter the name of the filter, and click on "OK" to save it for future use.
Figure 4.1.2
- Once saved, click on "OK."
- The saved filter will be displayed under the "Manage Filters" button as highlighted in Figure 4.1.3.
Figure 4.1.3
- Click on "Select Filter"; it will navigate you back to the Manage Filters form; click on "Apply" to apply the filter.
- The Product Pricing List Report with the selected filter will be displayed as highlighted in Figure 4.1.4.
Figure 4.1.4
5. Product Status
You can use this field to select the product's status, as shown in Figure 5.1.
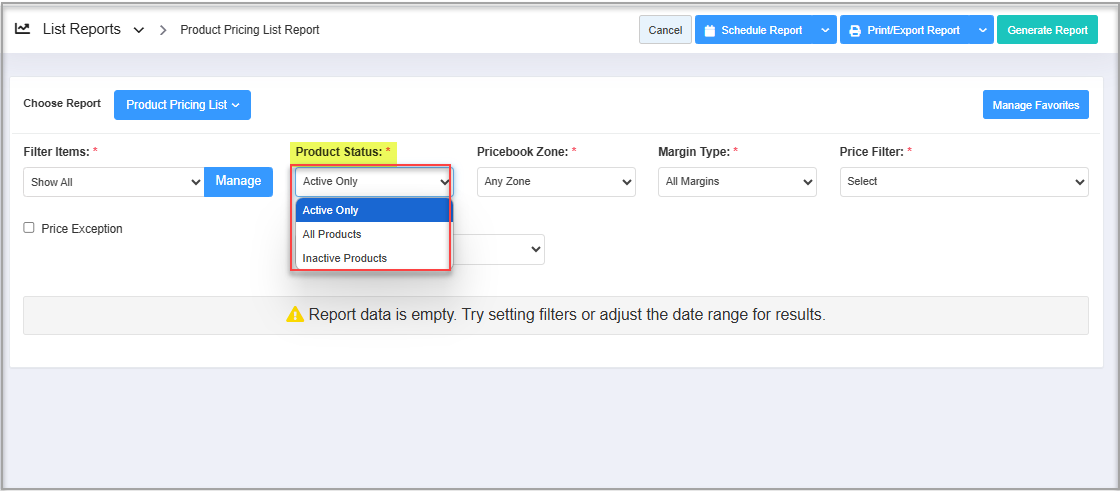
Figure 5.1
- Active Only: This option is selected by default and displays all active products currently available for sale. See Figure 3.1 above under heading 3. Generating the "Product Pricing List Report."
- All Products: If this option is selected, the reports will include all products, both active and inactive. See Figure 5.2 below.
Figure 5.2 - Inactive Products: Selecting this option will generate a report listing inactive products, i.e., not currently being sold by the store.
Figure 5.3
6. Pricebook Zone
The Pricebook Zone Filter lists all zones associated with the company account.
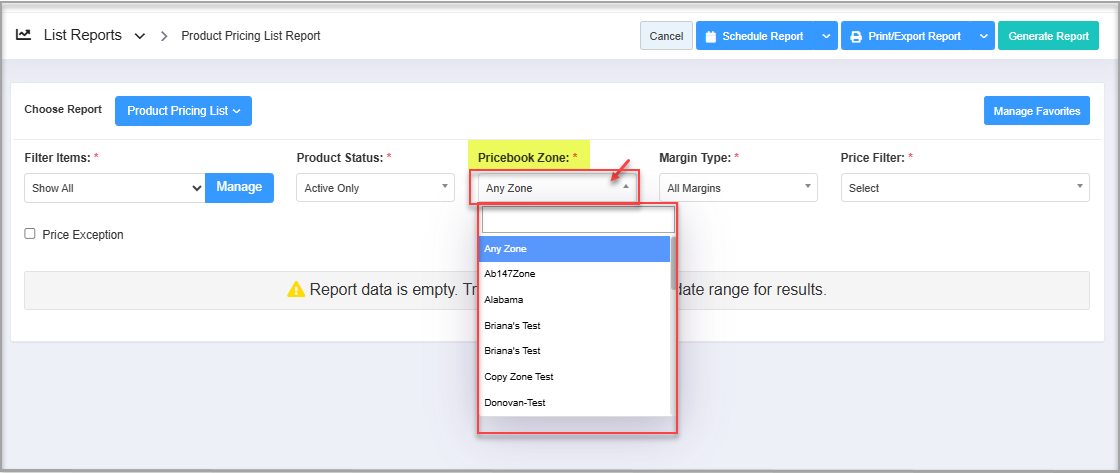
Figure 6.1
Figure 6.1
- Select a pricebook zone, and click the "Generate Report" button to view cost and price data based on the selected zone.
Figure 6.2
- This filter displays the results in the Product Pricing List Report based on the selected pricebook zone.
7. Margin Types
The Margin Type filter allows you to select which type of product margins to include in the Product Pricing List report. Here's what each option means:
All Margins: Displays products regardless of their profit margin. This includes both profitable and unprofitable items (selected by default).
Positive Margin: Displays only products where the selling price is higher than the cost price, indicating a profit.
Figure 7.1
Negative Margin: Displays only products where the cost price is higher than the selling price, indicating a loss.
Figure 7.2
8. Price Filter
This field allows you to filter the product list based on price — either greater than or less than the entered value — as shown in Figure 8.1.
Figure 8.1
- Price Greater Than: If this option is selected, the report will display a list of products that have a price greater than the entered amount.
Figure 8.2
- Price Less Than: If this option is selected, the report will display a list of products that have a price less than the entered amount.
Figure 8.3
- Price Equal To: If this option is selected, the report will display a list of products that have a price equal to the entered amount.
Figure 8.4
9. Checkbox Filter
- Price Exception: This filter option will let you exclude the selected location and display the report with that price exception. See Figure 9.1.
Figure 9.1
10. Scheduling a Report
FTx Cloud POS supports report automation. You can configure a report and schedule it. The system will send the scheduled report to the indicated email IDs at the defined frequencies (daily, weekly, bi-weekly, monthly, quarterly, etc.).
Please refer to Scheduling a Report to learn how to schedule a report.
11. Printing/Exporting a Report
You can print or export any report according to your requirements. When you use the Print function, the system creates and opens the report's PDF file in a new tab. You can download the soft copy or print the paper copy according to your requirements.
Please refer to Printing a Report to learn how to print or export a report.
12. Manage Favorites
FTx Cloud POS allows quick access to the reports you need to view frequently through "Favorite Reports." You can save a report as a favorite and manage all your favorite reports from any of the report screens using the "Manage Favorites" button.
Please refer to Managing the Favorite Reports to learn how to manage or export a report.
Related Articles
Product Pricing List Report - Store Employee
Product Pricing List Report Overview The "Product Pricing List Report" offers a detailed overview of products along with key details and pricing information. Users can filter the report based on various criteria, such as category, brand, product ...Product List Report
Product List Report Overview The "Product List Report" lists products based on a variety of filters with their applicable details and pricing from specific pricebook zones. 1. Reaching the "Product List Report Report" To reach the "Product List ...Specialty Pricing Report
Overview The Specialty Pricing Report offers a detailed summary of all items with specialty pricing applied. It includes essential information such as the item’s name, UPC, specialty pricing type, cost, and selling price. This report enables users to ...Tag List Report
Tag List Report Overview The "Tag List Report" displays a complete, scrollable list of all product tags stored in the system. Each row shows the tag name as it appears in the database. Tags may include pricing indicators, promotional codes, package ...Product/General Settings
Product/General Settings Overview "Product/General Settings" lets you configure all the product-level interaction, price changes, and tender information. This article focuses on explaining what individual settings in the module are configured for. 1. ...