Signage Settings
Signage Settings Overview
Signage Settings allow you to configure and manage customer-facing messages and content displayed across the FTx Cloud POS signage system. Organized into easy-to-navigate tabs, these settings help maintain consistent branding, communication, and messaging across all signage-enabled devices.
1. Reaching "Signage Settings"
- Step 1: Log into Control Center
- Step 2: Choose Point of Sale
- Step 3: Choose Maintenance
- Step 4: Choose Settings & Panels
- Step 5: Choose Signage Settings
Figure 1.1
2. Understanding "Signage Settings"
Please see the image Figure 2.1 for a description of the buttons and fields that appear on the screen.
Figure 2.1
2.1. Notifications
This section controls all email notifications related to signage activity. It allows you to decide who receives alerts and under what conditions, ensuring the right stakeholders are informed about signage-related events.
2.1.1. "General" Tab
This tab focuses on standard, customer-facing communication and is used to configure basic signage communication, such as welcome email text sent to newly added accounts.
Figure 2.2
- Welcome Email Text: Customize the message sent to your added accounts for their welcome email.
2.1.2. "Advertisement" Tab
Manages promotion-related notifications by allowing you to select specific users to receive promotion-ending alerts, add custom email addresses for promotion reports, and control scheduler behavior such as skipping empty content messages.
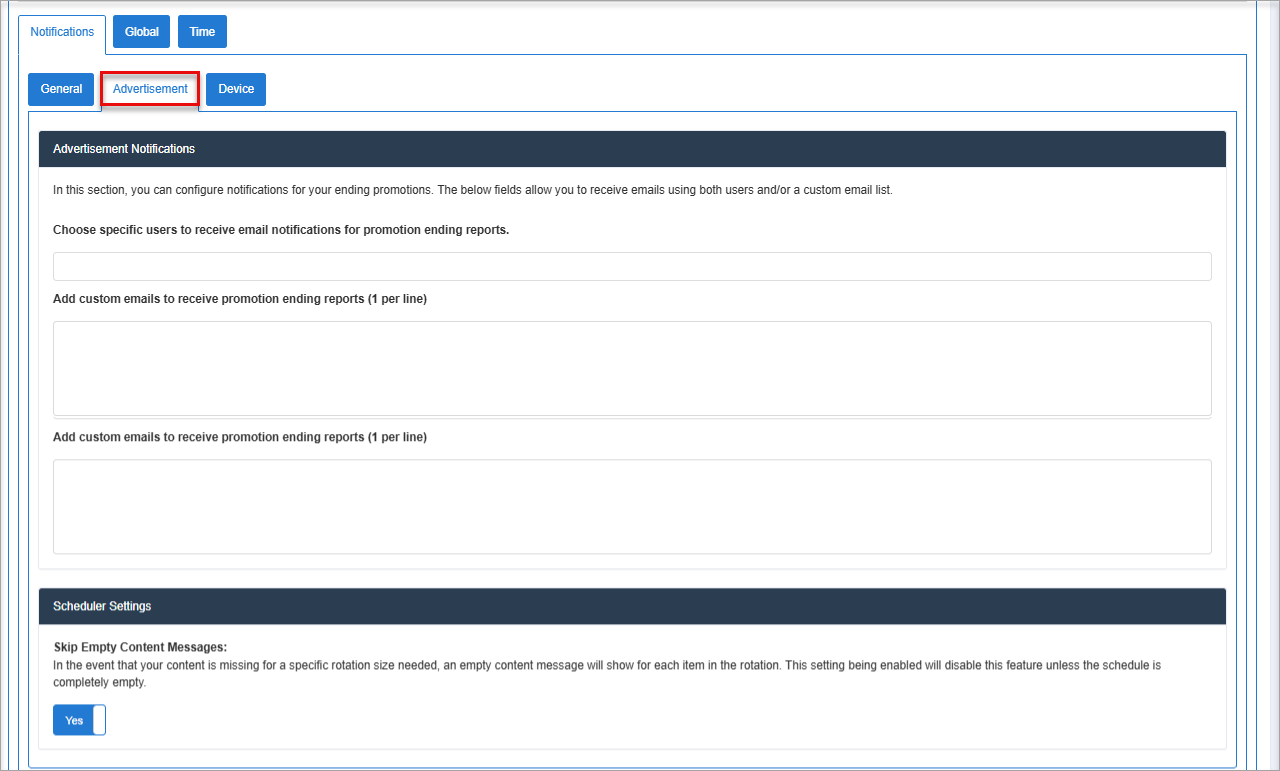
Figure 2.3
Figure 2.3
Settings Information:
- Choose specific users to receive email notifications for promotion ending reports: Select internal system users who should automatically receive email alerts when a promotion is nearing its end or has ended.
- Add custom emails to receive promotion ending reports (1 per line): Enter external or additional email addresses to receive promotion-ending reports, with one email address per line.
- Skip Empty Content Messages: When enabled, signage will not display “empty content” messages if content is missing for a specific rotation size, unless the entire schedule is empty, helping keep screens clean and professional.
2.1.3. Device
In this section, you can manage the settings for your offline device reports. We send a batch out for all qualifying stores set with hours of operation. You can control the frequency of notifications and the overall duration after store opening.
Figure 2.4
- Enable Device Offline Reports: Turns offline device monitoring on or off. When enabled, the system generates and sends reports for signage devices that go offline during store operating hours.
- Choose specific users to receive email notifications for device offline reports: Select internal system users who should receive email alerts when a signage device is detected as offline.
- Choose the frequency at which each alert is sent after opening: Enter additional or external email addresses to receive offline device notifications. Each email address must be entered on a separate line.
2.2. Global
You can set a default logo to appear in your branding bar if none are assigned in a display.
Figure 2.2.1
Settings Information:
- Default Branding Logo: Allows you to upload a default logo that appears in the branding bar on signage displays when no specific logo is assigned to a display. This ensures consistent branding across all screens by preventing empty or missing logo areas.
- Scrolling Feed: Enables you to configure scrolling text content that appears on signage displays. Each line entered is treated as a separate feed item and scrolls independently, making it ideal for announcements, promotions, store messages, or reminders.
- Enter one message per line
- Messages rotate automatically on the display
- Updates apply across all displays using the global scrolling feed
- Max Scheduler Groups: Defines the maximum number of scheduler groups that can be created within the signage system. This helps control scheduling complexity and system performance by limiting how many content groups can be scheduled at a time.
2.3. Time
This is the default timezone for the signage system. This timezone is automatically applied when creating new displays and is used across various signage-related features, such as scheduling content and time-based display rules.
Figure 2.3.1
- Default Time: Select the correct timezone to ensure that scheduled content, promotions, and notifications appear at the intended local time across all signage-enabled locations.
3. FTx Academy Training Course

Click here to dive into the Settings module training in FTx Academy.
Related Articles
Control Center Settings
Control Center Settings Overview POS -> POS Device Global Settings -> "Control Center Settings" You can manage the settings related to uplifts that are configured from the "Signage" -> "Uplifts" module. You can enable/disable the Uplifts at POS ...Product/General Settings
Product/General Settings Overview "Product/General Settings" lets you configure all the product-level interaction, price changes, and tender information. This article focuses on explaining what individual settings in the module are configured for. 1. ...Recon Settings
Recon Settings Overview POS -> POS Device Global Settings -> "Recon Settings" You can manage the reconciliation settings for lottery and general reconciliations that are performed at the POS. In this article, you will learn about reconciliation ...Redemption Settings
Redemption Settings Overview "Redemption Settings" allows you to configure settings related to bottle redemptions and associated gift cards. 1. Reaching "Redemption Settings" To reach "Redemption Settings," follow the below steps: Step 1: Log into ...Reconciliation Settings
Reconciliation Settings These reconciliation settings are account-level settings. You can configure settings related to reconciliation notifications and alerts. 1. Reaching "Reconciliation Settings" To reach "Reconciliation Settings," follow the ...