Filtration - Custom Filters (Global Pricebook)
Custom Filters Overview
Custom filters offer advanced search options by allowing you to filter products based on parameters like brand, manufacturer, and category. They help tailor the product list to your specific needs, making it easier to locate, manage, or copy relevant items. Custom filters can be added, saved, and reused for consistent and efficient product selection.

To learn how to navigate to the Global Pricebook, click here.
1. Applying Custom Filters on Global Pricebook
The Custom Filters option allows you to create and manage personalized filters for faster product searches.
Figure 1.1
Custom Filter Key Information:
- Add: Define and apply new filters based on your criteria.
- Save: Store a filter for future use.
- Load: Reapply previously saved filters.
This helps streamline searches by letting you quickly reuse commonly applied conditions instead of setting them up each time.
1.1 Adding a Filter
- The "Add Filter" button allows you to create and apply a new custom filter. This helps refine the product list based on specific conditions.
- Upon clicking, it opens options for selecting filter criteria such as manufacturer, brand, and category.
Figure 1.1.1
- Select a filter type (e.g., Brand, Manufacturer) and click on “Add Filter.”
Figure 1.1.2
The filter will get added, and you can customize it with the help of the "Manage" button (explained in section 1.1.1 Managing Filters).
1.1.1. Managing Filters
- Click on “Manage” as highlighted in Figure 1.1.2 above to open the Manage Filters configuration screen.
Figure 1.1.1.1
Manage Filter Screen Information:
Manage Filter Screen Information:
- Search: Search for specific entries within the item type (e.g., brand) selected using the “Add Filter” option (Figures 1.1.1 and 1.1.2).
- Results: Displays available entries based on your filter type.
- Selection Checkboxes: Check items to add to your filter.
- Move All: Use the green arrow to move selected items to the selection area.
- Clear Selection: Clears all selected items; use X to remove individual entries (Figure 1.1.1.1).
- Apply: Apply the selected filter to the product list.
- Close: Exit the filter management screen.
Note:
- You can repeat this process to create filters for brands, categories, and manufacturers.
- Once the filter is applied, it will navigate you back to the Global Pricebook home screen.
1.1.2. Filtered Screen
The filtered screen displays only the products that match your applied criteria, such as selected categories, custom filters, or uploaded UPCs, allowing for a more focused and efficient product selection.
The filter will be applied based on your selection and will display results, accordingly, as highlighted in Figure 1.1.2.1 above.
- To delete the whole selection, click on the X next to the "Manage" button.
- To delete an individual brand filter, click on the X next to the individual brand selection.
Quick Tips
- You can select products individually using Ctrl + Click or Shift + Click and choose items from the current page or across all pages.
- When broad categories are selected, you can expand the view to display up to 2,000 products on a single page.
Figure 1.1.2.2
1.2. Saving Filters
- Click on the “Save” button to store your current filter setup for future use.
- A dialog box will appear as highlighted in Figure 1.2.1.
Figure 1.2.1
- Enter a filter name and click on “OK.”
- Once the filter is saved successfully, a confirmation message will appear, as shown in Figure 1.2.2.Figure 1.2.2
1.3. Loading Saved Filters
- Click on the “Load” button to view saved filters.
Figure 1.3.1
- Select a filter and click on “Select Filter” to apply it to the product list.
- To remove a saved filter, click on it and select “Delete.”
- Click on “Close” to exit the filter loading screen.
Note:
- Use the “Clear All” button to reset all applied filters from both the Categories and Custom Filters panel.
- To delete the selected filter, click the X next to the “Manage” button.
2. Copying Current Page
After selecting products through manual search, click on the “Copy Current Page” button to proceed to the Global Product Download Options screen, as shown in Figure 2.1.
This is where you’ll define how new and existing products should be handled before starting the download.
This is where you’ll define how new and existing products should be handled before starting the download.
Figure 2.1
2.1. Managing Existing Products
- Choose “Skip” or “Update Fields.”
Figure 2.1.1
- Choosing “Skip” will discard the existing products.
- If you choose “Update Fields,” select the desired fields in the Fields to Update section.
Figure 2.1.2
Moreover, you can choose how product images sync to FTx Commerce:
- Reference from Global DB: Links to the original image, avoids duplicates, and auto-updates from the source.
- Copy from Global DB: Copies images into your system, allowing edits and independence from the source.
2.2. Adding New Products
Use the Fields to Pull section to select which product’s attributes to copy. All fields are selected by default, but you can uncheck any you don’t need or plan to define later.
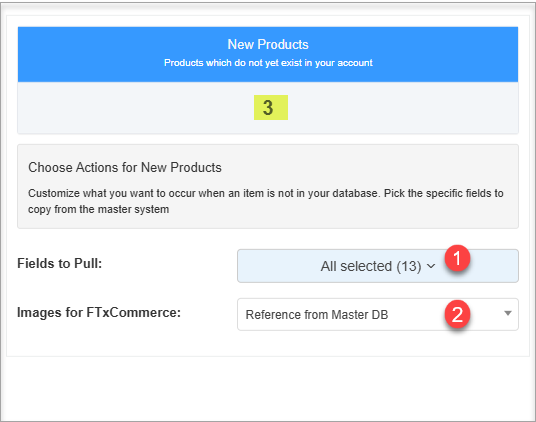
Figure 2.2.1
Figure 2.2.1

You can choose how images sync to FTx Commerce, just like with existing products.
3. Completing the Product Download
Clicking on the “Start Download” button (see Figure 2.1) launches the Global Product Download Wizard, where you begin the product mapping process by assigning key attributes such as Manufacturer/Brand, Category, and Department for the selected products.
While downloading desired products, you can map your account-level fields to the attributes in the Global Pricebook. This gives you flexibility to keep your internal data structure aligned with the system.
1. Manufacturer and Brand Name: If your account lists JW and the Global Pricebook has Johnny Walker, you can choose to map it to your attribute.2. Category: If your account categorizes as Liquor > Whiskey while the Global Pricebook defines it as Whiskey > Scotch Whiskey, you can select your attribute structure.3. Department: If your account specifies Alcohol while the Global Pricebook uses Liquor, you can map it to your attribute.
Figure 3.1
Step 1: Select Manufacturer/Brand
Selecting a manufacturer/brand is straightforward, and here's a step-by-step mapping screen that appears, guiding you through the setup:
- Accept Rows: Toggle to “Yes” to confirm the suggested Manufacturer/Brand mapping.
- Select Manufacturer/Brand: Manually pick a Manufacturer/Brand through Select Manufacturer/Brand if one isn't auto-selected or you wish to define your own.
- Accept & Next: Confirms the current mapping and moves to the next step.
- Next: Skips the current mapping without accepting.
- Previous: Goes back to the previous step.
Step 2: Select Category
- Repeat the same steps used in the Manufacturer/Brand selection to assign a product category as done for the manufacturer/brand.
Step 3: Select Department
- Apply the same selection method to assign a department as done for manufacturer/brand and category.
Step 4: Finalizing the Import
- When all three steps are completed, click on “Apply Changes.”
Figure 3.2
- A confirmation dialog appears. Click on “Yes, Proceed.”
Figure 3.3
- A success message will confirm the import. Click on “OK.”
Figure 3.4
4. Post-Import Access
- Your copied products are now added to your inventory.
- To view them, navigate to: Point of Sale → Pricebook → Products → Product List.
- You can search for the new products using their UPC or name.
- Once listed, you may edit or update their details as needed.
The global products can be filtered and copied in 3 other ways as well:
1) CSV Upload - Apply UPC Filter (KB article link)2) Filtration (KB article link)3) Categories/Subcategories Search (KB article link)
Related Articles
Category & Sub-Category Filters (Global Pricebook)
Category and Sub-Category Filters Overview The Category filter groups products into broad types, making it easier to browse and locate items in the Global Pricebook. Each category can be expanded to view and filter by sub-categories, allowing for a ...Navigating to Global Pricebook
Global Pricebook Overview The FTx Cloud POS "Global Pricebook" is a centralized repository designed to copy global product information across client accounts from various industries. It serves as a single source of standardized product details, ...CSV Upload - Apply UPC Filter (Global Pricebook)
CSV Upload with "Apply UPC Filter" Overview CSV Upload allows you to upload a CSV file containing a list of UPCs. The system will automatically compare (match) each UPC from your file with the Global Pricebook database. If a match is found, the ...Manual UPC Search (Global Pricebook)
Manual UPC Search Overview Once you select an industry and navigate to the Global Pricebook screen, the system automatically displays all related products from the Global Database. On the Global Pricebook home page, you can enter the ...Adding New Products Via Global UPC (Global Pricebook)
Adding New Products Via Global UPC - Overview FTx Cloud POS with its Global Pricebook - Product Download Feature streamlines new product creation by letting you enter a UPC and instantly retrieve matching details from the Global Database. You can ...