Purchase Orders
Purchase Orders Overview
Once the PO is generated within the POS system, it includes essential details such as a unique PO number, vendor information, item descriptions, quantities, prices, and order creation/update dates. It then undergoes multi-level workflows (send to store and send for review), ensuring accuracy before approval.
The vendor uses the PO number to track the order and initiate fulfillment. Once the items are shipped, the vendor sends an Invoice, which the system processes to update the store’s inventory, ensuring accurate stock levels.
The Verified Invoices feature is used to validate the received quantities against the original PO. Any discrepancies are managed through Back Orders.
This article provides a complete overview of Purchase Orders.
Reaching "Purchase Orders"
- Log into Control Center
- Choose Point of Sale
- Choose Inventory
- Choose Reorder
- Choose Orders
Understanding "Purchase Orders" Layout
- Add New Order: This button lets you create a new purchase order.
- Edit Order: This button lets you edit the existing purchase order.
- View Notes: This button lets you view the notes history of the selected order.
- Multiple option drop-down:
- Print Order: This button lets you print order details in report format.
- Copy Orders: This button allows you to copy the order template of the selected order.
- Order Logs: It allows you to view the items associated with the selected order, along with details such as the order date, order number, order method, and location.
- Delete Order: This button allows you to delete an order that has been completed.
- Merge Orders: "Merge Orders" is used when multiple orders for a particular product share a single location as well as vendor and you want to combine all of the orders into a single order.
- Mass Merge Orders: This option will merge all the orders for every individual location into one single order.
- Send EDI: If you have your EDI/FTP connection set up for your store, then the "Send EDI" button will help you send the order electronically.
1. Adding a New Order
- Click the “Add New” button highlighted in Figure 0.1 above to add a new order.
- The form highlighted in Figure 1.0 will appear on your screen.
- Location: This field lets you select one or many locations for which you wish to create an order of products/items.
- Single Location: If you create an order for a single location, it will create the order for that location. Clicking on "Create Order" will redirect you to the product draft page. See Figure 1.1.
Figure 1.1
- Multiple locations: For two or more locations, the orders will be added individually to the list of purchase orders on the purchase order home screen. From there, you can add, edit, and review the created purchase order.
- Vendor: Select the name of the vendor from whom items are going to be purchased. The drop-down will show the names of all vendors allocated to the selected locations.
- Order Comments: Mention any general comments that support/explain the purchase order.
- Order Filters: This field further gives you two choices (explained below):
- All: If selected, it will include all the items that the vendor supplies.
- Custom: If selected, this will customize the item order according to a category, department, manufacturer, and tags. Upon clicking, the following screen appears:
- The custom filter options to filter orders as per specific parameters such as UPC, Department, Category, Manufacturer, Vendor, and Department Tag. The "Manage" button to apply filters to get the customized results.
- The Manage Filters screen will appear, as Figure 1.3 shows.
Figure 1.3
Manage Filter Page Information:
- Manage Filters Drop-Down: Select the saved custom filters from the Manage Filters drop-down (if any) and click "Apply" to apply the saved custom filter. Clicking the "Manage Filters" button will also open the list of saved custom filters.
- Parameter Tabs: You will see seven tabs: Department, Category, Manufacturer, Tag, and Department Tag. Select the required tab, i.e., Department, to create or apply a custom filter specific to the selected departments.
- Filter Items: Use this field for a specific result.
- Match All Filters Drop-Down: Use the "Match All Filters" filter to decide whether or not the Manage Filters screen data matches all applied filters.
- Results: Here, you see the relevant list of data for the selected tab. For example, if you have chosen the "Department" tab, it will show the list of all Departments. You can search for a specific department in the Search bar.
- Checkboxes: Select the required products by checking the appropriate checkboxes.
- Arrow: Click the green Arrow button to move the selected records to the Selected List area.
Figure 1.4
1. Click the "Clear Selection" button to remove the whole selection. To remove any record from the list, click the Remove (x) icon.2. Apply or save the customer filter.
- Apply: Click the "Apply" button for the selected parameters. The system will navigate you to the Creating Working Order home screen. Fill in the order form and click on "Create Order." The system will generate reports based on your selection.
- Save Filters: Click the "Save Filters" button to save the custom filter for future use. 4.1 Save and Manage Custom Filters explains the details.
- Close: Use this button to exit the Manage Filters screen.
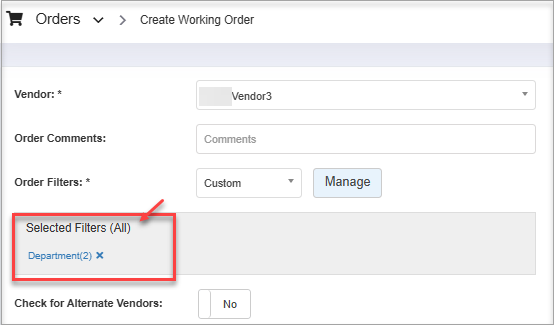
Figure 1.54.1 Save Filters
You can also save the configured custom filters for future use. By clicking the "Save Filters" button, a pop-up will appear to allow you to enter the name of the custom filter.
Figure 1.6
- Save Filters: Click on this button to save the current selection as a filter for future use. Click on "OK" to proceed with the filter saving. The Saved Filter will appear under "No Saved Filter Selected."
Figure 1.7- Click on the "Apply" button on Manage Filter if you wish to apply the selection and create filter-specific order.
- The filter applied will be visible, as displayed in Figure 1.8. You can apply multiple filters in one go.
Figure 1.8
- Check for Alternate Vendors:This field checks whether the item has multiple vendor parts. If so, the system will alert you when the item is available at a lower cost from another vendor. Set this option to "Yes" to optimize savings.
 However, you can only switch to a different vendor if no contract exists with the current vendor for that product.
- Use Order Requirements From: When set to "Yes," this option applies a predefined Order Requirement containing rules for when to generate daily or weekly inventory replenishment orders, including the quantity or percentage to order. It helps ensure that these requirements align with and support the store’s overall ordering policy.
Figure 1.9
 This is done because, even in the event of a price increase, your vendors are unlikely to want to lose your business. They would prefer that you continue purchasing at least 20% of the volume you bought last month.
- Create As Transfer From Store: If this option is toggled to "Yes," it will create a transfer instead of creating an order. If you toggle this option to "Yes," it will direct you to the Transfer form.
- Store Review Not Required: This option is not for the store but for corporate users. If this is toggled to "Yes," the status of the order will be Open Order, and store review is not required.
- Send to Store: This option is for the company that generates an order and sends it to the store for review. This option is not available if the above option, “Store Review Not Required,” is toggled to "No."
- If Send to Store is set to "Yes," the system automatically generates a backend message for the store.
- The cashier will see the notification on the POS dashboard with the following details:
- Subject: Working Order Received from Store
- Body: Working Order Received from Store
- Location: Order Location
- This notification alerts the cashier that a working order has been sent to the store for review and further action.
- When Send to Store is No, no backend message or POS notification will be generated.
1.1. Order Methods
Figure 1.1.0
1.1.1. List All Products from Vendor
Figure 1.1.1
- Require Multiples Of: Select this checkbox to enable editing of the input value. This setting allows you to order items from the selected vendor only in specified multiples—for example, 30 or any other entered value (e.g., 10). If set to 10, you can only place orders in quantities like 10, 20, 30, etc.
- With a Min Order % Of: This option works in conjunction with "Require Multiples Of" to determine how the system rounds order quantities. For instance, if the multiple is set to 10 and the minimum order percentage is set to 50%, the system evaluates the recommended order and rounds accordingly:
- If the system recommends ordering 5, it rounds up to 10.
- If it recommends 25, it rounds up to 30.
- If it recommends 22, it rounds down to 20.
- Create a Negative Order: This option flags items for return to the vendor and is used when generating a return order. It is rarely used, as there is a separate, dedicated process for handling returns.
1.1.2. Reorder by Min/Max
To read more on this, click here: Products. - Include "Children" to Calculate "Parent" Qty on Hand: Check this option if you wish to use the child item (pack) to calculate the parent item (carton) on hand.
Require Multiples Of: Tick this checkbox to allow input in the field. This option restricts ordering from the selected vendor to specific multiples—for instance, 10, 30, or any custom value. If set to 10, you can only place orders in quantities like 10, 20, 30, and so on.
With a Min Order % Of: This setting works together with "Require Multiples Of" to control how the system rounds the order quantities. For example, if the multiple is set to 10 and the minimum order percentage is 50%, the system will round the suggested quantity based on the following logic:
If the suggested quantity is 5, the system will round it up to 10.
If the suggestion is 25, it will be rounded up to 30.
If the suggestion is 22, it will be rounded down to 20.
- Create a Negative Order: This flag is used when you have to create a return order. This option is occasionally used, as there is an entirely different method to create a return order.
- If the needed quantity for Item A is only 10, and that's less than 15 (which is 50% of the required multiple of 30), then the item is ineligible for ordering because it doesn't meet the minimum reorder threshold set by the filter.
1.1.3. Reorder by Days in Inventory
- Date Range From: You can choose a date range by weeks (1-8 weeks), months (1-3 months), the custom # of days (select the number of days through the counter), or the custom range (select an appropriate date range from the drop-down calendar) for which you wish to calculate average sales.
- Start Date Offset: The Start Date Offset determines how many days back from today the system should begin analyzing sales data. A value of 0 means the system starts analysis from today. For example, if the date range is 2 weeks and the offset is 0, the system will analyze sales from today through the previous 13 days.
If you set the offset to 2, the system will skip today and the previous 2 days. So, if today is Friday, the analysis would start from Wednesday, and the 2-week window would cover Wednesday through the Wednesday two weeks ago (14 days including that Wednesday).
- Date Offset = 0
- The system starts analysis from Friday (today) and looks back 2 weeks, covering Friday through 13 days before.
- Date Offset = 1
- The system starts from Thursday (1 day before today, i.e., yesterday) and looks back 2 weeks from there, covering Thursday through 13 days before.
- Date Offset = 2
- The system starts from Wednesday and looks back 2 weeks from that day.
Days of Inventory: If you set the "Days of Inventory" value to 10 and the item's average daily sales are 1 unit, it means you need enough stock to cover 10 days—i.e., 10 units. If the current Quantity on Hand (QOH) is 3, the system will prompt you to order 7 more units. However, if you already have 10 units in stock, no additional order is needed.
This method relies on actual historical sales data to calculate the average daily sales. So, if you already have 10 units of an item that sells 1 unit per day on average, no order will be placed because your current inventory meets the requirement.Use Item Min Qty: When Use Item's Min Qty is enabled, the system considers the parent item's Minimum Quantity. If a child item does not have a Vendor Part, its Minimum Quantity is also included. The child item's Minimum Quantity is ignored if it is blank/undefined or it is 0. The child item's Minimum Quantity is first rolled up to the parent using the Parent-Child Link Quantity. The rolled-up value is then added to the parent's Minimum Quantity. If the rolled-up value contains decimals:
Greater than 0.50 → round up to the next whole number.
Less than or equal to 0.50 → round down to the previous whole number.
The resulting combined Minimum Quantity is then used by the existing Days in Inventory calculation logic when determining the order quantity.
Example:
- Parent Item Minimum Qty = 5
- Child Item Minimum Qty (without Vendor Part) = 10
- Parent-Child Link Quantity = 5
- Roll up child minimum quantity: 10 ÷ 5 = 2
- Combined minimum quantity: 5 + 2 = 7
The system compares the calculated order quantity against 7 instead of only the parent's minimum quantity (5).
- Use Item's Max Qty: When enabled, the system compares the calculated order quantity with the item's maximum quantity. If the calculated quantity exceeds the maximum quantity, the order quantity is reduced according to the reorder method. If no maximum quantity is defined or it is set to 0, the system ignores the maximum quantity.
- Compare the calculated order quantity with the item's Maximum Quantity.
- If the calculated quantity exceeds the Maximum Quantity:
- Days in Inventory
- Order Quantity = Maximum Quantity − Current On Hand
- Otherwise, the calculated quantity remains unchanged.
- If the item has child items without Vendor Parts, the system:
- Reads the parent's Maximum Quantity.
- Reads the child Maximum Quantity.
- Ignores the child if its Maximum Quantity is blank or 0.
- Rolls up the child Maximum Quantity using the Parent-Child Link Quantity.
- Rounds the rolled-up value:
- 0.50 → round up
- ≤0.50 → round down
- Adds the rolled-up child quantity to the parent's Maximum Quantity.
- Uses this combined Maximum Quantity when determining the order quantity.
Example:
- Parent Max Qty = 20
- Child Max Qty = 10
- Parent-Child Link Qty = 4
- Calculated Order Qty = 25
- Current On Hand = 5
- Roll up child quantity: 10 ÷ 4 = 2.5
- Rounded: 3
- Combined maximum quantity: 20 + 3 = 23
- Comparison: 25 > 23
- Include Sold Items with 0 Order Qty: When you tick this checkbox, the system will include the items that are sold during the specified period, but based on the system’s calculations, they have 0 quantity in the order and offer you further options to choose from, as Figure 1.1.3.1 shows. Please choose the appropriate option.
- For example, when you choose any of the following options under "When QOH <= 0," the system will check the item's current QOH and perform the action based on your choice when the current QOH is <= 0:
- Do Nothing: The system will do nothing.
- Add with Zero Qty: The system will add the items with the zero-order quantity to the order. You can edit or remove it, as shown in Figure 1.1.3.1.
- Add with Qty 1: The system will add the items with the order quantity as one in the order.
- Add with 10 Week High (Summary Only): The system will add the items with the order quantity as the highest sold in the last ten weeks in the order. This will override the time range you selected in "Date Range From," and the system will consider the last ten weeks from the current date.
- Add with 52 Week High (Summary Only): The system will add the items with the order quantity as the highest sold in last fifty-two weeks in the order. This will override the time range you selected in "Date Range From," and the system will consider the last fifty-two weeks from the current date.
Figure 1.1.3.1
- Similarly, when you choose any of the above options under "When QOH < 1," the system will check the item's current QOH and perform the action based on your choice when the current QOH is < 1.
Require Multiples Of: Tick this checkbox to allow input in the field. This option restricts ordering from the selected vendor to specific multiples—for instance, 10, 30, or any custom value. If set to 10, you can only place orders in quantities like 10, 20, 30, and so on.
With a Min Order % Of: This setting works together with "Require Multiples Of" to control how the system rounds the order quantities. For example, if the multiple is set to 10 and the minimum order percentage is 50%, the system will round the suggested quantity based on the following logic:
- If the suggested quantity is 5, the system will round it up to 10.
- If the suggestion is 25, it will be rounded up to 30.
- If the suggestion is 22, it will be rounded down to 20.
The percentage actually defines the direction in which it is used to round off the value (lower or higher).
- Create a Negative Order: This option reverses the flag of the items in an order, which is only used when you wish to return items back to the vendor. Essentially, this option is occasionally used, as there is an entirely different method to return items.
- Example: Item A sold 5 units in the past 2 weeks and has 20 units in stock. Based on the reorder formula, it needs only 10 more units.
- If "Require multiples of 30 with 50% min" is selected, 10 < 15 → not eligible to reorder.
1.1.4. Reorder by Products Sold (Replenishment)
Figure 1.1.4.0
- Round Up When Child Reaches: Some products are sold in both parent units (e.g., cartons) and child units (e.g., packs). During the ordering process, sales of child units are rolled up to the parent level. You can set a threshold percentage for when to round up to the parent unit.
Example: If you sell cigarette packs (child items) and set the round-up threshold to 70%, and a carton contains 10 packs, then when 7 or more packs are sold, the system will round up and recommend ordering a full carton. If sales are below 50%, no reorder will be triggered.
- Date Range From: You are allowed to choose a date range by weeks (1-8 weeks), months (1-3 months), by custom # of days (select number of days through counter), or custom range (select an appropriate date range from the drop-down calendar) for which you wish to calculate average sales.
- Start Date Offset: The offset determines how far back in time you want to start the data analysis. The default value is 0, which represents today. For example, if the date range is 2 weeks and the offset is 0, the analysis will cover the last 2 weeks up to today.
If the offset is set to 2 (days) and the date range is 2 weeks, the analysis will start 2 days before today. So, if today is Friday, the start date moves back to Wednesday. The analysis will then cover the 2-week period ending on that Wednesday.
- Use QOH Reorder Point: Check this option if you wish to use QOH Reorder Point to reorder.
- For example: Product_Cig has a QOH of 15 and sold 5 in the reorder history week. The vendor part for this item has 20 num units. So, if the reorder point is set at 25%, then it would only order the item when its QOH reaches 25% of 20 of the num units, i.e., 5.
- Use Item Min Qty: When this option is enabled, the system compares the calculated reorder quantity with the item's minimum quantity. If the item has child items that do not have a Vendor Part, the system also considers their minimum quantities. Child items with an undefined or 0 minimum quantity are ignored. The child item's minimum quantity is rolled up to the parent using the Parent-Child Link Quantity and added to the parent's minimum quantity. If the rolled-up value contains a decimal:
- Greater than 0.50: Round up to the next whole number.
- Less than or equal to 0.50: Round down to the previous whole number.
- Parent Minimum Quantity = 5
- Child Minimum Quantity = 10
- Parent-Child Link Quantity = 5
- Use Item Max Qty: When this option is enabled, the system limits the reorder quantity based on the item's maximum quantity configured for the location. For standalone items, the calculated reorder quantity is compared against the item's maximum quantity. If no maximum quantity is defined or it is set to 0, the maximum quantity is ignored. For parent-child items, if a child item without a Vendor Part has a maximum quantity greater than 0, the system rolls up the child's maximum quantity using the Parent-Child Link Quantity and adds it to the parent's maximum quantity.
- Greater than 0.50: Round up to the next whole number.
- Less than or equal to 0.50: Round down to the previous whole number.
If the calculated reorder quantity exceeds the combined maximum quantity, the system sets the order quantity equal to the combined maximum quantity.
Example
- Parent Maximum Quantity = 20
- Child Maximum Quantity = 10
- Parent-Child Link Quantity = 4
- Calculated Order Quantity = 25
Rolled-up Child Maximum Quantity = 10 ÷ 4 = 2.5 → Rounded to 3
Combined Maximum Quantity = 23
Since 25 exceeds 23, the final order quantity becomes 23.
- Include Sold Items with 0 Order Qty: In the round-up field, if you enter 50%, and if you don't sell 50% of the sub-units that are needed to create an order, the item will still be there on the order form but with 0 quantity. You can keep/edit or remove the item(s) with 0 quantity with the help of “Remove Products with 0 Quantity" on the Edit Order form. See Figure 1.1.4.3 below for reference.
- As highlighted in Figure 1.1.4.1, Sug Qty (Suggested Quantity calculated by the system) is 0, Actual Qty is one, and Order Qty is one for the product.
Figure 1.1.4.1
- Still, you can order any number of quantities for such items on a purchase order, even if the system suggests 0 as the order quantity.
- For that, edit the Actual Qty field with the order value that you want to order for that product, which will be reflected in Order Qty field. See Figure 1.1.4.2.
Figure 1.1.4.2
- For example: Item A sold 8 units in the past 2 weeks. Based on recent sales, 12 units are suggested for reorder. But if "Require multiples of 30 with 50% min" is checked → 12 < 15 → ineligible for reordering.
1.1.5. List All Products from Vendor with Replenishment
For fields, refer to Reorder by Products Sold (Replenishment). - Item B sold 6 units in the past 2 weeks. The system suggests reordering 12. If "Require multiples of 30 with 50% min" is checked → 12 < 15 → Ineligible for reordering.
1.1.6. Reorder Using Blank Order Method
Figure 1.1.6.0
1.1.7. Reorder Using Hybrid Days/Replenishment
Exemplary scenario: Imagine you have a brand-new item that has been on sale for only one week, but you want to analyze sales history for the past two months. Since the item has only been in your store for 7 days, looking back over 2 months means the Days of Inventory method might not generate a reorder. This happens because, based on this method, your average daily sales appear low due to the limited sales history.
So, even though that item is a hot seller or out of stock, you cannot create an order.
This is where the Reorder with Hybrid Days/Replenishment methods come in handy. You can use this method to generate an order for all items based on Days of Inventory other than brand-new items. See Figure 1.1.7.0.
Figure 1.1.7.0
For field information, refer to the Reorder Using Hybrid Days/Replenishment order method section until the date offset.- New Item Days: Here, you will enter the number of days for which you wish to apply the hybrid method.
- For example: If you enter 14 days and the item is newer than 14 days and filtered by category, department, manufacturer, tag, or department tag, then that item is going to be ordered based on the replenishment order. Any item that is older than 14 days will be ordered by days of inventory.
- Use Item Max Qty: When this option is enabled, the system limits the reorder quantity using the item's maximum quantity configured for the location. For standalone items, the calculated reorder quantity is compared against the item's maximum quantity. For parent-child items, the system also considers child items without a Vendor Part by rolling up the child's maximum quantity using the Parent-Child Link Quantity and adding it to the parent's maximum quantity.
- Greater than 0.50: Round up to the next whole number.
- Less than or equal to 0.50: Round down to the previous whole number.
The combined maximum quantity is then used to determine the final order quantity.For older products, if the calculated reorder quantity exceeds the combined maximum quantity:
- Order Quantity = Combined Maximum Quantity − Current On Hand
For new products, if the calculated reorder quantity exceeds the combined maximum quantity:
- Order Quantity = Combined Maximum Quantity
Example:
- Parent Maximum Quantity = 20
- Child Maximum Quantity = 10
- Parent-Child Link Quantity = 4
- Calculated Order Quantity = 25
- Current On Hand = 5
Rolled-up Child Maximum Quantity = 10 ÷ 4 = 2.5 → Rounded to 3Combined Maximum Quantity = 23Results:
- Hybrid (Older Products): Order Quantity = 23 − 5 = 18
- Hybrid (New Products): Order Quantity = 23
- Include Sold Items with 0 Order Qty: When you tick this checkbox, the system will include the
items that are sold during the specified period, but based on the system’s
calculations, they have 0 quantity in the order and offer you further options
to choose from, as Figure 1.1.7.0 or Figure 1.1.7.1 shows. Please choose the appropriate option.
- For example, when you choose any of the following options under "When QOH <= 0," the system will check the item's current QOH and perform the action based on your choice when the current QOH is <= 0:
- Do Nothing: The system will do nothing.
- Add with Zero Qty: The system will add the items with the zero-order quantity to the order. You can edit or remove it, as shown in Figure 1.1.7.1 above.
- Add with Qty 1: The system will add the items with the order quantity as one in the order.
- Add with 10 Week High (Summary Only): The system will add the items with the order quantity as the highest sold in the last ten weeks in the order. This will override the time range you selected in "Date Range From," and the system will consider the last ten weeks from the current date.
- Add with 52-Week High (Summary Only): The system will add the items with the order quantity as the highest sold in the last fifty-two weeks in the order. This will override the time range you selected in "Date Range From," and the system will consider the last fifty-two weeks from the current date.
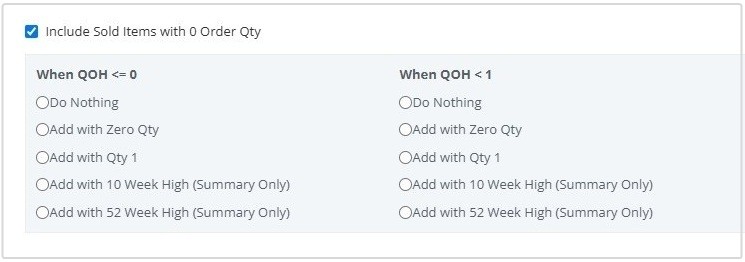 Figure 1.1.7.1
- Similarly, when you choose any of the above options under "When QOH < 1," the system will check the item's current QOH and perform the action based on your choice when the current QOH is < 1.
1.1.8. Weekly Max Reorder
Figure 1.1.8.1
- Number of Weeks: Enter the number of weeks for which the Weekly Max Order is to be applied. Say you enter 6; then the system will look for the previous 6 weeks’ sales history for all the items that are filtered by category, department, manufacturer, or tags.
Example: If a regularly ordered product is consistently out of stock each week, you may be losing potential sales. In such cases, you can manually adjust the Order Qty by increasing it by one unit the following week. If the issue persists, continue to incrementally increase the quantity until demand is met.1.1.9. Items with Zero QOH
- Default Quantity: If the QOH for any item at a location is zero, and the default quantity for the Items with 0 QOH order method is set to, e.g., 20, then the system will suggest 20 quantities to order and will overlook the Require Multiples of and With a Min Order % of value for this order method.
For a complete video tour on Reorders, click here: Reorders.- Item X has 2 units in stock → Ineligible (QOH ≠ 0)
- Item Y has 0 units in stock, but the suggested quantity is 10. If “Require multiples of 30 with 50% min” is checked → 10 < 15 → Ineligible for reordering.
1.1.10 Purchase Order Listing: Choose Order Method Column
On the Purchase Order Listing screen, the Choose Order Method column displays the Order Method selected while creating a Purchase Order, helping users quickly identify how each Purchase Order was created and filter records accordingly.
The selected Order Method is saved at the time of Purchase Order creation and is displayed in the Choose Order Method column on the Purchase Order Listing screen for the respective Purchase Order.
Filtering Purchase Orders by Order Method
You can filter Purchase Orders using the Choose Order Method column.
You can select one order method to view only those Purchase Orders.
You can select multiple order methods to view Purchase Orders matching any of the selected methods.
Notes: The Choose Order Method column reflects the Order Method selected during Purchase Order creation. Filtering supports multi-select to make it easier to review Purchase Orders across different reorder methods.1.2. Creating an Order
- Fill out the Create Purchase Order form as described under section 1. Add New Order Fields section.
- Choose an order method of your choice.
Here we are taking an example of the order method: Most Famous Order Method: Reorder by Days in Inventory.- Click on "Create Order."
- The order form highlighted in Figure 1.2.1 will appear on your screen.
- When you click on "Create Order," the system generates a draft order, which can then be reviewed and edited to adjust item quantities before finalizing.
During the editing stage, the order status remains as Working Order until the "Convert to Order" button is clicked.1.2.1. Actions on "Products on Order" Ribbon
- Add: This button helps you add item(s) to a purchase order directly. Upon clicking, Figure 1.2.1.0 appears.
- Search: This option allows you to search for a specific product on the purchase order either with its name or UPC.
- Settings: This button lets you configure order-related settings.
Figure 1.2.1.0
- For the selected product(s), the Vendor Part, UPC, Set Quantity, and Cost Each will be autopopulated by the system.
- Select the product by clicking on the "Select"
button; the screen highlighted in Figure 1.2.1.0 above appears.
- Search for the product(s) and check the box next to the ones you want to add. The selected products will appear highlighted, as shown in Figure 1.2.1.1 below.
Figure 1.2.1.1
- Name: Displays the product name or description, allowing users to easily identify the item in the search results.
- UPC: Displays the product’s Universal Product Code (UPC), which is a unique barcode identifier used to distinguish the product from other items in the inventory.
- Vendor Part Number: Shows the part number assigned by the vendor or supplier for the product. This helps users match the item with the vendor’s catalog or ordering reference.
- Vendor: Displays the name of the vendor or supplier associated with the product, helping users confirm the correct supplier when placing an order.
- QOH (Parent/Child): Displays the Quantity on Hand (QOH) for the product, indicating the current inventory level.
- Active: Indicates whether the product is currently active in the system. Active products are available for selection and use in orders, while inactive products may be retained in the system for historical or reference purposes.
- For a parent product, the tooltip displays the quantities of its associated child products.
- For a child product, the tooltip shows the quantity available for its parent product.
- For an independent product, the tooltip displays the product’s own quantity on hand.
- Cycle Count Blind Enabled: The QOH column is hidden in the Product Search popup for the employee user.
- Cycle Count Blind Disabled: The QOH column is visible in the Product Search popup for the employee user.
- If you have added multiple products, click on "Next" (as shown in Figure 1.2.1.2) to proceed to the next product.
- If no additional products are added, simply click "Apply" to continue.
Figure 1.2.1.2
- After adding products, you can click "Save & Close" or "Save & Add" to include the product in the purchase order.
Figure 1.2.1.3
- Refresh QOH: This button lets you refresh the data in the QOH column.
- Remove Products with Zero Qty: Clicking on this button helps in deleting the products that have zero Quantity on Hand.
- Add Back Order Items: This button will help you Append, Replace, or Ignore the items on the back order to the purchase order.
Figure 1.2.1.4
- When the Back Order form has items listed, clicking on "Apply to Order" will Add, Replace, or Ignore (as per the Manage Quantity option selection) on Edit Purchase Order form.
- Days Left From: This column allows you to select a number of weeks to estimate how long the current Quantity On Hand for a product is expected to last at the store.
- Columns: This option will let you select the number of columns that are to be displayed in the purchase order form. Check the boxes against the options that you wish to include in the purchase order form.
- Reset
Columns: This
button will allow you to reset the column in the purchase order form.
- Show All Products: This option lets you choose the list of products, i.e., the data you wish to display in the purchase order form: Show All Products, Show Only Products with 0 Qty, or Show Deleted Records.
Figure 1.2.1.5
- Show All Products: Choosing this option will include all the items on the created purchase order form.
- Show Only Products with 0 Qty: This option, if chosen, will include all the items with 0 Qty on the created purchase order form.
- Show Deleted Records: Choosing this option will include and show only those items that were deleted from the purchase order form.
Color | Meaning |
Purple | Last ordered before 365 days |
Light Yellow | Product cost changed |
| Color | Meaning |
| Yellow | Store quantity updated |
Text Highlights
Color | Meaning |
Red | Days left ≤ 0 |
Green | Days left > 0 |
Black | Weekly highest sale |
1.2.2. Column on Purchase Order Form:
1. Product: This defines the product's or item's name that is to be ordered.2. Sug. Qty: This value is automatically calculated by the system based on the Min/Max settings in Manage Location and the On-Hand Quantity from the "Products" module.Figure 1.2.2.1
Figure 1.2.2.2
3. Store Qty: When a corporate user creates an order but requires input from the store to determine the exact item quantity needed, the order is forwarded to the store. The authorized store employee receives the order, and this field becomes visible on their interface. It allows the store staff to enter the precise quantity of items required at the store.4. Actual Qty: If a corporate user creates the order, this column is used to adjust item quantities within the order. These fields remain editable until the "Convert to Order" button is clicked, at which point the working order is converted into a standard purchase order.5. Order Qty: This field value is finalized after considering the store quantity, actual quantity, and suggested quantity. Once confirmed, it becomes the final order quantity on the purchase order.6. Back Order Qty: This column describes the item values that were not fulfilled by the vendor in the previous order.7. On Hand: This column displays the quantity of the item that the store currently has in inventory.8. # Days Left: This column provides an estimate based on historical inventory trends to support effective inventory management. It displays the number of days the listed inventory item is expected to last, relative to the value selected in the "Days Left From" field.
- For example, if the selected value is 3 weeks, the system analyzes sales data from the past 3 weeks to calculate an average weekly sales rate (shown in the Avg Sales column). Based on this rate, it estimates how many days the current Quantity on Hand will last. This estimate is displayed in the # of Days Left column. See Figure 1.2.3.3.
Figure 1.2.2.3
In the # of Days Left column, red values indicate a projected inventory shortage for the specified number of days, while green values indicate sufficient inventory to cover that duration.The highest rollup value in each “Week X” column will be highlighted when editing an order.
Figure 1.2.2.5
- Action Buttons:
Figure 1.2.2.6
1.2.3. Right-Click Functionality on Purchase Order Items
- Right-clicking on any order will display two options, as highlighted in Figure 1.2.3.0.
Figure 1.2.3.0
- View Logs: The View Log screen lets you see all the details of the product added to the order. It displays all relevant information in this context, and the data is for viewing purposes only.
Figure 1.2.3.1
- Item Analysis: This feature helps to analyze a particular product at a particular store location from the purchase order screen itself. A variety of information from different modules is used together here to analyze the item.
Figure 1.2.3.2
1.3. Convert to Order
- When you create a purchase order, adjust the item quantities on order and click on "Convert to Order"; the working order will be converted to a Standard Purchase Order.
Figure 1.3.0
- The Convert to Dialog box will appear, with two associated options: Close, and Yes, convert to order.Figure 1.3.1
From this point forward, you can mark the order as complete and send it to the vendor in EDI format, as described later in the article.1.4. Send to Store
1. Automated "Send to Store"
- If Store Review is Required toggle is set to "Yes" and the Send to Store toggle is also set to "Yes," the system will automatically send it to the store as an open order.The rest of the purchase order process continues in the same manner as outlined above.
- If both Send to Store toggle and Store Review Not Required are set to "No" on the Create Order page as displayed in Figure 1.4.0.
Figure 1.4.0
- Then, the "Send to Store" button becomes available on the Working Order draft of the purchase order on the admin side. In Manual "Send to Store" case, only the Suggested Qty column will be editable; all other fields will remain non-editable.
- You can edit system-suggested item quantities and then click Send to Store as highlighted in Figure 1.4.1 below.
Figure 1.4.1
1.5. Send For Review (Employee Side)
- Once the order is received at the store, for both cases, the authorized store employee makes the changes in the store quantity column on the order that is received.
- The store employee can then click "Send for Review" to return the purchase order for corporate review, as shown in the figure below.
Figure 1.5.0
- Any changes made by the authorized store employee on the order form should be entered in the Store Quantity field. These changes will be highlighted in yellow to notify the corporate user of the actual quantity required at the store.
Figure 1.5.1
- The order will remain in Open status until it is marked as Completed.
1.6. Completing Order
- To mark the order as complete, click on "Complete Order" as highlighted in Figure 1.6.0.
Figure 1.6.0
- A dialog box will appear as shown in Figure 1.6.1 below.
- Click on "Yes, mark completed" to proceed with the order completion process.
The order now will be locked/view only and can't be edited further, and the order status will be Complete Order. The admin/client user can now mass Complete Orders from the Order List page to improve operational efficiency by enabling them to perform bulk actions directly from the list pages.
How to Mark Multiple Orders as Complete
- Select one or more Open Orders.
- You can use:
- Shift key for range selection
- Ctrl key for selecting multiple individual orders
- Selection behavior works similar to the Delete action.
- A maximum of 30 orders can be selected at a time.
- If more than 30 orders are selected, the system will display the following error: “Maximum 30 Orders can be selected to be marked as complete.”
- Click the Complete Order icon.
- A pop-up window will appear displaying total orders being processed.
- Asking for confirmation.
- Click OK.
- A progress bar will display showing the total orders being processed.
- After processing, the system will display:
- Number of orders successfully completed
- Click OK to close the status window.
- Automatically refresh the Order List page
Notes: The Complete Order button is visible only for Open Orders. Orders are processed in bulk but validated individually. Any failed orders will remain open and must be reviewed separately. The existing View Notes button is available the More menu. - At this stage, the order can be sent to the vendor either in EDI format via FTP or by email to the respective vendor.
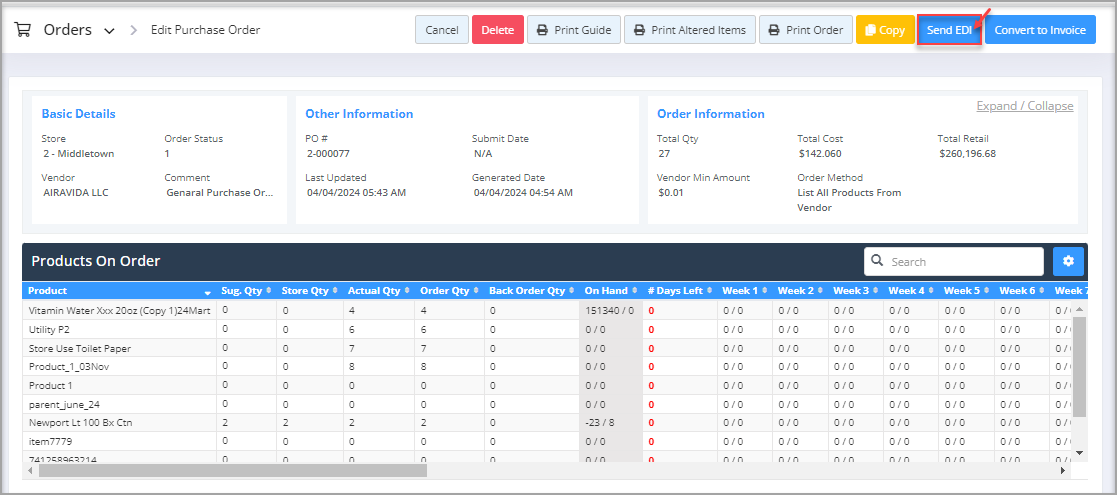 Figure 1.6.7
EDI: After the order is created, edited, and reviewed. This option is selected to send this purchase order electronically to the vendor on the FTP side. This option is found on the Edit Purchase Order screen and the Purchase Order home screen as well. It is explained below.1.7. Send EDI
Please check your EDI setup and FTP connection, then use the "Send EDI" button to send the order electronically.- You can select multiple orders ordered within the selected date range for a single vendor in different locations and send them electronically.
Figure 1.7.0
- Click on "Send EDI," and the order list will be sent to the vendor side.
Figure 1.7.1
- By clicking "Yes," the selected order(s) will be sent to the respective vendor in EDI format either through FTP/SFTP connection or via email.
- To configure EDI Settings, refer to the EDI Setup and for FTP connections, read the FTP Connections article.
The system removes the items with 0 Order Qty from the physical file sent during the EDI process. Please note the system will not remove those items from the actual order; it will only remove the physical file.1.8. Convert to Invoice
- The next step is to receive the inventory. This option allows you to convert the purchase order into an invoice once the physical inventory is received from the vendor.
- Enter the name for the invoice and click on the "Create" button.
Figure 1.8.1
- Click on "Refresh Order" to refresh the order list, or click on "Load Invoice" to load the invoice, i.e., redirect you to the invoice page that is created from the purchase order.
1.9. Schedule Order Button
- On the Add New Order form, you get two options: "Create Order" and “Schedule Order,” as highlighted in Figure 1.9.0.
Figure 1.9.0
- Weekly restocking of supplies.
- Regular orders to vendors based on consumption.
- Maintaining inventory levels without manual intervention.
- Fill in the Create Schedule Order Form fields as explained below.
Figure 1.9.1
- Schedule Name: Give a unique name for the scheduled order in this field.
- Run Type: Select the run type from the drop-down menu (weekly, bi-weekly, or monthly).
- Run Day: Select the scheduling day that suits your requirements, from Monday to Sunday.
- Run Time: Select the scheduled run time from the attached timer.
- Date Offset: The Date Offset is the number of days added or subtracted from the scheduled run date to determine the purchase order (PO) date.
- Duration: The number of days the PO should cover or remain active. This might control delivery windows or active periods.
- Auto Send EDI: Toggle this option to automatically send this scheduled order electronically to the vendor on the FTP side.
- Send to Store: This option sends scheduled orders to the store for review.
- Mergeable: Whenever multiple orders share a single location and single vendor, the system will merge all the orders together into one single order. If one order has 5 units of an item and another has 7 units, then the system will merge these two into a single order with 7 units. This way, the orders are easier to manage for the store as well as for the vendor.
1.10. Create Transfer
Figure 1.10.0
- Enter the fields in the form by selecting a "Transfer From" location and a "Transfer To" location.
- Select cost type as vendor part cost or product cost and click on "Create Transfer."
Figure 1.10.1
- Click on "Close" to close the form.
- Click on "Go to the New Transfer" to get redirected to the Transfer form.
1.11. Add/View Notes
1.11.1. Add Notes
Figure 1.11.1.0
- Write the note explaining it in under 255 characters.
- Click on "Add" to save the note.
1.11.2. View Notes
1.12. Print Order
1.12.1. Print Order Guide
Figure 1.12.1.0
- Sort By: Select the option from the drop-down list by which you want to sort the report.
- Group By Department: Set it to Yes/No to print the report grouped by department.
- Export Type: Select the report format, i.e., PDF, CSV, or XLXS.
- Include Header: The system enables this button by default. Please turn it off to exclude the report's header from the report.
- Repeat Header on Every Page: Enable this button to repeat the header on every page.
- Print Title on Every Page: This button is enabled by default. Turn it off if you want to remove the report's title from showing on each page.
- Send As Email: Enable this button to send the report's PDF file via email. The Email Address field will appear. Enter the email address and click "Send Email."
- Once clicked, the purchase order details are printed in the predefined format (the headers of the columns are predefined) and as per the selected export type (PDF, CSV, or Excel). The order report in PDF format is displayed as highlighted in Figure 1.12.1.0.
- "Print Guide" is used for making an informed decision by looking at the details of the order guide.
Figure 1.12.1.0
1.12.2. Print Order
- When you wish to print order details in report format, this option is chosen. See Figure 1.12.2.0 (same as Print Order Guide) if the same options are chosen.
- The order is printed as highlighted in Figure 1.12.2.1.
Figure 1.12.2.1
1.12.3. Print Altered Items
Figure 1.12.3.0
1.14. Copying Purchase Order
Figure 1.13.0
- For the selected Purchase Order, click on the "Copy Order" button to copy the attributes of that particular order.
- Select the desired location from the associated drop-down menu and click "Copy."
- The form highlighted in Figure 1.13.1 will appear on your screen.
Figure 1.13.1
- Clicking on the "Go to the New Order" button will take you to the Edit page for the copied order.
2. Modifying/Editing the Order
Follow the steps mentioned below to edit the order:
- Click the Modifying Order button highlighted in Figure 0.1 above to edit (make changes to) a created purchase order before marking it as complete.
- The form highlighted in Figure 2.0 will appear on your screen.
 The labels, fields, and buttons are described above under Create Order.
3. Order Logs
- Follow the steps mentioned below to view order logs.
- Click on "Order Logs," as highlighted in Figure 3.1 below, to view order logs.
Figure 3.1
- Order Date: It displays the exact date and time when the order was created. It's useful for tracking order timelines and verifying transaction records.
- Order Number: This is a unique reference number for the order that helps in searching and tracking orders.
- Order Method: It shows how the order was created. The order method here is List All Products From Vendor.
- Location: Specifies the store location associated with the order.
- Search: It helps you in quick filtering within the current tab.
Tabs:1. Items added to Order: This displays the list of items that were successfully included in the order.
Figure 3.2
- Click the (+) icon, as shown in Figure 3.2, to view more read-only details, such as product UPC, ID, name, vendor part, qty/total qty sold, etc., of the selected product.
Figure 3.32. Item Ineligible for Order: Lists the items that were rejected or skipped during the order process for not meeting reorder conditions (e.g., quantity needed = 0).Figure 3.4
- Click the (+) icon, as shown in Figure 3.4, to view more read-only details, such as product UPC, ID, name, vendor part, date range, etc., of the selected product.
Figure 3.5
- It is imperative to note that the order logs feature can also be accessed from Edit Order screen.
Figure 3.6
4. Deleting the Order
- Click the "Delete Order" button highlighted in Figure 0.1 above to delete an order.
- A dialog box highlighted in Figure 4.0 will appear on your screen.
Figure 4.0
- Click “Yes, Delete” to continue the process of deleting the order record.
- Click “Cancel” to close the pop-up and skip the deletion process.
5. Merging Orders
- Click the "Merge Orders" button highlighted in Figure 0.1 above to merge an order.
- The form highlighted in Figure 5.0 will appear on your screen.
Figure 5.0
- Single Location: This option will merge all the selected orders for a single vendor and single location into one order, as depicted in Figure 5.1.
- The orders listed in Figure 5.1 are all the orders under the Show Entries label.
- Select the orders by checking them against their order numbers. Click on "Merge Orders" to merge the selected orders.
Figure 5.1
- Doing so will merge all the selected locations into one order. The system requires a minimum of two orders to merge. The "Merge Orders" button will be disabled unless two or more orders are selected.
- Multiple Location: This option also lets you choose multiple orders with OPEN ORDERS status for different locations while sharing a single vendor.
Figure 5.2
- In Figure 5.2, we see two purchase orders from a single vendor for two different locations.
- Click on the "Merge Orders" button; a dialog, as highlighted in Figure 5.3, shows up.
- Select "Multiple Location" in this case.
Figure 5.3
- After that, select a vendor and location(s) for whom you wish to merge orders for, and select the date range for it.
Figure 5.4
- Select the vendor name, location(s), and date range, and click on "Review Orders."
Figure 5.5
- Select the orders you wish to merge (a minimum of 2 should be there; otherwise, it will lead to an error message) and click on "Proceed To Merge Order."
Figure 5.6
- On clicking on "Proceed To Merge Order," the dialog box as highlighted in Figure 5.7 appears.
Figure 5.7
- Clicking on "Yes" will merge the selected orders. See Figure 5.8.
Figure 5.8
- Orders must originate from the same vendor and have the "Open Order" status.
- Even if orders are from different locations, the system allows them to be merged. Quantities for the same items are aggregated and can later be transferred or adjusted to their respective locations.
- Once merged, the combined order receives a new Order Number prefixed with “MO” (e.g., MO-000123).
- The status of the merged order is updated to “Completed,” making it non-editable.
- Although the merged order is presented as a single record, the system retains location-specific data.
- Upon invoicing, the system automatically generates a separate invoice for each location included in the merged order.
- This ensures that inventory, accounting, and delivery tracking remain accurate and store-specific.
- The order quantity for both orders gets appended in this case.
6. Split Order
- Select the orders (all those that were merged) to split them into original individual order.
Figure 6.1
- Once the orders are selected, click on "Proceed to Split Order."
Figure 6.2
- Click on "Yes," and the merged order will be reversed.
Figure 6.3
7. Mass Merging Orders
- For example, if a location, say Middletown, has 5 orders and another location, say Oneonta, has 10 orders, the Mass Merge feature will merge all 5 individual orders for Middletown into 1 order and Oneonta's 10 orders into another 1 order.
- Choose the vendor from the drop-down list and also the set of locations.
- Click on "Review Mass Merge Orders" to select the open orders for merging.
- After reviewing the set of orders for different locations, click on "Proceed To Mass Merge Order."
- A dialogue box will appear, as highlighted in Figure 7.2.
Figure 7.2
- Click on "OK" to proceed with the merging process.
8. FTx Academy Training Course
Check out this FTx Academy video to learn how to set up and use EDI for your vendors.Check out this FTx Academy video to learn more about how to use the “Reorder” module in Control Center.Related Articles
Purchase Orders - Store Employee
Purchase Orders Overview A Purchase Order (PO) is a process used to procure products for a store from a vendor. You can create a purchase order, specifying the vendor, quantities, and agreed prices for products. POs can only include parent items and ...Reorder - Purchase Orders – Classic
Reorder - Purchase Orders Overview A purchase order, commonly referred to as a PO, is a formal offer from a buyer to a seller to purchase specific products or services at a specified price. Generally, purchase orders are created in Control Center ...Back Orders
Back Orders Overview "Back Orders" shows the list of all system-generated back orders. When the vendor cannot completely fulfill a product or multiple products in a purchase order for any reason, the system logs the quantity difference as a back ...Scheduled Orders
Scheduled Orders Overview This article outlines the automated purchase order scheduling process, from creating the purchase order to delivering items to various store locations. Once you have figured out your regular ordering needs (quantity, ...Back Orders (Employees)
Back Orders Overview Back Orders displays a list of all system-generated back orders. When a vendor is unable to fully supply one or more products in a purchase order, the system records the unfulfilled quantities as back orders. A separate back ...