Buydown Item List Report
Overview
The "Buydown Item List Report" offers a comprehensive overview of all buydown entries within the system. It details essential information such as buydown amounts, applicable time frames, and conditions. The report also includes a list of items associated with each buydown, enabling users to effectively track and evaluate the impact of buydown promotions on individual products.
This article includes:
- How to generate the "Buydown Item List Report."
- How to apply the filter options to customize the report.
- How to automate (schedule) or print a report.
- How to mark the report as a favorite report.
1. Reaching "Buydown Item List Report"
To reach the "Buydown Item List Report":
- Step 1: Log into Control Center
- Step 2: Choose Point of Sale
- Step 3: Choose Reports
- Step 4: Choose List Reports
- Step 5: Choose Buydown Item List Report
Figure 1.1 below appears that will help you understand the navigation better.
Figure 1.1
2. Understanding the "Buydown Item List Report"
Please see the image below labeled Figure 2.1 for a description of the buttons and fields that appear on the screen.
Figure 2.1
The report initially displays no data. Apply the desired filters and generate the report based on your requirements.
The report initially displays no data. Apply the desired filters and generate the report based on your requirements.
3. Generating the "Buydown Item List Report"
Refer to Figure 3.1 below for a description of the buttons and fields displayed on the screen.
Figure 3.1
Buydown Information:
- Buydown Name: The name of the buydown applied.
- Manufacturer: The name of the manufacturer offering the buydown.
- Buydown Group: The buydown group associated with the buydown promotion.
- Buydown Style: The buydown style that was defined at the time of its creation, i.e., Dates, Quantity, Date and Quantity, Dollar Amount, and Date and Dollar Amount.
- Buydown Amount: The amount specified for the buydown during setup.
- Dollar Limit: The maximum dollar value allowed for the buydown within the specified promotion period.
- Date Range: The time period during which the buydown is active.
- Buydown Qty: The quantity of items on which the buydown is applied.
- Buydown Receipt Text: The text shown on the customer’s receipt when a buydown is applied (e.g., "$1 Discount" or "$1 Buydown"). If left blank, the default text "Buydown (name) Applied" will appear.
Affected Products' Information:
- UPC: The UPC code of the product to which the buydown is applied.
- Item Name: The name of the product receiving the buydown.
- Pricebook Zone: The Pricebook zone associated with the product.
- Original Price: The product’s price before the buydown is applied.
- New Price: The product’s price after the buydown is applied.
3.1 Filter Items
This field allows users to refine the report results based on specific buydown configurations. It includes a drop-down menu with the following two options:
Show All: Displays all buydowns available in the system. Use this option to view a complete list of all applied buydowns across items.
Custom Filter: Allows users to display a filtered buydown item list report. This is helpful when generating a report focused on particular buydowns for analysis.
- Click on the "Manage" button to apply filters to get the customized results.
Figure 3.1.1
- Upon clicking the "Manage" button, Figure 3.1.2 appears.
Figure 3.1.2
Fields Information:
Fields Information:
1: Manage Filters Drop-down: Select the saved custom filters from the Manage Filters drop-down (if any) and click "Apply" to apply the saved custom filter. The system will redirect you to the Buydown Item List Report home screen.Click "Generate Report" to generate the report for the selected filter. Clicking the "Manage Filters" button will also open the list of saved custom filters.2: Parameter Tabs: You will see the following tabs: Manufacturer, Buydown, and Buydown Group. Select the required tab, i.e., "Manufacturer," to create or apply a custom filter specific to the selected manufacturers.3: Search: Use this Search box for a specific result.4. Match All Filters drop-down: Use the Match All Filters filter to decide whether or not the Manage Filter screen data matches all applied filters.5: Results: Here, you see the relevant list of data for the selected tab. For example, if you have chosen the "Buydown" tab, it will show the list of all buydowns. You can search for a buydown-specific menu in the "Search" bar.6: Checkboxes: Select the required products by checking the appropriate checkboxes.7: Arrow: Click the green Arrow button to move the selected records to the Selected List Area.
The Manage Filters screen will look like the one in Figure 3.1.3.
Figure 3.1.3
- 1: When generating the report, you can decide whether to include or exclude the selected parameters.
- Include: If you select "Include," the system will include all the specified parameters to generate the report.
- Exclude: If you select "Exclude," the system will exclude all the specified parameters to generate the report.
- 2: Click the "Clear Selection" button to remove the whole selection. To remove any record from the list, click the Remove (x) icon.
- 3: Apply or save Action Buttons:
- Apply: Click the "Apply" button for the selected parameters. The system will navigate you to the Buydown Item List Report home screen. Click "Generate Report." The system will generate reports based on your selection.
- Save Filters: Click the "Save Filters" button to save the custom filter for future use. 3.1.1 Save and Manage Custom Filters explains the details.
- Close: Click to close the Manage Filters window.
- The results will be displayed as per the selected custom filters in Figure 3.1.4.
Figure 3.1.4
3.1.1. Save Filters
You can also save the configured custom filters for future use. By clicking the "Save Filters" button, a pop-up will appear to allow you to enter the name of the custom filter.
Figure 3.1.1.1
- Enter the name of the filter to save it for future use.
Figure 3.1.1.2 - Once saved, click on "OK."
- The saved filter will be displayed under the "Manage Filters" button as highlighted in Figure 3.1.1.3.
Figure 3.1.1.3
- The Buydown Item List Report with the selected filter will be displayed as highlighted in Figure 3.1.1.4.
Figure 3.1.1.4
4. Buydown Style:
Select a buydown style from the buydown style drop-down to include its details in the report as per your requirements. See Figure 4.1.
Figure 4.1Follow the steps to fetch the results for the selected Buydown Style filter:
- Dates: Select the time period (Start Date & End Date) to retrieve the buydown data for the Date buydown style in the Buydown Item List report. See Figure 4.2.
Figure 4.2
- Quantity: Choose this style to retrieve the data for Quantity buydown style details in the Buydown Item List Report. See Figure 4.3.
Figure 4.3
- Date and Quantity: When selected in the Buydown Item List Report, fill in the Date Range and Quantity to get the customized buydown details in the Buydown Item List Report.
Figure 4.4
- Dollar Amount: When this option is selected, the report will display the buydown details for only this buydown type. See Figure 4.5.
Figure 4.5
- Date and Dollar Amount: When selected, fill in the period (Start Date and End Date) and Dollar Limit amount, and the custom results will be displayed in the report. See Figure 4.6.
Figure 4.6
5. Pricebook Zone:
The Pricebook Zone filter displays all zones linked to the company account.
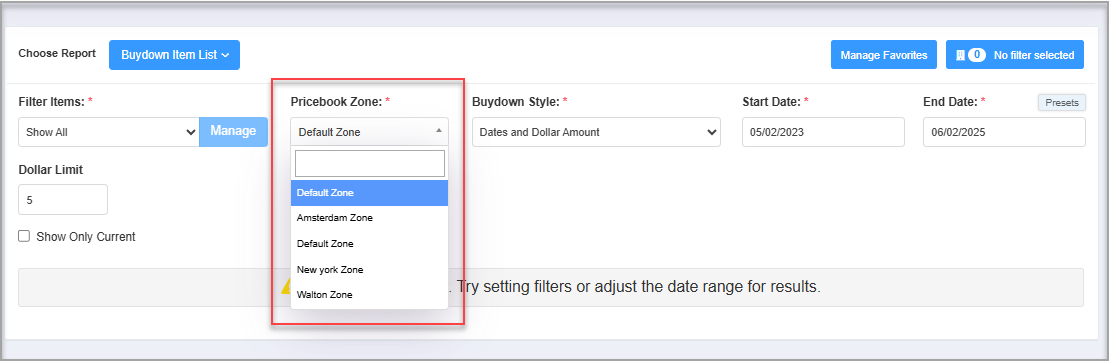
Figure 5.1
Select a Pricebook zone, and click the "Generate Report" button to view cost and price data based on the selected zone.
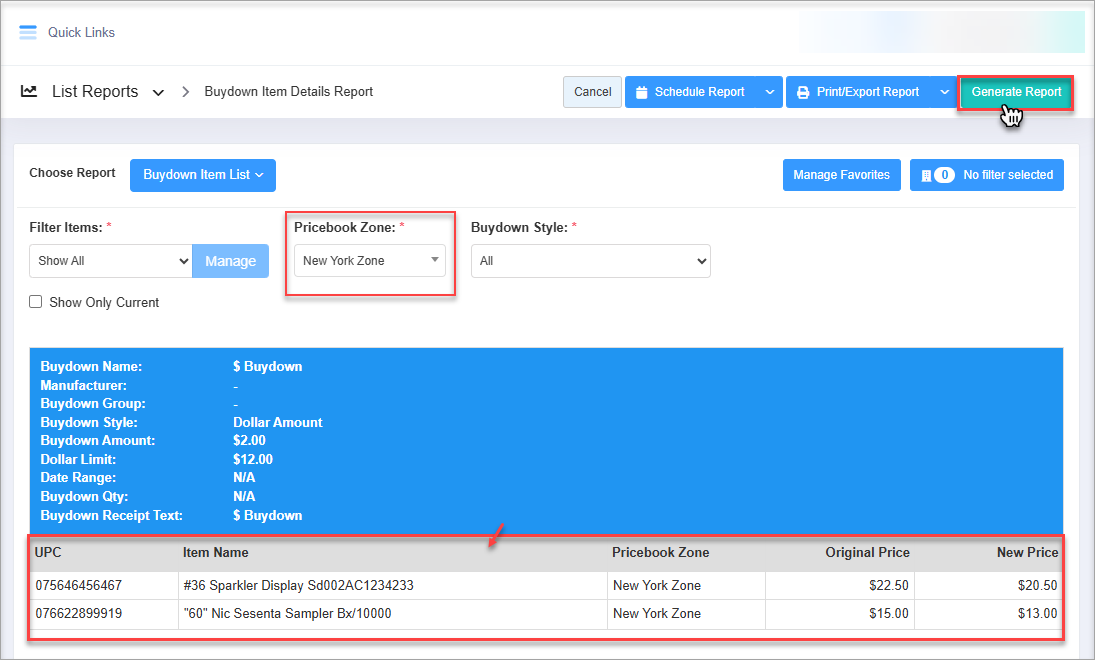
Figure 5.1
Select a Pricebook zone, and click the "Generate Report" button to view cost and price data based on the selected zone.
Figure 5.2
This filter displays the results in the Buydown Item List Report based on the selected Pricebook zone.
This filter displays the results in the Buydown Item List Report based on the selected Pricebook zone.
6. Checkbox Filters:
- Show Only Current: This filter displays only the buydowns that are active on the date the report is run. See Figure 6.1.
Figure 6.1
7. Scheduling a Report
FTx Cloud POS supports report automation. You can configure a report and schedule it. The system will send the scheduled report to the indicated email IDs at the defined frequencies (daily, weekly, bi-weekly, monthly, quarterly, etc.).
8. Printing/Exporting a Report
You can print or export any report according to your requirements. When you use the Print function, the system creates and opens the report's PDF file in a new tab. You can download the soft copy or print the paper copy according to your requirements.
9. Manage Favorites
FTx Cloud POS allows quick access to the reports you need to view frequently through "Favorite Reports." You can save a report as a favorite and manage all your favorite reports from any of the report screens using the "Manage Favorites" button.
Related Articles
Buydown Sales Report
Buydown Sales Report Overview The "Buydown Sales Report" enables you to create, schedule, and print custom reports related to buydown data based on two parameters: store sales and invoices received by the store. Manufacturers, especially tobacco ...Buydown Sales Report - Store Employee
Buydown Sales Report Overview The "Buydown Sales Report" allows employees to generate, schedule, and print customized reports that track buydown data using two key parameters: store sales and invoices received by the store. Tobacco manufacturers and ...Item Sales Report
Item Sales Report Overview The sales reports must track the sales details, stocks on hand, profits, and other parameters to monitor your item sales. Several sales reports are available, providing valuable insights and detailed statistics on the ...Commission Items List Report
Commission Items List Report Overview The "Commission Items List Report" provides a detailed view of all products associated with active or past commission campaigns. Commissions serve as performance-based incentives (spiffs) that can be applied to ...Vendor Parts List Report
Vendor Parts List Report Overview The Vendor Parts List Report offers a detailed listing of all vendor-associated parts along with their corresponding UPCs (Universal Product Codes) and other key product details. This report is a vital tool for ...