FTx Cloud POS Step-by-Step Guide – Classic
FTx Cloud POS Step-by-Step Guide
FTx Cloud POS is a cloud-based point-of-sale (POS) solution that provides comprehensive business management capabilities through a single tool, featuring extensive integration capabilities for property management systems, paperless kitchen display systems, credit card interfaces, and reporting applications. It includes three touchpoints:
- Control Center: A cloud application accessible through a web interface.
- POS: A point-of-sale system, which combines hardware and software, is used at the retail store's payment point.
- Handheld Device: Handheld devices are mobile computers that facilitate inventory management and customer service.
This user guide provides information about Point of Sale (POS).
User Guide Purpose:
This user guide provides an overview of the daily use of FTx Cloud POS.
User Guide Audience:
This document is intended for FTx POS operators.
Editor's Note: We make every effort to keep the text and images in our User Guide up to date. However, FTx Cloud POS is regularly updated to improve the user experience. We apologize for any differences you may notice between the User Guide and the POS system you are using.
1. Introduction
POS is the combination of hardware and software used at the payment point in the retail store. It includes a monitor, keyboard, fingerprint scanner, product scanner, and receipt printer.
You can perform the following activities using POS:
- Ringing items and processing sales.
- Handling item returns.
- Perform the three inventory actions: Transfers, Adjustments, and Worksheets.
- Perform reconciliations.
- Perform Cycle Counts.
- Changing settings configurations.
Online & Offline Modes: A POS that can communicate with the database to post transactions is online. Conversely, a POS that cannot communicate with the database due to internet-related issues is offline. You can still perform sales and payment activities when the POS is offline.
Synchronization with Control Center: When an administrator makes configuration changes, the POS automatically downloads new information based on the database update frequency settings. However, periodically performing the "synchronization" operation is essential to ensure synchronization with the Control Center.
Please read POS Panels - Layout & Buttons for an introductory idea about the FTx POS's layout and buttons.
1.2 Terminology
- POS: A POS, or point-of-sale, is any location where a sales transaction occurs. It can be anywhere, but it is most likely a restaurant, retail store, hotel, or similar establishment.
- POS System: A POS system is simply the central hub of any business and the combination of hardware and software. It is also where a customer executes payment for goods or services. Still, it can also perform many additional functions, such as inventory control, data reporting and analytics, and customer relationship management, among other key benefits.
- POS Transaction: A POS transaction can also be known as a POS purchase, which is the point-of-sale purchase or “point” where a customer pays in exchange for goods and services. The payment can be in any form, such as cash, debit, credit, or mobile. The transaction is completed when a PIN, signature, or fingerprint is authenticated and authorized.
- Age verification: Age verification is the process of verifying a potential buyer's age for age-restricted products by checking their government-issued identification. The products may include alcohol, cigarettes, pornography, or more. Age-restricted products may be legally limited to adults 18 or 21 years old. The merchant must verify the buyer's valid government-issued identification to confirm their purchase eligibility.
- Loss prevention: Loss prevention is a store’s strategy for reducing inventory disappearance due to shoplifting, employee theft, return fraud, breakage, PO shortage, and other unwanted stock shrinkage reasons. Numerous implementation strategies can help reduce loss, including installing cameras, hiring security personnel, and utilizing a point-of-sale system with real-time inventory tracking and robust point-of-sale analytics.
- Safe Drop: A safe drop removes excess money from a register to deposit into a secure location at the business. The secure location might be a safe, lockbox, back office, or another fortified location. This is not to be confused with a bank deposit or balancing the drawer at the end of a shift, which are both separate processes.
- Register Z: A Register Z Report is a detailed printout of transactions for a point-of-sale register. In most POS systems, initiating a Z Report triggers the closing out of the register. Z reports should be run at the end of a shift or the day.
- SKU Vs. UPC Vs. PLU:
- SKU: Stands for stock-keeping unit and is a unique alphanumeric code used internally by a company to manage inventory and organize product catalogs. SKUs can be any length but are usually 8–12 digits. They can be printed as a barcode or the code itself and are readable by humans.
- UPC: This stands for Universal Product Code, a 12-digit code used by retailers to identify products externally. UPCs are purchased from GS1 US, a nonprofit organization, and are usually printed as barcodes.
- PLU: Stands for Price Look-Up Code and is a 4–5 digit code used to identify bulk produce in supermarkets. PLUs are administered by the International Federation for Produce Standards (IFPS).
2. Getting Started with Shift
This section provides instructions on starting and logging
in to, as well as logging out of, the various components of FTx Cloud POS.
2.1 Signing In and Out
FTx Cloud POS allows you to sign in using four options: ID, Password, Fingerprint, and Card. Your store can configure multiple options for you to sign in.
Figure 1.1
All three login methods are described below. Use the one that best suits your access preference.
1. Use Keypad
- Allows manual login by entering the employee ID and password.
- Typically used when biometric or card access isn’t available.
2. Use Fingerprint
- Enables biometric login using a registered fingerprint scanner.
- Provides quick, secure, and password-free access.
3. Use Card
- Allows login by swiping an employee or access card (magnetic stripe or RFID).
- Often used in retail environments for speed and security.
4. Exit: It closes the login window or returns to the previous screen. It is generally used when the you want to exit the POS when not logged in.
2.2 Clocking In and Out
The FTx Cloud POS automatically clocks you in when you sign in and clocks you out when you sign off. However, we recommend using the Time Clock section.

To learn more, read here.
2.3 To-Dos & Messages
The corporate employee can create To-Do tasks to send to the store employee. If authorized, you can view the To-Do list on your Dashboard.
To learn more, read here.2.3.1 Viewing and Completing To-Dos
The corporate employee can send tasks to the store employee by creating To-Do lists. The system will continue to send the To-Do task at a specified frequency (e.g., One Time, Daily, Weekly) until it is marked as completed by the store employee.
If you are authorized, you can view the to-do list on your Dashboard in the Current To-Do's section, as Figure 2.3.1.1 shows.
Figure 2.3.1.1
- View: This button opens the details of the selected To-Do.
- Show Finished: Use this button to switch between the current and finished To-Do task lists.
- To complete a To-Do, please select it and click the "View" button. The POS | Manual screen will appear, as Figure 2.3.1.2 shows.
Figure 2.3.1.2
- Print: Use this button to print the To-Do details from the attached printer.
- Close: Use this button to close the POS | Manual screen without marking the To-Do completed.
- Close Complete: This button marks the To-Do as completed.

The To-Do List cannot be deleted in POS. Only the authorized corporate employee can delete it from Control Center.
2.3.2 Managing Messages
FTx Cloud POS provides a two-way messaging facility across the account.
If you are authorized, you can view the sent and received messages on your Dashboard in the Messages section, as Figure 2.3.2.1 shows.
Figure 2.3.2.1
- View: Use this button to view the details of the selected message.
- Create: Use this button to create and send a message.
- Delete: Use this button to delete a selected message.
Viewing & Responding to a Message:
The Messages section lists all messages that have been sent and received. The system will highlight the unread message, as Figure 2.3.2.2 shows.
Figure 2.3.2.2
Please select a message by clicking on it and click the "View" button. The View Message screen will appear.
Figure 2.3.2.3
- 1: Message Thread - This section displays the entire message thread.
- 2: Send Reply: Enter the message's reply and click the "Send Reply" button to reply to the message.
- 3: Add Attachments: Use this section to attach your reply.
Sending a Message:
Please follow the steps below to send a message.
- Click the "Create" button highlighted in Figure 2.3.2.1.
- The POS | Create Message screen will appear, as Figure 2.3.2.4 shows.
Figure 2.3.2.4
- Subject: Enter the message's subject line.
- Message: Enter the message you wish to convey.
- Visibility: Select the appropriate visibility setting.
- Attachments: Add attachments if required.
- User Selection:
- All Users: Select this option to send messages to all users of your company's account.
- Specific User: Select this option to send the message to a specific user. The To drop-down field will appear. Please select the required users from it.
Figure 2.3.2.5
2.4 Navigating to POS & Setting Starting Till Amount
- Click the "Open POS" button displayed on the Dashboard.
Figure 2.4.1
- The POS Main Panel will open.
- If the corporate employee enables the "Force A Starting Till" setting in Other Settings (Settings > POS > POS Device Global Settings > Other Settings), the POS | Starting Till screen will appear. Enter the appropriate information and click "Ok."
Figure 2.4.2
- If the corporate employee enables Dual Payment, the POS | CHOOSE METHOD OF PAYMENT screen will appear.
Figure 2.4.3
- Use the POS Panel to scan items, proceed with payments, and perform other cashier actions.
2.5 Adding or Searching for a Customer
The Customer option in the POS system allows cashiers to quickly search for an existing customer or add a new one before processing a sale. This ensures accurate recordkeeping and enables customer-based promotions, loyalty programs, or receipts.
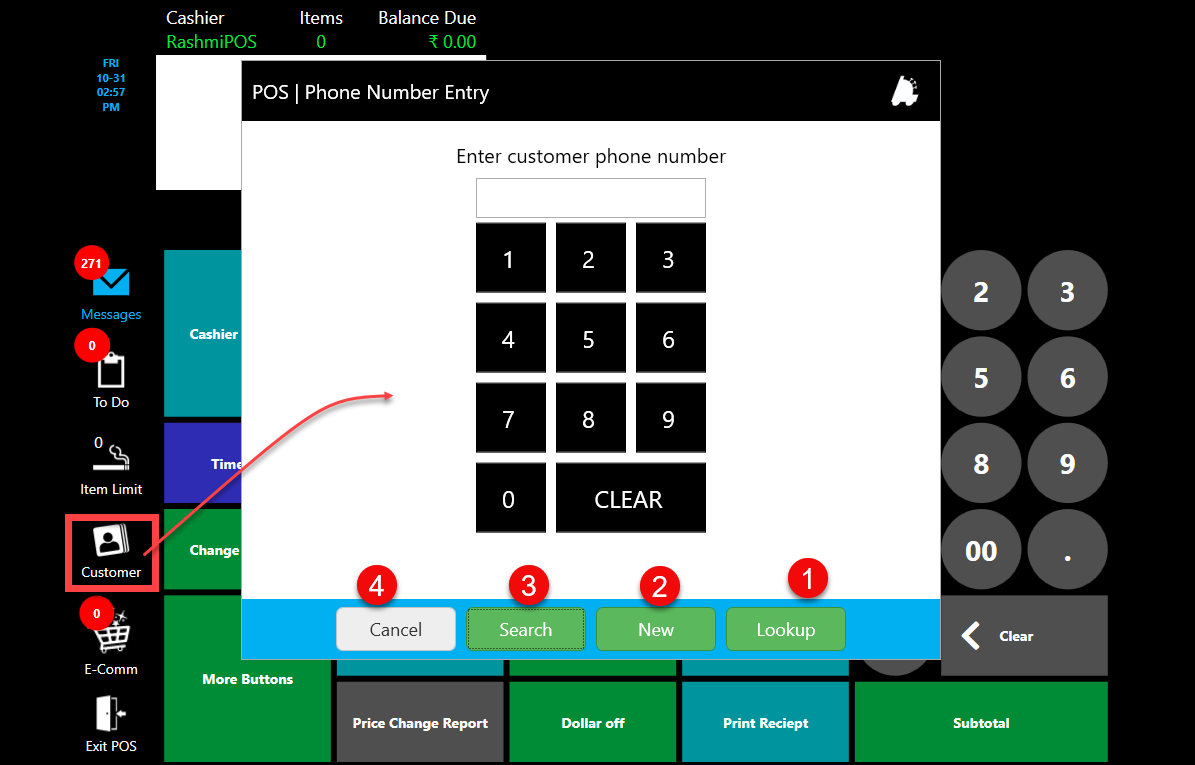
Figure 2.5.1
Figure 2.5.1
Screen Information is as follows:
2.5.1. Lookup Button
The Customer Lookup feature allows the cashier to search for an existing customer in the POS system. This option enables quick location of a customer’s record by phone number, preventing duplicate entries and ensuring transactions are linked to the correct customer.
- Steps:
- Click the Customer button on the left panel.
- The Phone Number Entry screen appears. Enter the customer’s phone number using the keypad.
- Click Lookup to look for the customer associated with the entered phone number.
Figure 2.5.1.1
- Click on the customer name to open the customer details and view their memberships as highlighted in Figure 2.5.1.2.
Figure 2.5.1.2
Explanation of the highlighted fields in the Customer Profile and Membership screen:
- Edit Profile: Opens the customer details window, allowing you to update personal information like name, phone number, or email.
Figure 2.5.1.3
- View Balances: Displays the customer’s current loyalty points and redeemable dollar balance.
Figure 2.5.1.4
- View Coupons: Shows all available and active coupons linked to the customer’s account. The coupon can be selected to be applied or printed.
Figure 2.5.1.5 - View Sales History: Lists the customer’s past transactions and purchase details.
Figure 2.5.1.6
- Choose Another Customer: Opens up Phone Number Entry Screen as highlighted in Figure 2.5.1.1 It lets you search for and select a different customer without closing the POS window.
- Clear Customer: Removes the currently linked customer from the ongoing transaction.
- Close: Exits the customer profile window and returns to the main POS screen.
2.5.2. New Button
Opens the Customer Details form to add a new customer if not found in search results.

Figure 2.5.2.1
Figure 2.5.2.1
Customer Details Screen Information: Enter the data as follows.
- Name, Phone, and Email: These include essential customer information.
- Address Fields: Include Address Line 1, Address Line 2, City, State, and Zip Code.
- Gender / Birth Date / License #: Optional demographic or identification fields.
- Referral: Used if the customer was referred by someone else.
- Can Text / Can Email: Toggle options to allow marketing communication.
- Card Number: Used to link loyalty or membership cards.
- Mark as Employee: Marks the customer record as a store employee.
- House Account: This option is displayed when the "Allow House Account Pairing in POS" setting is enabled in the Control Center. If the setting is disabled, the Link House Account option will not be displayed. To retrieve available house accounts, click Link House Account. The POS retrieves all available House Accounts from the Control Center. The dropdown displays House Accounts in the following format: Company Name + House Account Number. Example: Company ABC (12345).
The first House Account in the list is selected by default. Cashiers can select a different House Account if required.
- Once the House Account is selected, click Save. The customer profile is updated.
- The selected House Account is linked to the customer.
- If no House Account is selected:
- Only the other customer details are updated.
- No House Account association is added.
If the selected House Account is deleted before the customer is created, the following error message appears:
"The customer could not be created because the selected house account no longer exists."
Figure 2.5.2.2
- Capture Image: Opens the camera to take a customer photo for their profile.
Once all information is entered, click Save to create the new customer record. Click Cancel to exit without saving.
2.5.3. Search Customer
Finds an existing customer using the entered phone number. If found, their details load automatically for the transaction. Additionally, the Search By field lets you search customers using parameters like Last Name, Phone Number, or Email.
Figure 2.5.3.1
Search Customer Screen Information:
- Find Local: Searches for the customer record within the local POS database (i.e., data stored on the store’s system).
- Find Online: Searches for the customer record across the central or cloud database if it’s not found locally.
- New: Opens the New Customer window to create and add a new customer record if the required customer does not exist in the list.
- Cancel: Closes the Find Customer window without making any changes or selecting a customer.
- OK: Confirms and selects the highlighted customer from the list to link them with the current transaction.
2.5.4. Cancel Button
Use this button to close the window and returns to the POS sales screen.
3. Handling Transaction
A POS transaction manages how customers purchase goods and services in a retail establishment. It can occur in person or online, and receipts can be generated electronically or in a printed format.
3.1 Ringing Items on POS
3.1.1 Scanning or Manually Adding Items to the Sale
- Scanning an item: When you scan it, it is automatically added to the sale.
- Adding an item manually: If scanning the product is difficult, you can manually enter the product UPC or PLU and click "Enter."
- Searching for an item in POS: You may need to search for a specific item on the POS in cases such as when a customer requests it during the sale or when you encounter difficulty scanning a product due to a damaged barcode sticker, etc.
- You can use the "Item Search" button to search for a specific item.
Figure 3.1.1.1
- The POS | Find Item screen will appear, as Figure 3.1.1.2 shows. Search for the products you want to add to the order.
Figure 3.1.1.2
- Search By: The Search By drop-down lets you select the information type you want to insert in the search bar. You can choose from Description, UPC, UPC Expanded, Vendor Part, or Everywhere.
Figure 3.1.1.3
- Search bar: The Search bar lets you enter the keywords based on which you want to search for the product.
- Select the appropriate options for the Search By and All Products drop-downs, enter your keywords in the search bar, and click the "Find" button. Based on your input, the item list will appear, as Figure 3.1.1.5 shows.
Figure 3.1.1.5- Click on the desired item's name and click "Ok." The system will add the selected item to the sale.
- If the item you selected has multiple prices, the system will prompt you to select the price.
3.1.2 Selecting Kits
To cater to the customer's specific requirements, the retail business creates kits that can be added to the sale in one go. For example:
- Kit of raw materials to prepare a specific dish.
- A kit of ready items to fulfill festive requirements, such as those for Christmas or Thanksgiving Day.
Your store may occasionally brief you about available kit options. However, you can easily view and select a kit to add to the sale.
- Click the "All Kits" button on your POS. The POS | Create Order screen will appear. Click the "Add To Cart" button to add the kit to the sale. Proceed with the payment.
Figure 3.1.2.1
3.1.3 Processing Remote Sales
In retail businesses, customers sometimes place orders in advance and then collect them later. Even in such cases, there can be big orders. The Remote Sales feature in FTx Cloud POS enables store employees to handle such situations easily. The store employee can scan the products using a handheld device as a remote sale and prepare the order. When the customer arrives, they go to the store's payment desk. The cashier can see the scanned order in the POS device's Remote Sales section and proceed with the payment.
- Click the "Remote Sales " button on your POS. The POS | Remote Sales screen will appear, displaying the list of all remote sales. Select the sale you want to proceed with and click "Ok." The system will show the selected sale as the current sale. Proceed with the payment.
Figure 3.1.3.1
3.1.4 Handling Open Department Items
An Open Department Sale in a point-of-sale (POS) system refers to a transaction where the salesperson enters a sale without predefined inventory or product codes. Instead, the sale is linked to a general department(s.)
Your store will provide guidance on which products are permitted to be sold in the Open Department.
- Enter the item's price amount and click the "Open Department" button on your POS.
- If the authorized user has allocated only one department as the open department, the system will log this item's sale to that department. You can continue scanning the other products or processing the payment.
- If the authorized user has allocated multiple departments as open departments, the POS | Department Price Prompt screen will display the department names and the amount you entered. You can change the amount if required. Click the applicable department and continue scanning the other products or processing the payment.
Figure 3.1.4.1
3.1.5 Handling Sales for a House Account
What is a house account?A house account is a store-managed charge account that allows approved customers to purchase on credit. Customers associated with the specific account can buy products and pay later, typically through a monthly billing cycle or on any other payment terms.
- Retailers often offer this option to trusted individual clients, corporate buyers, or regular customers who prefer simplified and recurring billing.
- Unlike bank-issued credit cards, retailers establish credit limits, payment terms, and policies. House accounts are also utilized for internal staff purchases or promotional transactions.
Please follow the steps below to process sales for a house account:
- Click the House Lookup button on your POS.
Figure 3.1.5.1
- The POS | Phone Number Entry screen will appear.
Figure 3.1.5.2
- Enter the customer's registered phone number and click "Search" to search the customer or the "Lookup" button to open the customer's screen directly.
- Select the customer and continue with the sales as a regular sales.
- However, if the "Credit Hold" setting is enabled for a house account, the system will not proceed with the sale further until a manager overrides it by entering their credentials, after which the cashier can continue with the House Account Charge.
Figure 3.1.5.3
3.2 Void, Suspend, or Cancel Sale
3.2.1 Void Items on Sale
When you void one or more items from the sale, the system removes those items from the sale, and you can continue.
Void Last Item: During the sale process, the customer may request that you remove a specific item from the sale. Select the item on the sales list screen and click the "Void Last Item" button. The system will delete the item from the sale.
Void All Items: During the sale process, the customer may instruct you to remove all scanned items and restart the scanning process with different items.
Click the "Void All Items" button. The system will delete all items you have scanned from the sale so far.
Figure 3.2.1.1
3.3 Discounts & Tax Exemption
3.3.1 Applying Percentage Discounts
- The authorized user from the Control Center defines discounts. If the discount is set for specific items, the POS will automatically calculate it during the sale.
- However, to accommodate changing business needs, FTx Cloud POS allows authorized users to set a choice-based percentage discount on selected departments if required. The authorized users select the department(s) and discount percentage in the Control Center.
- When you scan the item from the selected department, you can choose to apply the set discount by clicking the "% Off" or "% Discount" button. Your store will inform you if they have put such a discount.
3.3.2 Applying Tax Exemption
- Customers such as government entities, non-governmental organizations (NGOs), schools, etc., are eligible for tax exemption.
- To apply the tax exemption, scan all items and click the "Tax Exempt" button.
- The Tax Exempt Information screen will appear. Add the required information in the fields and click "Ok." The system will remove the tax from the sale.
Figure 3.3.1
Figure 3.3.2
3.4 Processing Payments
3.4.1 Cash Payment
- Click the Cash function key.
- When tendering exact cash, click "Ok" on the Change Due dialog.
- When tendering partial cash, enter the Cash Amount in the Cash dialog and click "Ok."
3.4.2 Card Payment
- Press the "Tender" button configured for credit card sale payments.
- Enter the amount to charge the credit card, and then press "Ok."
- Swipe the credit card, enter the card number and expiration date, and then press "Ok." The merchant voucher, customer voucher, and customer receipt print (if configured).
- Suppose your system uses OPI to process credit card transactions after the guest signs the merchant voucher to authorize the credit. In that case, you must visually verify that the signature on the merchant voucher matches the guest's signature on the card.
- If the signatures match, click "Yes." Does the signature on the card match the one on the document? Prompt.
- If the signatures do not match, click "No." The payment is voided, and a reversal request is sent to OPI. The check detail area appears, and the check remains open; we are awaiting a new payment tender.
- Repeat steps until the check is paid in full.
3.4.3 Other Payment Methods
The Sub-Total Panel will show buttons for all tenders being accepted at your store. You can click the required button and process the payment. You may come across various payment methods such as:
- Manufacturer Coupon: A manufacturer coupon is a discount or promotional offer provided directly by a product's manufacturer, rather than the retailer selling the product. It is a tool used to encourage consumers to purchase specific products by offering a price reduction, cashback, or other incentives.
- Store Coupon: A store coupon is a discount or promotional offer provided directly by a retailer rather than the manufacturer of a product. Stores use store coupons as a marketing tool to attract customers, increase foot traffic, and encourage purchases at their locations or online stores.
- Loyalty Points/Coupons: Loyalty points (or loyalty coupons) are a type of reward retailers offer as part of a loyalty program to encourage repeat purchases and build long-term customer relationships. Customers earn points based on their spending or engagement with the retailer, and these points can be redeemed for discounts, free products, or other benefits.
- Gift Cards: A Gift Card is a prepaid card that holds a specific amount of money. It can be used to make purchases at a specific store or business. It's like giving someone a pre-loaded card instead of a gift. You can sell a gift card and accept the payment via a gift card.
- Digital Coupons: Customers can buy digital coupons from the FTx web interface.
- If the customer is already registered with the system, you can search for the customer, find the list of coupons available to them, and redeem the coupon.
- If the customer is not registered with the system, you can register them first and then redeem their coupon.
3.4.4 Multiple Payment Methods in a Single Transaction.
The customer may wish to pay using multiple methods. Use the Sub-Total panel's flexibility to accommodate the customer's payment preferences.
For example, suppose the total bill is $66, and the customer wants to use the store coupon to pay $25. In this case, you can process the payment using the following:
- Navigate to the Sub-Total panel. Enter 25 as a tender amount on the POS and click the "Store Coupon" button. (Depending on the coupon type, you may or may not need to scan the coupon.)
- The system will prompt you to choose the item to which you want to apply the store coupon. Choose the item and click “Apply.”
- The system will deduct $25 from the bill. You can select the following payment method: If the customer wants to pay using a debit card, click the "Debit Card" button, insert the debit card in the card terminal, and request the customer to enter their PIN carefully.
- Once the transaction is completed, the system will generate the receipt.
3.4.5 Accepting A House Account Payment
Please follow the steps below to accept the house account payment:
- Enter the amount and click the "House Account Payment" button.
- The system will prompt you to search for the customer.
- Search the customer and proceed with the transaction.
4. Specific Cashier Actions
4.1 Safe Drops
A safe drop removes excess money from a register and deposits it into a secure location at the business. The secure location might be a safe, lockbox, back office, or another fortified location. This is not to be confused with a bank deposit or balancing the drawer at the end of a shift, which are both separate processes.
- Click the "Safe Drops" button, located in the Cashier Functions panel.
Figure 4.1.1
4.2. Pay In Pay Out
- The Pay In function allows you to add the specified amount of cash to the drawer.
- The Pay In screen will appear when the cashier clicks this button on the POS device. The cashier can enter the amount and description to add the money and click "Ok."
Figure 4.2.1
- The Pay Out function allows you to take out the specified amount of cash from the drawer.
- The POS | Pay Out screen will appear when the cashier clicks this button on the POS device. The cashier can enter the amount and description to add the money and click "Ok."
Figure 4.2.2
4.3 Item Return
Prerequisites:
[1] The cashier needs the authority to perform returns.
[2 POS will allow the item to be returned to the vendor only
when the following settings are enabled in “Worksheet Settings” (Settings
>> POS >> Worksheet Settings) in Control Center.
The Enable Return To Vendor setting is enabled.
The item’s vendor’s name is added to the Picklist of
allowed vendors for Return to Vendor section.
- Click the "Item Return" button on your POS and scan the item.
Figure 3.5.2.1
- When you click the "Item Return" button, scan the item or receipt, and proceed to the return process, the POS | Return Notes screen will appear. Enter the appropriate notes and click "Ok."
Figure 3.1.1
- The POS | Add Return To Worksheet screen will appear. You can choose from three options: Return To Inventory, Return To Vendor, and Return To Warehouse.
Figure 3.1.2
4.3.1 Return To Inventory
Please note that when you choose this option, the system will not create a worksheet.
- The system chooses the Return To Inventory option by default. You can make the appropriate selections based on the item's conditions.
Figure 4.3.1.1
- This item is new and can be added back to the inventory: If you see the item in perfect condition, choose this option. You can send it back to inventory by clicking "Ok."
- This item is damaged: Choose this option if you see the item is not in perfect condition. Choose the applicable options in the Item Condition drop-down, write notes, and click "Ok."
- Item Condition: Choose the suitable option from this drop-down.
- Condition Notes: Enter the appropriate notes.
4.3.2 Return To Vendor & Return To Warehouse
- Choose the "Return To Vendor" or "Return to Warehouse" option as applicable.
- Return To Vendor: This option will allow you to return the item to its vendor.
- Return To Warehouse: This option will allow you return the item to the warehouse.
It is a business decision to decide which items should be returned to the vendor and which should be returned to the warehouse. We recommend you learn about your store's return policies or discuss this with your manager.
Figure 4.3.2.1
- Vendor: Choose the vendor from the drop-down.
- Worksheet: Choose the worksheet type: Vendor Return, Vendor Return Damaged, and Warehouse Return.
- Part#: This field will be prefilled.
- Partial: Mark this checkbox if you are returning the partial item.
- Notes: Select the applicable notes from this drop-down.
Figure 4.3.2.2
4.4 Logging Waste & Spoilage
Prerequisite: The Allow Waste setting must be enabled for an item in the Products module to be considered eligible for logging as waste or spoilage. Please follow the steps below to log waste and spoilage from the point of sale (POS).
- Click the "Waste & Spoilage" button on the POS.
- The Waste Confirmation screen will appear, as Figure 4.4.1 shows. Search for the required item.
Figure 4.4.1
- Click on the item to select it, enter the applicable quantity in the Waste Qty field, and click "Add To Waste List."
Figure 4.4.2
- The system will add the item to the waste and show it in the Confirmed Waste Items section.
Figure 4.4.3
4.5 Price Check
- Click the "Price Check" button on the POS and scan the item.
- The POS | Price Check screen will appear.
Figure 4.5.1
- To add this item to the sale, specify the required quantity in the "Qty To Sale" field and click the "Add To Sale" button.
- Use the "Vendor Parts" button to view the vendor part details and the "Print Label" button to print the item's label.
4.6 Changing Salesman
- Suppose you have selected "Prompt for Login":
- When the cashier clicks this button on the POS device, the Salesman Login screen will appear, as Figure 4.6.1 shows. The new cashier can log in using their employee ID and password.
Figure 4.6.1
- Suppose you have selected "Prompt for Salesman":
- When the cashier clicks this button on the POS device, the Cashier List drop-down will appear, as Figure 4.6.2 shows. The new cashier can be selected from the list.
Figure 4.6.2
4.7 Searching for & Adding a Customer
FTx Cloud POS supports customer loyalty programs, so adding the customer's details to the POS is essential.
- Please click the Customer icon on your POS Main Panel.
Figure 4.7.1
- The POS | Phone Number Entry screen will appear.
Figure 4.7.2
- Enter the customer's phone number and click the "Lookup" button. The POS | Customer Profile and Membership screen displays customer details.
Figure 4.7.3
- You can also search for the customer using other details such as last name, email ID, license number, and LNS card. Click the "Search" button on the POS | Phone Number Entry screen. The Find Customer screen will appear, as Figure 4.7.4 shows. Use the Search By drop-down to select the information type you want to insert in the search bar, enter the information in the search bar, and click the "Find Local" button.
Figure 4.7.4
- The system will show the customer record(s) based on your inputs. Select the required record and click "Ok." The POS | Customer Profile and Membership screen, shown in Figure 4.7.3, will appear.
5. POS Actions
5.1 Reconciliation
"Reconciliation" is the process of closing out a shift and recording the physical tender amounts on hand against the tender amounts recorded by the system. This allows for tracking of any discrepancies between system totals and on-hand tenders. Reconciliation takes place in two phases:
- Shift Reconciliation: Shift reconciliation compares the cash, card, and other payment types received during a shift, along with any safe deposits, to the sales records in the POS system, identifying and resolving discrepancies. Each cashier performs this reconciliation at the end of their shift.
- Please read Shift Reconciliation to learn how to perform shift reconciliation in FTx Cloud POS.
- Daily Reconciliation: The store manager performs daily reconciliation at the end of the day (or at the beginning of the next day) and verifies all shift reconciliations (Register Zs) performed during the day.
- To learn how to perform daily reconciliation in FTx Cloud POS, refer to the Daily Reconciliation section.
5.1.1 Manage Safe
The "Manage Safe" feature manages tickets for new games added at the store location. The activated game can be selected from the Add Games drop-down list. The associated list is the list of all games that are configured and active at your store location. You can manage spare/extra lottery tickets (which are not kept in the bin) with the "Manage Safe" feature.
To learn how to manage safe in FTx Cloud POS, please read Manage Safe.
5.2 Data Synchronization
The
corporate employee can change any parameter from the Control Center. FTx Cloud
POS is designed to be constantly updated. However, we still recommend that you perform
the data synchronization operation from time to time. Your store will
update you about the data sync frequency if they have been determined.
Please follow the steps below to perform the data synchronization operation.
- Click the "Actions" button on your POS Dashboard and navigate to the Point of Sale | Actions screen.
- Click "Data Synchronization."
- The Actions | Data Synchronization screen will appear, as Figure 5.2.1 shows.
Figure 5.2.1
- Click "Sync Options." The system will show the list of parameters. Click the parameter you want to sync.
Figure 5.2.2
- The system will sync the data for the selected parameter and
display the message, as shown in Figure 5.2.3.
Figure 5.2.3
5.3 Cycle Counts
"Cycle Counts" is how FTx allows you to count the physical products in your store. A cycle count is an inventory management technique in which a company regularly counts a subset of its inventory rather than the entire inventory. This method helps maintain a more precise inventory count and facilitates the identification and resolution of issues within the inventory management system.
To learn how to manage cycle counts in FTx Cloud POS, please read Cycle Counts.
5.4 Inventory Actions
5.4.1 Worksheets
Worksheets are an easy way to manage the return process. FTx Cloud POS allows you to create worksheets from both the POS and Control Center.
If the customer returns the products, the store may retain them in inventory and resell them at the same or a discounted price. In this case, the system does not create any worksheets during the return process. However, when a product must be returned to the warehouse or vendor for any reason, the system creates a worksheet to handle the return during the return process.
To learn how to add and manage worksheets in FTx Cloud POS, you can just read Worksheets.
5.4.2 Transfers
A stock transfer is a warehouse logistics process that involves transferring products from one store to another. The goals of the stock transfer include the following:
- Optimizing the purchase process by leveraging extra stocks at some stores
- Optimizing the store warehouse's storage capacity
- Making the inventory handling process faster and more cost-effective.
With FTx Cloud POS, you can easily create transfers and track all transferred products. The system automatically adjusts the quantity when you create and apply a transfer. You can create transfers using the POS, handheld devices, and Control Center, making the process simple. The Control Center will automatically display it when you create or manage a transfer using the POS or handheld device.
To learn more about the transfer process in the FTx Cloud POS, please read Transfers.
5.4.3 Adjustments
Inventory Adjustments are increases and decreases made in a point-of-sale system to accommodate known instances of breakage, theft, waste, item expiration, internal use, stock movement to a different location, shipment errors, and various write-offs. These adjustments return recorded inventory counts to accurate levels.
To learn how to record and manage adjustments in FTx Cloud POS, please read Adjustments.
5.5 Receiving (Invoices)
Receiving invoices is an efficient method for updating store inventory levels. It establishes a traceable inventory movement trail against vendors, including quantities and costs. Additionally, invoices aid in projecting inventory, which assists in forecasting future sales.
5.6 Reordering (Purchase Orders)
A purchase order, commonly referred to as a PO, is a formal offer from a buyer to a seller to purchase specific products or services at a specified price.
Please read Reorder - Purchase Orders to learn how to create and manage purchase orders in FTx Cloud POS.
5.7 Managing Lottery Games
The Manage Lottery Games feature allows you to activate or deactivate lottery games at your store location. You can also change its bin assignment from the POS at the location level. A lottery game is created and activated from Control Center at the account level for all the locations. However, POS can manage a particular game (activation/deactivation, bin assignment) at the location level.
Please read Managing Lottery Games to learn how to create and manage lottery games in FTx Cloud POS.
5.8 Re-register Fingerprint
The Re-register Fingerprint function allows employees to register or re-register their fingerprints for logging in
to the FTx Cloud POS device.
5.9 Settings
Most POS settings are defined in Control Center by the authorized user. Based on your user rights, you can handle a few of the following settings:
5.10 Training Mode
The “Training Mode” in the FTx Cloud POS system is a feature
that allows new cashiers, employees, or trainees to practice using the POS
software without affecting actual business data. It creates a safe, simulated
environment where users can learn the system's functionalities—like processing
sales, applying discounts, handling payments, and issuing refunds—without
recording real transactions in the system’s database. This ensures that no
inventory is deducted, no financial data is altered, and no customer records
are impacted.
The system indicates when a POS is being operated in the
training mode, as shown in Figure 5.10.1.
Figure 5.10.1
To exit the training mode, please click the "Exit POS" button.
When you click the "Open POS" button on the POS Dashboard again, the POS panel
will open regularly.
- The Training Mode feature will be available to the cashiers
with the required permissions.
- The corporate employee can generate the "Training Mode Usage Report," which provides information related to training mode access, including activity types, locations, registers, cashier details, and the corresponding timestamps from Control Center.
5.11 Scan Store
The FTx Cloud POS Scan Store feature simplifies inventory
management. It allows the employee to add new items or update details of existing items, inactivate the active
items, and remove inactive items.
6. Other Important Information
This section provides essential details supporting your overall FTx Cloud POS experience.
6.1 smarttill Integration
A smarttill in a POS system is an intelligent cash drawer that automatically tracks and manages cash in real time. It helps store owners and
cashiers reduce errors, theft, and time spent handling cash.
The smarttill + FTx POS System is an integrated solution
that minimizes discrepancies and improves real-time operational efficiency.
It offers:
- Automated cash reconciliation: Effortlessly reconcile cash drawers with POS transactions.
- Real-time
data synchronization: Gain instant visibility into cash drawer
activity.
- Powerful security: Improve cash security with automated tracking and audit trails for each employee.
6.2 Prerequisites Guide for Installation & Updates
Please refer to Prerequisites Guide for Installation &
Updates to view essential information to ensure your system meets the requirements
before installing or updating software. This guide covers hardware, software,
network, and user-level prerequisites, ensuring that the installation and
update processes proceed smoothly.
7. FTx Academy Training Course
Learn how to navigate the POS panels in your store with this FTx Academy video. Explore how to handle sales functions in the POS with this FTx Academy video. Learn to navigate and complete POS to-dos in this FTx Academy video. Check out this FTX Academy video to learn how to read, reply, and create dashboard messages on your POS.Check out this FTx Academy video to learn how to use the product lookup tool on your POS.Watch this FTx Academy video to get the most out of the “Gift Cards” module. Click here to learn how to set up your smarttill cash drawer and simplify cash management with real-time accuracy.
To gain a more comprehensive understanding, sign up for the FTx Academy training program — enroll in the courses and explore the topic lesson by lesson and reinforce your learning with quick quizzes at the end of each module.
Related Articles
FTx Cloud POS Step-by-Step Guide – Modern
Overview FTx Cloud POS is a cloud-based point-of-sale (POS) solution that provides comprehensive business management capabilities through a single tool, featuring extensive integration capabilities for property management systems, paperless kitchen ...Scan Store (POS) – Classic
Scan Store Overview FTx Cloud POS's Scan Store feature is designed to streamline inventory management by allowing employees to update item details within the POS system quickly. This functionality helps maintain accurate and up-to-date product ...Transfer - POS – Classic
Transfer Overview A stock transfer is the warehouse logistic process of transferring products from one store to another. The goals of the stock transfer include the following: Optimizing the purchase process by leveraging extra stocks at some stores ...Adjustments - POS – Classic
Adjustments Overview Adjustments are additions or deductions made in stock levels in a point-of-sale system to accommodate known breakage, theft, waste, item expiration, internal use, shipment errors, and various write-offs. When an adjustment is ...Cycle Counts - POS – Classic
Cycle Counts Overview FTx POS allows you to physically count the products that are present in your store with an inventory management method called Cycle Counts. You can regularly count a subset of the inventory, a.k.a. inventory definition, rather ...